Standards Of Measure And Tools Used In Measuring And Testing. Continued
Description
This section is from the "Educational Woodworking For Home And School" book, by Joseph C.Park . Also see Amazon: Educational Woodworking For Home And School.
Standards Of Measure And Tools Used In Measuring And Testing. Continued
4. Rule
A rule is an instrument or tool used in measuring. Its graduations are recorded in inches, halves, quarters, eighths, and sixteenths. For convenience in shop practice, a rule is made to, fold, such as "fourfold," "sixfold," etc. Rules are also made in different lengths, but the. most common size is the 2-foot, fourfold length. For accurate measuring a rule should be held on its edge against the object to be measured, so that the graduations on the rule can be located exactly. Rules are usually made of boxwood which has been thoroughly seasoned. Some of the more expensive rules are made of genuine ivory, but these are not practical in a manual training equipment on account of their expense.

Fig. 3. Rule. Boxwood, two-feet, four-fold, square joint, bound.

Fig. 4. Try-sqnare. a, blade ; d. handle.
5. Try-Square
The try-square is used in laying out work and in testing faces, edges, and ends to sec that they are true. In testing a block of wood to see whether a face and an edge are true or not, the handle of the try-square should be placed firmly against the face and then slid down until the blade touches an adjoining edge. If the face and edge fit the try-square perfectly, they are "true" to each other, i.e. they form a right angle. The parts of the try-square are the blade (a) and handle (b). These parts are riveted firmly together so that they form a right angle. The blade is graduated in inches, halves, quarters, and eighths. Try-squares may also be obtained graduated in the metric system. The blade differs in length from 2 to 12 inches.
A 6-inch blade is about the right size for all practical purposes. The handle of the one shown in Fig. 4 is nickelplated. The handle is sometimes made of rosewood and having a brass face plate to protect the wood. These are more expensive than nickel-plated handles.
6. Bevel
The bevel consists essentially of a handle (b) with a movable blade (a) which is hold in place by a set screw (c). It is used in drawing lines at an angle with a straight edge and in testing angles. The handle and blade are made of the same kind of materials as the try-squares. There are no gradations on the blade of the bevel. The lengths of blades range from 6 to 14 inches.

Fig. 5. Bevel, a, blade; b,handle.
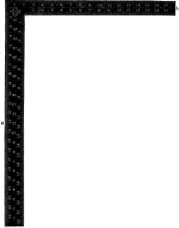
Fig. 6. Framing square (face). a,body or blade; b, tongue.
7. Framing Square, Also Called "Square," "Carpenter's Square," And "Steel Square"
The framing square consists of a long arm, called the body (24 inches long, 2 inches wide), and a short arm, called the tongue {16 or 18 inches long, 1 1/2 inch wide), arranged at right angles to each other. On both sides and on each edge of the body and tongue are graduations used in measuring, testing, and computing. Some one has said that the graduations and rulings on an ordinary framing square number 2571 with 870 figures. The usefulness of its graduations makes it a very valuable tool.
The square shown in Fig. 6 was patented June 5, 1900, and is very complete and accu.-rate. It gives the Patent Rafter Table, used in determining the length of rafters for any one of seven pitches of roof and for buildings of any width; the Brace Measure, which gives the length of common braces; the Octagon "Eight-square" Scale, used for laying off lines to cut an "eight -square" or octagon stick of timber from a square one; and the Essex Board Measure, which gives the contents in feet anil inches of boards of various lengths and widths.

Fig. 6. Framing square (back).
8. Rafter Table Directions
The rafter table includes the outside edge graduations of the back of the square on both body and tongue, and is in twelfths. The inch marks may represent inches or feet, and the twelfth marks may represent twelfths of an inch or twelfths of a foot (that is, inches) as a scale. The edge graduation figures above the table represent the "run" of the rafter, and under the proper figure on the line representing the "pitch" will be found, in the table, the rafter length required. The "pitch" is represented by the figures at the left of the table and in the illustration under the word "Pitch".
12 feet run to 4 feet rise is 1/6 pitch. 12 feet run to 6 feet rise is 1/4 pilch. 12 feet run to 8 feet rise is 1/3 pitch. 12 feet run to 10 feet rise is 5/12 pitch. 12 feet run to 12 feet rise is 1/2 pitch. 12 feet run to 15 feet rise is 5/8 pitch. 12 feet run to 18 feet rise is 3/4 pitch.
The Run of a rafter set up in place is the horizontal measure from the extreme end of the foot to a plumb line from the ridge end. From A to B.
The Rise is the distance from the top of the ridge end of the rafter to the level of the foot. From C to D.
The Pitch is the proportion that the rise bears to the whole width of the building. The above illustration shows 1 pitch; the rise of 8 feet being 1 of the width of the building.

The Cuts or angles of a rafter are obtained by applying the square bo that the 12-inch mark on the body and the mark on the tongue that represents the rise shall both be at the edge of the rafter. The illustration shows 8-foot rise, the lino A the cut for the foot end of rafter and B the cut for ridge cud.

Fig. 7. Rafter table.

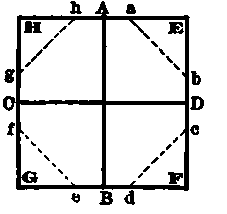
Fig. 8. Brace measure.
Continue to:
My Books

