Tools With Teeth
Description
This section is from the "Educational Woodworking For Home And School" book, by Joseph C.Park . Also see Amazon: Educational Woodworking For Home And School.
Tools With Teeth
30. Saws And Their Construction
Saws are classified as reciprocating in action and continuous in action. A reciprocating saw has a straight cutting edge, or an edge that is slightly curved, while the continuous saws are the circular saws and the band saws. Saws are made from the best steel saw plates. In early times these plates were imported from England, but now most of the American saws are made from American saw plate. The processes involved in the making of the best saws are as follows: 1. Tempering, giving hardness and toughness to the blade. 2. Smithing or hammering, making the plate level and toughening the steel. 3. Grinding, giving a uniform thickness, or a tapering thickness. 4. Polishing, causing the saw to run easily. 5. Punching of teeth, giving shape to the teeth. 6. Jointing, setting, and filing, giving a proper cutting edge. 7. Etching, giving the maker's name, address, trade-mark, etc. 8. Handling, fitting well-shaped handles to give the saw the proper "hang." 9. Blocking, the final operation to make the saw straight and level.
Nearly every element that enters into the construction of a saw tends to give efficiency to the tool, and that efficiency is measured by the amount of force required to do a given amount of work. The cut which a saw makes in wood is called the "kerf." A thick blade will make a wider kerf than a thin blade, and more force is required in using a thick blade. The bending of the saw teeth a little (one to the right, and the next to the left, etc.) by means of a saw set is what gives "set" to a saw.

Fig. 48. Ripsaw, a, blade; b, handle; e, teeth; d. tip; e, heel.
The amount of set also determines the width of the kerf. In sawing hard woods little set is required, while in sawing soft and spongy woods more set is required.
31. Rip Saw
A rip saw is a saw having teeth especially adapted for dividing wood in a direction parallel to its fibers. It is used for sawing with the grain of wood. The teeth are nothing less than a series of small chisels arranged so that each tooth does its own share of the cutting. It will be observed in Fig. 45 that the teeth of the rip saw slant forward. This shape is one of the chief characteristics of the rip saw, for it gives efficiency to the tool in splitting the fibers. The cuts in Fig. 46 are full size of the respective number of teeth and points per inch which they represent. A "3-point" saw is a saw having three points to the inch but not three teeth to the inch. A "3-point" saw has two teeth to the inch. It will be observed that in one inch of space there is always one tooth less than there are points.
32. How To Sharpen A Rip Saw
A rip saw does its cutting by means of the front part of the tooth. This part of the tooth wears down fastest and it needs most of the filing that is done on the tooth. The back of the tooth should be filed very little, just enough to give the required depth between the teeth. Rip saws are jointed and set the same as cross-cut saws, but the teeth are filed straight across so that they are perfectly square on the front side. In using a rip saw it should be held at an angle of 45 degrees with the wood that is being cut, as shown in Fig. 47.

Fig. 43. Teeth and points per inch of rip saws.
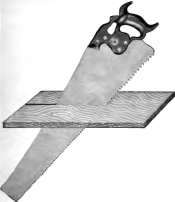
Fig. 47. Position of ripsaw when cutting.

Fig. 48. Cross-cut saw.

Fig. 49. Teeth and points per inch of cross-cut saws (full size).
33. Cross-Cut Saw
In a cross-cut saw the teeth are V-shaped and are sharpened in such a way that they cut the fibers in passing over them. The finer a saw is made to cut, the greater the number of teeth to the inch. For the number of teeth and points per inch see Fig. 49. For ordinary cross-cutting a 10-point saw (10 points to the inch) should be used, while for ordinary ripping a 7-point rip saw should be used.
34. How To Sharpen A Cross-Cut Saw
Place the saw in the saw vise. The first process in putting a saw in order is known as jointing. To joint a saw take a flat mill file and file the teeth down until they are all the same height. See Fig. 50.

Fig. 50. Hand-saw jointer.
The second operation is the setting. This is done by means of a saw set (Fig. 51), which turns the points of the teeth uniformly. The teeth should be set alternately right and left. Great care should be exercised not to break the teeth, for in highly tempered saws the teeth are brittle. Very little set is required in saws for bench work - just enough to make them clear nicely.
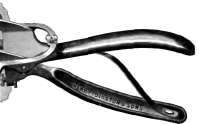
Fig. 51. Monarch patent safe-set.
C, set screws; B, gauge; D, plunger.

Fig. 52. Saw-filling guide. scially designed to assist not skilled in the art of filing to file a saw cots.
After the jointing and setting the saw is ready to be filed. Select good files of proper sizes. Six and seven point saws require a 7-ineh slim taper file; eight and nine points, 6-inch slim taper file; and for ten, eleven, and twelve point saws a 5-inch slim taper file is required. Begin to file at the heel and progress towards the tip, filing the teeth which are set away from you. When the teeth are filed on one side reverse the saw and repeat the process. The teeth are filed at an angle of 45 degrees, as shown in Fig. 53. Sometimes other angles are used, but for general use this is preferred, Fig. 55 shows a saw that has been incorrectly filed. Avoid such errors. Fig. 53 also shows the proper position of the file in filing.

Fig. 53. Filing position.

Fig. 64. Correct filing.

Fig. 55. Incorrect filing.
Looking down the edge of a saw after it has been filed, the groove should appear as in Fig. 56. If a tooth is out of place, it will be easily detected. A saw in good condition should leave the bottom of the kerf flat, like Fig. 57, and not like Fig. 58. The cutting action of the teeth is shown in Fig. 59. In making a knife line the blade will cut more smoothly if it is inclined forward a little instead of being held in a perpendicular position, so a cross-cut tooth should incline forward. The slant of the cutting edge of a tooth is called the pitch or rake of the tooth. Fig. 60 illustrates the principle on which saw teeth are constructed.
Fig. 56.
Fig. 57.
Fig. 58.
Fig. 59.
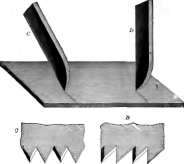
Fig. 60. Cutting action of saw teeth. C, cross-cut saw; D, rip saw.
Continue to:
My Books

