Lesson XXII. Square-End Spindle
Description
This section is from the "Elementary Turning" book, by Frank Henry Selden. Also available from Amazon: Elementary Turning.
Lesson XXII. Square-End Spindle

Fig. 74. Square-end Spindle.
This lesson introduces the combination of round and square elements on the same piece. In using the rule to measure spaces on a piece having square

Fig. 75. Marking Spaces.
ends, it should be held as shown in Fig. 75. Never lay it on top of the rest, except after the piece has been smoothed to a cylinder its entire length, as in Figs. 19 and 31, as it is dangerous to do so.

Fig. 76. Cutting in for Square End.
Another way to determine the point for cutting in at the ends is to draw a pencil line across one side of the piece before starting the lathe, or before the piece has been placed in the lathe. First mark the distances from each end, and then with a try-square or with the rule, used as a straight edge, draw a heavy line entirely across the piece. This line will be visible while the lathe is in motion.
The skew chisel is used to cut the curve at the square part. The first operation is to cut a deep groove, as shown in Fig. 76, with the point of the chisel. To make this V-shaped groove the point of the skew chisel must not be pressed hard against

Fig. 77. Rounding Corners.
the piece, but cut lightly from the two edges of the V until the space is formed.
After the groove has been made, the chisel is reversed, and the corner rounded with the obtuse angle, as in finishing a large bead (Fig. 77). See also Figs. 23, 27, 29, and 33.
Care must be taken in cutting such a place, that nearly all the work shall be done by that part of the edge near the obtuse corner of the chisel. If the tool turns much from the vertical position, it will probably catch. When the chisel is properly held, it will not catch, neither will there be much tendency for the tool to jar.
In order to get as much practice as you can before attempting to finish the ends, you can cut several places along the central part of the piece, and round them the same as the ends are to be rounded. Do not make the square part at the ends too short.
After the ends are finished, use the roughing gouge in removing the waste material from the central part of the piece, making it the proper size at the ends for the beads. Roll the gouge, as shown in Figs. 78 and 20, so that it can cut close to the corner without danger of catching.
Next smooth the cylindrical portion with the skew chisel and turn the beads at the ends, as shown in Fig. 79. For this you will probably require the 1/4-inch skew chisel.
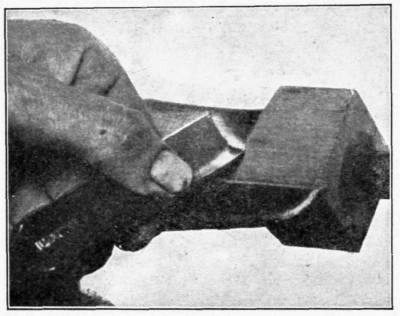
Fig. 78. Rolling Gouge.
With the roughing gouge shape the piece as shown in Fig. 80. Instead of using the rule and pencil or rule and skew chisel for marking the position of the center beads, you can set the compasses to the required distance, and by holding them as shown in Fig. 81, make a mark on the piece as it revolves. Do not attempt to make a deep mark with the point of the compasses, but make a light line, and deepen it with the point of the skew chisel, as in Fig. 39.
The position of the center bead should be determined by measuring to its sides from each end. The two smaller beads should be measured from the sides of the central bead.

Fig. 79. End Beads Turned.

Fig. 80. Center Sized.

Fig. 81. Spacing with Compasses.
First size the three beads which are at the center, making them square, as shown in Fig. 82; then round these three beads, as shown in Fig. 83.
Complete the piece by turning the long curves. These curves should be roughed to near the finished size with the roughing gouge, and then shaped and smoothed with the 1-inch skew chisel to the form shown in Fig. 74.
Before attempting to do any sandpapering on this piece, remove the rest so that the fingers or the hand cannot be caught between the corners of the revolving piece and the rest.
If the cylindrical portion of the piece is polished the same as the piece in Lesson 21, the flat sides at the ends should be dressed smooth with the plane, and sandpapered and polished by hand after the piece has been turned.

Fig. 82. Center Beads Roughed to Size.

Fig. 83. Center Beads Turned.
Continue to:
My Books

