Lesson XXIV Blind Mortise And Tenon
Description
This section is from the "Elementary Woodwork" book, by Frank Henry Selden. Also available from Amazon: Elementary Woodwork for Use in Manual Training Classes.
Lesson XXIV Blind Mortise And Tenon
The stock and finished sizes for this exercise are the same as for the halved cross (Lesson 19 (Halved Cross)).
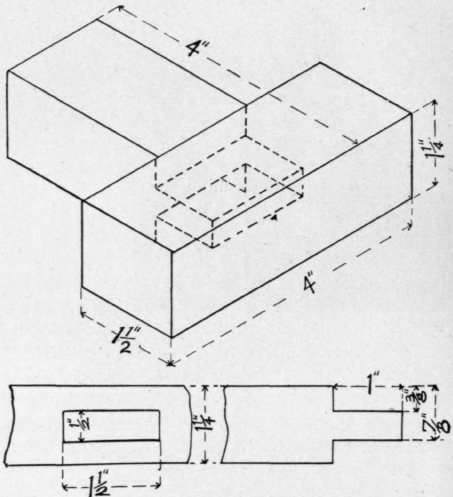
Fig. 85. Blind Mortise and Tenon.
The blind mortise and tenon is worked very much like the through mortise and tenon (Lesson 22 (Through Mortise And Tenon)). In the blind mortise and tenon the tenon is shorter and cut to length before putting together, and the mortise is lined out and worked entirely from the face edge. The most difficult part of the work is to beat or work the mortise so it will be at right angles, or square, with the surface. It must be also of the same size at both the top and bottomends. You must also guard against boring the holes entirely through. To make the holes of the proper depth you may count the turns of the bit or use a gauge on the bit. For most work it is best to depend on counting and thus avoid the bother of setting the gauge. The sides of the mortise may be tested by holding a chisel against the side, as shown in Fig. 86.
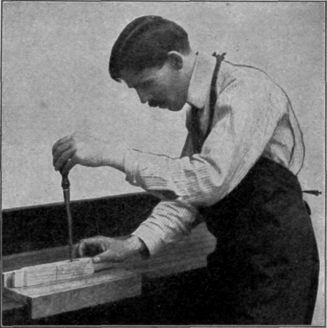
Fig. 86. Testing the Sides of the Blind Mortise.
When both the mortise and tenon are completed, draw lines around the center of the piece and saw it apart. Insert the tenon and, if it is all right, remove it and chamfer the lower end. Next make two small wedges and, after splitting the end, insert them as shown in Fig. 87. With the aid of the hammer drive the tenon to place. This is called blind wedging, and requires good judgment and experience to make the wedges of just the correct size, so that the joint will be tight when together, and yet not so tight that it will not go together. The bottom of the mortise should be quite smooth where the wedges strike it, or the wedges may turn to one side and not enter the tenon. Sometimes the bottom of the mortise is made wider than the top, or outer end, to allow room for the tenon to expand. Finish the ends by sawing, as instructed in Lesson 20 (Halved Dovetail). Do not plane or sandpaper the sides. Leave them with the face marks on, just as they were before the piece was cut in two. This is to show that your lines were correct, and that the work was properly done.

Fig. 87. Blind Wedging the Blind Mortise.
Continue to:
My Books

