Lesson XXXVI Miter Joint
Description
This section is from the "Elementary Woodwork" book, by Frank Henry Selden. Also available from Amazon: Elementary Woodwork for Use in Manual Training Classes.
Lesson XXXVI Miter Joint
The stock for this piece and the finished sizes are the same as for the halved corner (Lesson 16 (Halved Corner)).
This form of joint, though often used, is too difficult for elementary work except in its most simple form.
The angle at which the ends are cut is exactly the diagonal of a square, and therefore any method that will give the diagonal of a square will give the line for the miter. The easiest way for the student in woodwork to get the correct angle is to draw a square at the end of the piece and then draw the diagonal as shown in Fig. 116 A. The point A is as far from the point C as the point B is from the point C, or the distance A C is equal to the width of the piece. When several miters are to be cut, the tee bevel (Fig. 116 B) may be set to the line A B and the other miter lines drawn with it.
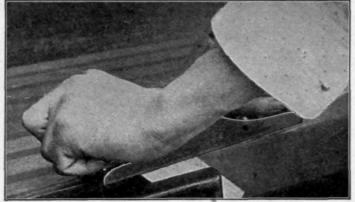
In making miter-jointed frames, etc., take special care to have the face side and face edge straight, square, and out of wind, and then be particular to

draw all lines and make all tests from the face side or face edge. Saw the miter near the line and finish with a plane, as shown in Fig. 117. As the cut is not square across the end, the plane may cut all from one edge. Holding the plane at an angle, as shown in Fig 98, is sometimes necessary to avoid splitting at the extreme point.
Fig. 115. Common Miter Joint.

As the miter presents end grain, it is usual to nail the jointrath-er than to depend upon glue. If the joint is well sized as described in
Lesson 31 (Gained And Rabbeted Corner), the glue will aid much in holding the joint in place. If glue is used, before applying it start all the nails and drive them in sufficiently to make it easy to bring the joint to place after the glue is applied. Then separate the
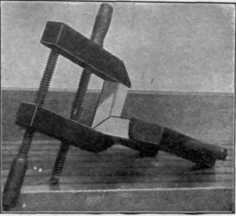
Fig. 118. Miter J oint Glued and Clamped.
Fig. 117. Planing a Miter in a Vise
Fig. 116 A.
Fig. 116B. Setting the Tee Bevel.
parts and apply the glue. This joint may be clamped as shown in Fig. 118.
There are many ways of securing the corners of frames which are mitered. Some of these methods are very simple and easy when one has the special tools required to use them. There are some forms of special nails or fasteners which may be used by any one who is capable of fitting the joint.
Continue to:
My Books

