Lesson XII. Use Of Chisel And Gouge
Description
This section is from the book "Elementary Woodwork", by George B. Kilbon. Also available from Amazon: Elementary woodwork.
Lesson XII. Use Of Chisel And Gouge
Some instructions were given in Lesson VIII (Edge And End Planing). concerning handling the chisel which are not necessary to repeat here.
Problem I. Locked Joint
Make, as in Lessons VII. and VIII., two boards 4 1/2 in. X 2 in. X 7/8 in.
Gauge from one edge of each on both of its sides 3/4 in. Place points on the edge at every 3/4 in., and through them, square lines across the edge; also continue the lines, squaring on each side as far as to the gauged line, when the work will appear as in Fig. 146.
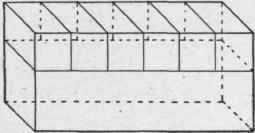
Fig. 146.
Remove each alternate section by sawing near to lines and then chiselling exactly to them, as in Fig. 147.
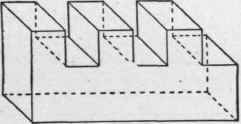
Fig. 147.
When accurately made, the two boards will fit together, as in Fig:. 148.
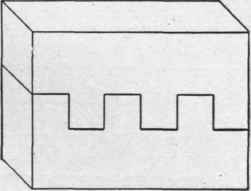
Fig. 148.
Problem II. Chiselled Pyramids
Make a board 5 in. X 3 in. X 7/8 in. On one side of it draw lines lengthwise at every 1/2 in., using rule and pencil, and crosswise at every 1/2 in., using try-square and pencil.
From that side gauge 1/2 in. on each edge and end, and square down to these last lines from the lines on the top, when the work will appear as in Fig. 149.
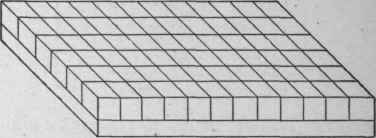
Fig. 149..
Make saw-kerfs on alternate crosswise lines, as in Fig. 150. Draw necessary bevelled lines on each end at an angle of
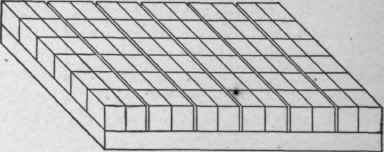
Fig. 150.
45°, and chisel lengthwise to them, giving the work the appearance of Fig. 151.
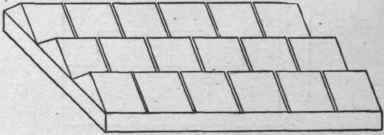
Fig. 151.
With rule and pencil restore the points that are to be apices of pyramids. Make a cardboard templet to the angle which the base of a pyramid is to make with an edge; use it to draw necessary pencil lines, and chisel V grooves crosswise of the board, leaving rows of square pyramids, as in Fig. 152.
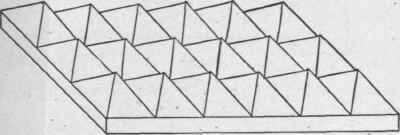
Fig. 152.
Problem III. Chamfered Corners
Make a square prism 8 in. X 1 3/4 in. X 1 3/4 in. Rapid workmen may plane the ends. Square around fine pencil lines 1 in. and 1 3/8 in. from each end. Set the gauge 3/4 in., and gauge two lines on every side between the two 1 3/8 in. squared lines, as in Fig. 153. Join the points a and b.
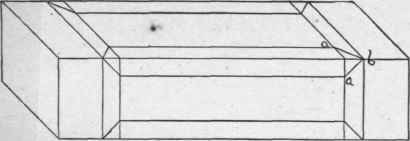
Fig. 153.
Put a thin keen edge on the 1 in. chisel, and cut to these lines; as in Fig. 154.
A corner cut away in this manner is called a chamfer. Pupils who work slowly need not plane this block on the end.
Problem IV. Use Of Outside Ground Gouge
Repeat the last problem, using 3/4 in. outside ground-gouge, and give the finished work the appearance of Fig. 155.

Fig. 154.
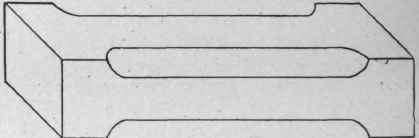
Fig. 155.
Problem V. Use Of Inside Ground-Gouge Across The Grain
Make a board 5 5/8 in. X 3 1/8 in. X 7/8 in. On one side of it square knife-lines across at every 5/8 in., and cut out each alternate section with the 1/2 in. inside ground-gouge, making semi-cylindrical grooves, as in Fig. 156.
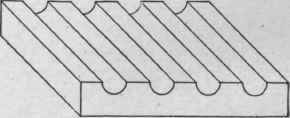
Fig. 156.
Test the accuracy of the work by using a right-triangle.
The corner of the try-square blade will answer, as in Fig. 157. The value of this test depends on the fact that every angle inscribed in a semi-circle is a right-angle.
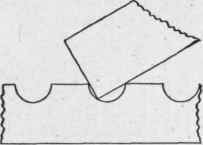
Fig. 157.
Problem VI. Use Of The Inside Gouge Lengthwise Of The Grain
On the opposite side of the board used in Problem V., gauge lines at every 5/8 in., and, operating in a manner similar to Problem V., make semi-cylindrical grooves in alternate sections, as in Fig. 158.
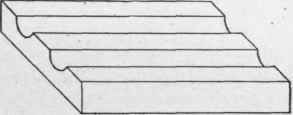
Fig. 158.
Continue to:
My Books

