Lesson XI. Square, Prism, And Cylinder
Description
This section is from the book "Elementary Woodwork", by George B. Kilbon. Also available from Amazon: Elementary woodwork.
Lesson XI. Square, Prism, And Cylinder
Problem I. Square Prism 8 In. X 1 3/4 In. X 1 3/4 In
Supply each pupil with a piece of 1 7/8 in. planed pine plank 8 1/2 in. long X any width. Draw pencil-lines lengthwise on one side of it 2 in. apart. Square lines across each end, and join them by lines on the back side, as in Fig. 138.

Fig. 138.
Place the work in the vise, and saw on these lines. See that the saw keeps on the lines on the back side of the work as well as on the front side. If difficulty is experienced, it may be wise to occasionally turn the work about in the vise, so as to bring that which is the back side to the front. Saw at least two pieces. Rapid workmen, if accurate, may saw five or six.
Rough-plane the two sawed sides of each piece sufficiently to remove saw-marks, observing carefully all directions given in Lesson VII (Surface Planing).
Finish-plane one side of a piece as directed in connection with Figs. 97-100, Lesson VII (Surface Planing), and write your name on it, as in Fig. 139.
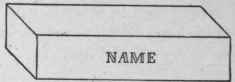
Fig. 139.
Plane an adjacent side, following directions given in Problem I., Lesson VIII (Edge And End Planing)., except imagining a division in three sections instead of two. When this second side is complete, place tried marks on it, as in Fig. 140.

Fig. 140.
Set the gauge 1 3/4 in. plus, and gauge from the first finished side on both of the sides adjacent to it, as in Fig. 141.

Fig. 141.
Rough-plane nearly to these lines, if necessary, Rule III., and finish-plane exactly to them. Rule IV., when a third side of the prism is completed.
With the same setting of the gauge, gauge from the second finished side, and complete the fourth side of the prism in like manner. Use try-square and knife, and square around about 1/4 in. from one end, as in Fig. 142.

Fig. 142.
Hold the work on the saw-block, as in Fig. 107, Lesson VIII (Edge And End Planing)., and saw about one-third of the way through. Turn it one-quarter of a revolution from you, and saw likewise. Turn it another quarter and repeat, and still another quarter and saw completely off. By thus turning and partial sawing, one can saw closer to the line than otherwise.
Hold the work in the vise, and plane, as in Fig. 108, Lesson VIII (Edge And End Planing). Plane from all four sides and corners to and a little past the centre, observing Rule IV.
From the end so finished measure 8 in. plus, and finish the other end. Make three such prisms 8 in. X 1 3/4 in. X 1 3/4 in.
Problem II. Octagonal Prism
Describe on drawing-paper a circle 1 3/4 in. diameter, and draw a square around it, as in Fig. 143.

Fig. 143.
Draw also the line a b at the angle of 45°. The distance a c measures 1/2 in. plus. Set the gauge 1/2 in., and gauge two lines on each of the four sides of one of the prisms, as in Fig. 144.

Fig. 144.
Hold the work in the vise, and plane to these lines, as in Fig. 145, when you have an octagonal prism.

Fig. 145.
Problem III. Cylinder
Make a second octagonal prism, and exercise skill to so plane away its corners as to make a 16-sided prism. Again plane away these corners so as to make a 32-sided prism, then a 64-sided prism, and sand-paper it to a cylinder.
For another method centre each end of a 1 3/4 in. square prism, describe 1 3/4 in. circles thereon, and plane the corners away till these circles are reached.
Continue to:
My Books

