Lesson X. Shove-Planing
Description
This section is from the book "Elementary Woodwork", by George B. Kilbon. Also available from Amazon: Elementary woodwork.
Lesson X. Shove-Planing
Wood as thin as 1/4 in. cannot be easily planed square on edges and ends by holding it in the vise, and resort is had to a contrivance known as the shove-plane, or shoot-plane board (Fig. 124), which may be bolted to the front right end of the bench by two carriage-bolts, one of which is shown in front section in Fig. 125. This arrangement provides for its being quickly put in position or removed.

Fig. 124.

Fig. 125.
The surfaces A and B are made parallel to each other, and the edges C and D are perpendicular to them.
Problem I. Finishing To A Width
Provide for each pupil a 1/4 in. pine board about 5 ft. long by 5 in. wide. Saw from it roughly a piece 4 1/2 in. long. Be sure that the plane-blade is finely set, as directed in Lesson VII (Surface Planing). Lay the work on the surface A, with its end resting against D, its edge overhanging C about 1/4 in. and hold it in that position firmly with the left hand as in Fig. 126. Lay the finishing-plane on its right side on the surface B, and holding it firmly in contact with that surface, make with it the least number of strokes necessary to true the edges of the work, as in Fig. 126.

Fig. 126.
With the help of the rule set the gauge 3/4 in. plus, as in Fig. 127.

Fig. 127.
The help of the rule is required since the gauge-point is not always accurately against the zero graduation of the gauge.
By the term plus is meant a small fraction over 3/4 in., as is seen in Fig. 127, where the gauge-point does not meet the centre of the 3/4 in. graduation, but meets that side of it which is farthest from zero.
With the gauge set as directed, gauge from the finished edge on both sides of the work, draw the knife-blade a few times in the gauge-line, as in Fig. 128, on both sides, and the wood will split apart.

Fig. 128.
Shove-plane the split edge of the 3/4 piece just enough to true it, and leave it 3/4 in. Again we must press the importance of having the plane set fine. Let accurate workmen make as many pieces 3/4 in. wide as they have time, while slower workmen are mastering the difficulties of making one or two.
Problem II. Finishing To A Length
Take one of the pieces planed to a width in Problem I., hold it as in Fig. 129, and plane an end, using the block-plane finely set.
In this operation the face of the block-plane needs to be held against the shoulder C, and a little more force is used with the right hand to keep the plane in contact with C than is used with the left hand to keep the work in contact with the plane.
It will be found helpful to divide every shove of the plane into four actions, thus :-
First, Hold the plane very firmly against C and B, with its edge in front of the work.

Fig. 129.
Second, Slide the work firmly against the plane, keeping it in contact with D.
Third, Shove the plane forward, keeping both it and the work in place.
Fourth, Relax the muscles of both hands, and bring the plane back, ready to repeat the first action.
A few shoves of the plane should finish.one end of the work, and, if the shove-plane block is in order, the work.will be true. The plane, however, must be kept finely set, or the accuracy of the shove-plane board will be destroyed.
From the finished end of the work measure 2 in. plus, square around using knife and try-square, saw near to lines using 10 in. back-saw, and saw block similar to Fig. 107, Lesson VIII (Edge And End Planing)., and shove plain exactly to line.
Finish several boards thus to a length, and lay their sides together, as in Fig. 130. If the work has all been accurate, they will agree with each other in lengths and widths.
Lay their edges together, as in Fig. 131, and four of them will cover 3 in. width. Lay their ends together, as in Fig.

Fig. 130.

Fig. 131.
132, and three of them will make a length of 6 in., or six of 12 in.
Fig 132
Problem III. To make from 1/4 in. Stock a Box 4 in. X 2 in.

Fig. 133.
X 1 in. Outside Measure. - Make a full-sized drawing, showing three views of the box, top, side, and end, as in Fig. 133.
From a study of these drawings obtain the dimensions of the bottom board, and also the sides and ends. Set the figures down in some convenient place. According to the figures make one bottom board, two sides and two ends. Use 5/8 in. No. 20 steel wire brads, and nail first the sides and ends together to form a frame, putting two nails in each end of a side piece spaced as in Fig. 134.

Fig. 134.
Nail the bottom to the frame, spacing the nails as in Fig. 135. Before nailing the sides and ends, however, hold them together and see if they make a width just equal to the bottom.
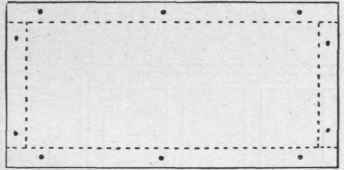
Fig. 135.
Let accurate rapid workmen make a box 5 in. X 2 1/2 in. X 1 1/4 in.
Problem IV. Fig. 136 is a full-size end view of a box whose frame has the same dimensions as Problem III., and which has a chamfered bottom of 1/4 in. stock, and a chamfered and rabbited cover of 3/8 in. stock. Lay out the chamfer lines on the edges and ends of boards with the gauge. Lay out the chamfer lines on the sides of boards with pencil, or if gauge is used make very light lines. Lay out lines for rabbit with gauge where they run lengthwise of the grain, and with try-square and knife where they run crosswise; plane the chamfers. Cut the rabbit with the knife.

Fig. 136.
Two partitions fitted as in the half-size views, Fig. 137, will divide the box in three compartments convenient for holding postage-stamps.

Fig. 137
Continue to:
My Books

