Lesson VI. Use Of Saws
Description
This section is from the book "Elementary Woodwork", by George B. Kilbon. Also available from Amazon: Elementary woodwork.
Lesson VI. Use Of Saws
Problem I. To Start The Kerf
Take a waste piece of board of any dimensions, 4 X 2 X 7/8 will answer. Place it end uppermost in the vise. With try-square and pencil draw lines on the upper end 1/4 in. apart. Hold the slitting-saw in the right hand, guiding it with the left thumb so that its teeth shall rest on one of the lines. Drive the saw first forward and then back several times, taking full length strokes to within about 1 in. of each end, meantime so controlling the muscles of the right hand that, although the saw teeth touch the wood during each entire stroke, they shall not cut into it at all. The commencement of this process is illustrated in Fig. 77.

Fig. 77.
The teacher should be able to drive the saw forward and back on the left hand, as in Fig. 78, touching the palm constantly, but not injuring it, to illustrate clearly to pupils that it can be done. Require the class to drive the saw forward and back on the wood as above, acting in concert as the teacher counts 1, 2; 1, 2, etc., in order to get a moderate, regular motion, as boys left to themselves will saw with fury. The power to follow all of the above directions we will term getting command of the saw; and every pupil needs to get this command before being allowed to saw.
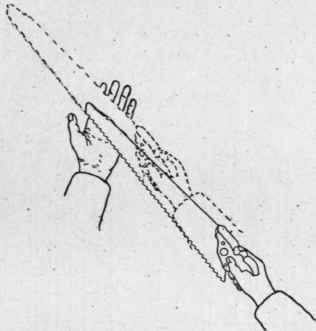
Fig. 78.
Next let the weight of the saw bear on the board while the forward stroke is being made, but not during the backward stroke, and the saw will descend into the wood, making a cut which is technically called a kerf.
At the commencement and close of each forward stroke the saw should be held at command. Midway of each forward stroke it should do its heaviest cutting. The full stroke should be a crescendo followed by a diminuendo as in music. The saw should be held at command during the entire backward stroke.
Problem II. Slit-Sawing Near To Line
Take a board 8 in. X 2 in. X 7/8 in. and make an X on one edge. Set the gauge 1/4 in. and gauge two lines on each side and each end, as in Fig. 79. Set the gauge 1/2 in. and repeat; then 3/4 in. and repeat; then 1 in. and gauge around once, that is, from the X edge. Square around with fine pencil-point at every inch. The work will appear as in Fig. 80.
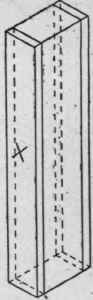
Fig. 79.
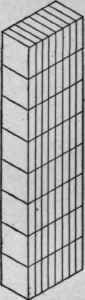
Fig. 80.
Hold the work in the vise, end uppermost, as in Fig. 77, one-half of it buried, and saw a kerf 1/17 in. to the right of the right-hand line. When this kerf has proceeded downward 1 in., that is, to the first squared line, stop and examine it carefully, and if it has not kept parallel with the gauged line, scrape it with that portion of the saw nearest the handle, commonly called the heel of the saw, until it is restored to parallel. A, Fig. 81, represents a kerf at first running to the right, but afterwards restored to its proper position and continued a little below the squared line. B represents a kerf running at first to the left and afterward restored. On no account should the kerf be allowed to proceed below the squared line till its wrong direction, if it have any, is rectified, and the aim of the pupil must be to keep the saw from running at all to either side. Furthermore, the location of the kerf should be as accurate on the back side of the work as on the front.
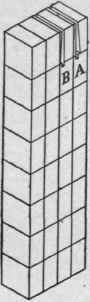
Fig. 81.
Proceed to saw down to the second squared line, stop and inspect, and correct if necessary. Proceed to saw down to the third squared line, and stop on it.
In the same manner saw near to the remaining gauged lines. The work will appear as the upper portion of Fig. 82, where for clearness, as also in Fig. 81, only one-half of the number of lines gauged on Fig. 80 are shown. Mark 10 off from 100 for every line which at its finish deviates 1/16 in. from its proper position.
Problem III. Slit-Sawing Close To Line
Place the opposite end of the work uppermost, and saw so that the left side of the saw-blade shall cut to the centre of the line, observing in all other respects the directions given above, and the work will appear as the lower portion of Fig. 82.
Fig. 82.
Problem IV. Cut-Off Sawing Near To Line
Take a board 8 in. X 3 1/2 in. X 7/8 in., gauge-lines at every 1/2 in. on the sides and square pencil-lines round at every 1/2 in. Put it in the vise with an edge uppermost, and, observing directions given in Problem II., saw near to every line, as in the upper portion of Fig. 83.
Mark 5 off from 100 for every line that deviates, at its finish, 1/16 in. from its proper position.
Problem V. Cut-Off Sawing Close To Line
Place the board in the vise with the opposite edge uppermost, and, observing directions given in Problem III., saw close to the line. The work will appear as in the lower portion of Fig. 83.
Fig. 83.
Rapid workmen may take a second board and repeat, which repetition will increase their proficiency, or they may saw diagonally.
Continue to:
My Books

