Exercise 17. - Construction Of A Stretcher-Joint
Description
This section is from the book "Exercises In Wood-Working", by Ivin Sickels. Also available from Amazon: Exercises in Wood Working.
Exercise 17. - Construction Of A Stretcher-Joint
Material. - Pine, 2" wide, 3/4" thick, and 12" long. Work. - To make a joint such as that used in frames for stretching canvas.
This joint is a combination of miter and half joint, and is laid out as shown in Fig. 1. The miter is on the face-side, and 1/4" thick, the tenon also 1/4" thick. For the miter the gauge is set at 1/4", but for the tenon at 1/2". To avoid mistakes, the parts to be cut out should be shaded as in Fig. 2. Saw the tenon and mortise with a back-saw before sawing the miter.
With an 1/8" chisel, or better, an 1/8" float (Fig. 5, Plate B), cut the grooves for wedges as shown in Fig. 4. The groove for the horizontal one is made in the tenon-piece, close up to the tenon, and, for the vertical one, in the mortise. Make the wedges of hard wood, with the grain parallel to one side, which must be in contact with the end wood of the pieces as they are driven in.
The pine piece for this exercise may be sawed out of a 7/8" board. This board should rest on carpenter's horses; the rip-saw is used first, the kerf is made on the pencil-mark, is brought just up to the cross-mark, and finished with a vertical stroke. In marking, an allowance of about 1/8" should be made for planing and finishing.
Fig. 5 shows a form of stretcher-joint sometimes seen in picture-frames. This joint will stretch the canvas fairly well, but has not the control over wrinkles as that of Fig. 4 has.
Fig. 6 shows a form of miter-joint in which oblique saw-kerfs are made for the insertion of thin pieces of hard wood. The joint has somewhat the character of a dovetail, and should be well glued.
A miter-joint in thin pieces is usually secured by a veneer, glued in as in Fig. 7. The pieces are first mitered, then fastened in the jaws of a hand-screw or bench-vise, and the saw-cut made for the insertion of the veneer.
Picture-frames are generally made by mitering, gluing, and fastening with small finishing-nails at the outer corners. Occasionally we see frames with joints like those of Fig. 3, and sometimes with two tenons and mortises instead of one. Since glue holds better on side-wood than on end-wood, the latter are much stronger.
Ex. 17.

Fig. 1

Fig. 2

Fig. 3

Fig. 4

Fig. 5
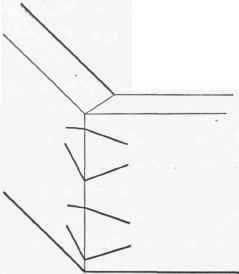
Fig. 6
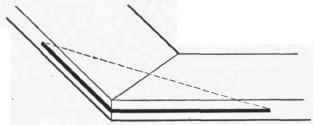
Fig. 7
104:
Simple Joints.
Continue to:
My Books

