Chapter XIII. On Metal-Spinning
Description
This section is from the book "Turning Lathes", by James Lukin. Also available from Amazon: Turning Lathes: A Guide to Turning, Screw Cutting, Metal Spinning and Ornamental Turning.
Chapter XIII. On Metal-Spinning
THE art of metal-spinning is the most interesting sub-ject that an amateur or novice can practise, and on which very little has, up to the present, been written to guide, or, at least, to be of any practical value; therefore I will describe the process, etc, in as few words as possible, and without going into technical details.
Assuming that the amateur possesses a lathe on which a high speed can be obtained (as the success of the operation depends a great deal upon this); also taking it for granted that he understands the working of his lathe, and is able to use his tools, at least for wood turning - all the addition he will require is a tool-rest with at least six ¼in. round holes drilled in about fin. apart, in which small iron or steel pegs are placed to serve as a side rest for obtaining a powerful side leverage to his tool (see Figs. 2 and 3, Plate XV.). These have to be shifted as the work advances or is spun over the wooden pattern.
The tools required are a roughening and a finishing tool, sometimes called burnishers; also a beading tool (see aa, bb, and c, Plate XIY.). Having all these, I will now proceed to describe the process :
After having chucked, or screwed a piece of hard wood on your lathe mandrel, turn it to the shape or pattern desired, care being taken at first not to attempt an elaborate pattern, but a plain one, that is not too deep; after this, cut out a circular disc of sheet copper, or brass, which, of course, requires to be previously well annealed by placing it into a bright fire, and making it just red, and then cooling - which latter is best done by plunging it into cold water, and wiping dry with a bit of waste, which gets rid of a large portion of the oxide - and it is ready for use. Place this next your pattern, backed by a piece of turned wood to keep the metal in place and from shifting; then bring up your tail-stock (see Figs. 2 and 3, Plate XV.: B, turned wooden pattern; C, circular metal disc; D, piece of turned wood or backing; and E, tail-stock). Next lubricate the front face of the metal disc on which you are going to operate with a little machine oil, applied with a brush or piece of oily waste, to prevent the tool scratching, and save unnecessary friction, adjust your rest (A, Figs. 2 and 3, Plate XV.) at a suitable distance, place in your pins or pegs, and you are now ready to commence operations.
Place your tool (aa, Plate XIV.) in the position as 6hown in Fig. 3, Plate XV., and bring a side pressure to bear on your metal disc, and, with a sweeping motion from the centre to the outer edge of disc, try to force the metal over your pattern, taking care that the outer edge and sides of disc always run perfectly true, as the success of forcing the metal over greatly depends on this. Should you by accident slip over the outer edge with your tool, which would cause your metal to buckle, remove it, and straighten; and do not have your disc larger than is actually required - if too large, turn down with a graver. Having got the metal satisfactorily forced or spun over the wooden pattern, finish with tool bb, Plate XIV., by using the flat edge against your metal, which, if properly done, ought to give it the appearance of a highly burnished surface, without showing any of the ridges previously made by tool aa (Plate XIV.).
Figs. 5 and 6 (Plate XVI.) are examples of two different patterns which will best show the gradual shapes the metal ought to assume, commencing at 1, and finishing at 5. The novice, in his first attempts, will have to give the metal as it progresses several annealings before he will get it spun over, but after practice will do so without any difficulty.
The gauge or thickness of metal to be used at first should be 26 B.W.G.; but after the novice has become proficient, thicker metal may be used, and other metals may be substituted, such as zinc, tinplate, nickel silver, etc.


Plate XIV. - TOOLS FOR METAL-SPINNING.

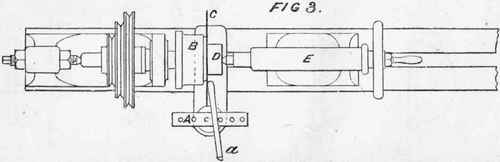
Plate XV - LATHES FOR METAL-SPINNING.

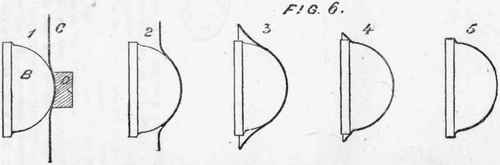
Plate XVI. -SIMPLE SHAPES FOR METAL-SPINNING.
The variety of work that may be done is very great; elaborate patterns may be spun and joined together by beading or soldering, etc, to suit the taste and requirements of the amateur. The examples given here are only to illustrate the process.
After practice, the worker will see numerous objects which he can spin; and as he can make his own patterns, the cost of experiments are trifling - the metals being thin, cost but little, and if spoiled can be sold for old metal.
Continue to:
My Books

