Chapter Seventeen. Setting The Stage
Description
This section is from the book "Time Out for Living", by Ernest DeAlton Partridge and Catherine Mooney. Also available from Amazon: Time Out for Living.
Chapter Seventeen. Setting The Stage
Scenery
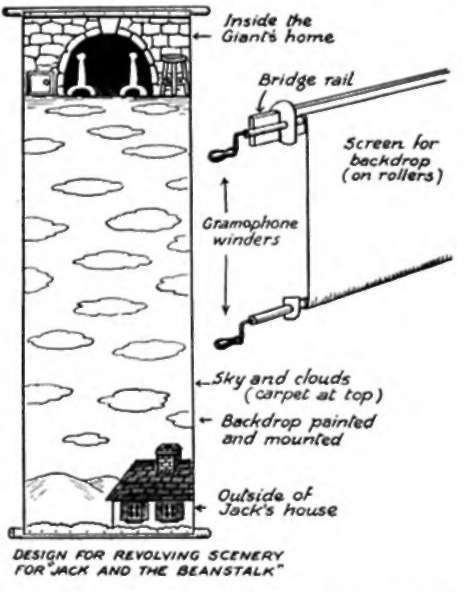
We all thought that those in charge of scenery would have a tough job devising ways by which the scenes could be changed quickly. But with the help of our master puppeteer, Mr. Adams, and by the use of some imagination on their own part they certainly did themselves proud. With some wrapping paper as wide as the back of the stage we had built, they worked out a plan to change the scenes by rolling the paper from one roller to another. On the bottom of the paper they painted Jack's house and yard.
By the way, they found that the scenery must not be too colorful lest it detract from the costumes of the puppets, whose clothes must always be brighter than the background. Above Jack's house they painted several feet of sky with clouds, and near the top they painted the giant's castle. You will have guessed the way that they worked the scenery. They rolled the paper on two old broomsticks (any round rollers, such as bamboo or curtain poles, will do), and then they turned these rollers and moved the scenery up or down as they pleased. As Jack climbed the beanstalk, they simply wound the backdrop down, and it looked as if Jack were climbing up the stalk, past the clouds, which were going down. This, of course, made the changing of scenery very easy.
Another thing they did, which to me was a clever idea, was to fasten several properties (pieces of furniture, etc.) to a baseboard. The scene in the giant's home, for example, with the fence and other things, was all tacked to a flat board. It was then possible to move the giant's home all at once, when the scene was changed. This plan also made it certain that the furniture and other properties were in just the right place every time, and awkward puppets did not knock them over. We learned that it was well not to have any properties with projections which catch strings easily.
In getting ready for the show, we all learned a great deal about painting scenery. For gay scenes, we found that it is well to use light colors; for somber, mysterious scenes, the darker colors are better. We saw, too, that it is well not to try to use too much detail in the scenery. By stepping back every once in a while, we could view the work and see how it would look from the audience. The edges of the wrapping paper needed to be reinforced, so that the paper would not tear. We reinforced them with gummed paper from the ten-cent store or strips of muslin glued on the edge of the paper.
Stages For The Marionettes
In practicing for our final show, we found many ways to make a stage for the marionettes. Of course, for the big event, a regular framework was constructed very similar to the manner shown in the illustration on this page.
Our show was given on the stage of the High School auditorium, and the curtains were drawn back slightly with our marionette stage placed just behind this opening.
For a marionette stage it is preferable to have the bridge higher than the stage floor. A strong table can be used for a bridge, with a slightly lower table in front for a stage. A ladder or chair should be placed alongside the rear table to serve as a step to the bridge. This type of stage is not suitable for young children, for they might injure themselves getting on and off. Even grown-ups must exercise care in using table stages. It is well, also, to cover the tables with heavy wrapping paper or several thicknesses of newspaper to protect the top from scratches.
We found many other types of stages that could be used for practice in our own homes. For example, the seat of a high-backed chair can be used as a backdrop. The puppeteer stands behind the chair to work the marionettes. A high-backed chair is about the right height, too, for practicing manipulation of a marionette.

Another easy way to make a small stage is to turn a small table upside down on a larger one. The space between the four legs of the small table then becomes the stage. The backdrop can be fastened to the two rear legs. If this stage is placed behind an open doorway, it makes an excellent background for a play. This kind of stage is especially good for use in the home.
In the classroom, the teacher's desk can be used as a bridge upon which the puppeteers can stand. Two flat-topped desks in front of this are good for the stage. A backdrop can be hung on two window poles tied to the edge of the teacher's desk. For a short demonstration, this arrangement is good.
If you happen to have French doors in your home, they make an excellent place for a marionette stage. Open both of them and place a studio couch between them. A piece of string or tape stretched from the two doors at the right height holds them from swinging open all the way. The string is also good to hang the backdrop on. A table back of this makes the bridge. It is usually necessary, also, to mask off the upper part of the door, so that the puppeteers cannot be seen by the audience.
Hand Puppets
The group working on hand puppets had great fun, too, making their little people. Under the direction of Mr. Adams they proceeded in much the same way that we did at first. Here are the directions for making the puppets in case you wish to make the same kind that our Guild manufactured.
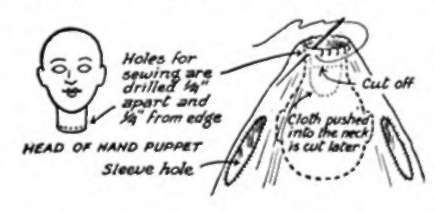
The head of the puppet is modeled from the paper mash just as that for a marionette except that the neck is thicker and about three inches long. It is made in this way because the index finger fits up into the neck to control the head.
There is no wood in the body of the hand puppet. The body is cut out from a double thickness of unbleached muslin, according to the pattern that is shown in the drawing on page 313. After it is sewn together and turned inside out to hide the seams, the hands are stuffed with cotton and the fingers marked by rows of stitches.
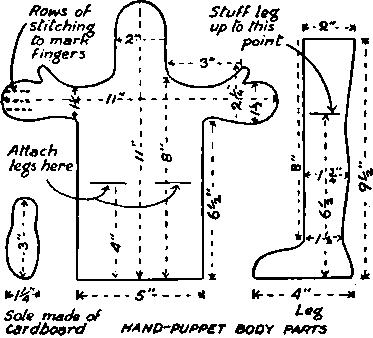
The legs are also cut from double thicknesses of muslin and sewed, leaving the top and bottom open. For the foot, the pattern of the sole of a shoe is cut out from cardboard and then covered with muslin. This is then sewed to the bottom of the leg. Now stuff the leg two thirds of the way up and sew it to the front of the body in the position indicated, with toes pointed forward. After both legs have been attached to the body, you are ready to fasten on the head.
Around the neck of the hand puppet's head drill small holes about one fourth of an inch up from the bottom and one fourth of an inch apart. Now place the head over the neck of the body, making sure the face is to the front of the body, and turn the body inside out over the head. Sew the head and body together with heavy thread, using an overhand stitch through the cloth of the body and the holes that have been drilled in the head. You may now place the puppet on an armature and paint the head and hands. Shoes may also be painted on the feet, if you care to do so.
Costumes are cut according to the size of the body pattern. When the trousers are put on a man puppet, an opening is left in the back between shirt and trousers to admit the hand for the fingers to manipulate the puppet. Follow the suggestions in costuming the hand puppet that are given for the marionette.
Hair can be painted on both hand puppets and marionettes, but it is better to make hair of yarn, steel wool, cord, fur, or fringe.
Stages For Hand Puppets
After a little practice, we found that stages for hand puppets are very easy to provide. Perhaps the easiest thing is to draw a sheet or drape across a doorway and tack it to the door frame on either side. It should be just high enough to clear the puppeteer's head. The puppets are then manipulated by holding them up over the edge of the sheet. A three-sided screen can also be used, as you will see.
Another easy thing to do is to kneel behind a high-backed chair or sofa and use the top as a stage. In good weather, the window sill of a ground floor is a good stage with the audience sitting out of doors. Two adjacent trees with a drape tacked up between them also make a stage quite suitable for hand puppets. If trees are not available, then the stands used to hold up volley-ball nets are quite as good. If none of these is handy, two persons can hold the drape up high enough.
A one-man show can be put on by cutting out a small stage from a wide piece of wallboard or cardboard and strapping this to the waist of the puppeteer. This will leave both hands free to operate the puppets. The wallboard should completely cover the operator. It may be cut and painted in any interesting design.
Continue to:
My Books

