How To Make A Belt. Continued
Description
This section is from the book "Time Out for Living", by Ernest DeAlton Partridge and Catherine Mooney. Also available from Amazon: Time Out for Living.
How To Make A Belt. Continued
The redrawn design is once more traced in its completed form. It may be used singly, as it is now, to fill a certain space on your material, or repeated double, double reversed, or in whatever manner and number of combinations you desire. Figure 7 shows the design doubled, with additional connecting lines. When new lines are added, it may be necessary to rearrange the interweaving to keep the under and over crossings in order. Other combinations of parts of the design are shown. These are found by aid of the mirror.
Again, this pattern may be used as a corner piece, one on each corner of your work, the four corners being connected with ruled lines as shown in figure 8 on page 243. These ruled lines should make bands of the same width as the bands in the design.
You may desire further decoration somewhere between these ruled lines. In this case, you can, with the help of the mirror, take another part of your scribble or make a new scribble to get something different. Figure 9 shows a whole completed design. Figure 10 shows a design with the ruled side lines brought in and interwoven.
To enhance your design still further, you may use color, or dot stamping, in the spaces between the bands. The whole background may be so marked. This is a matter for your own artistic taste. In metal work you can cut the background out completely so as to have a perforated pattern.
If you happen to need a larger design than one covering two or three square inches, you simply make a large scribble and use a larger mirror. So much for the scribbled design.
With a ruler and a compass, you can make many geometric designs, but be sure that you make your measurements accurately so that the pattern will work out exactly. Figure 11 shows a combined ruler-and-compass border section with a design suitable for a leather belt, and figure 12 shows a simple design made with a compass.
You may wish to have some figures in your design and may think it a hopeless task to draw them. Here is a simple plan whereby you may draw what you need. Put a photograph or a picture of the figure on paper thin enough for you to see the shape if you place the picture face flat against a window pane. With a pencil trace the outlines of the figure and whatever inside parts of it you require.
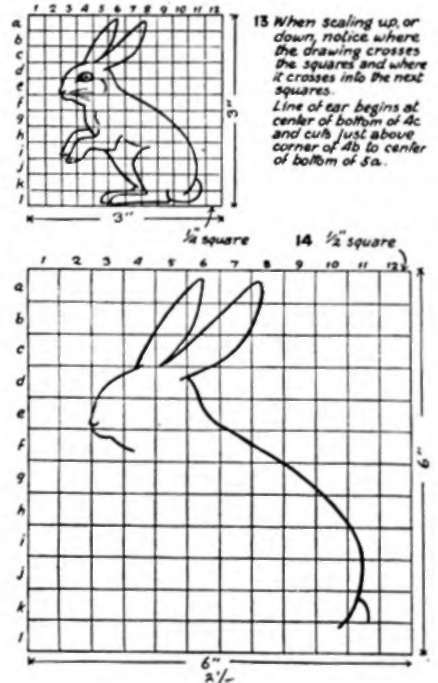
Now, with your tracing paper, copy this drawing and you will have it ready to trace on your design. You may have to hunt around for the figure you need and then discover that the figure is not the right size to fit into your scheme. If this is the case, you will have to scale the figure up or down. Suppose that the figure is three inches square and that it should be six. With a pencil make a three-inch square on your drawing and then mark the side lines of your square at quarter-inch intervals. Connect these markings from side to side and from top to bottom so that you have a grill over the entire drawing. Page 244 shows you how to do it.
Mark the side squares a, b, c, and so on, and the top squares 1, 2, 3, and so on, as shown in the illustration. Now make a six-inch square and mark it off in half inches, connecting the marks and numbering and lettering them as in the three-inch square. Each number and letter indicates the whole row of small squares outside of which it stands.
It is now a simple matter to draw any small part of your figure in its place in its own numbered and lettered square.

Figure 14 shows a part of the design in figure 13 drawn to the larger scale. Continue until you have the whole figure completed. You may make other measurements than those given. Suppose that you want to increase the dimensions from three to four inches. Proceed as before with the three-inch square and divide it into quarter squares, twelve in each line. Your four-inch square, first marked off in inches, is again marked off in thirds of an inch. You will have twelve squares in each row. Number and letter them as you did the six-inch square.
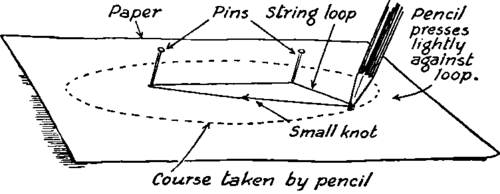
You may need an oval in your design. There are two ways of making one. The first makes a perfect oval but you have to experiment until it is of the proper proportions. It is made by inserting two pins in a sheet of white paper and putting a loose loop of fine string over the two pins (figure 15). Place your pencil inside the loop and, pressing it lightly against the string, move it around so that it makes a mark on the paper. The longer axis of the oval will be directly in line with the two pins while the shorter axis will be at right angles to the longer directly on a line crossing between the pins. If the resulting oval be too long and narrow, move the pins closer together. Your pencil will then travel in a shorter and wider oval. You will have to experiment with the pins and the size of the loop until you get what you want.
The second method is much quicker. Take a piece of paper and on it draw roughly the oval that you need, as near as you can to the correct proportions. Fold the paper in half along the line of the short axis so that when you press it against a window pane you can see the two halves of the oval come together.
15 DRAWING AN OVAL.
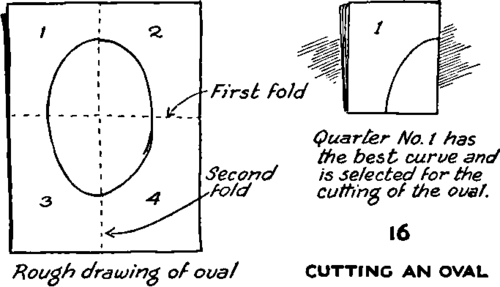
Now fold this paper on the long axis so that your drawing is quartered (figure 16). Examine each of these quarters and select whichever quarter shows the best shape. With the paper folded in quarters, cut with a scissors along the selected line and when the paper is opened out you will have a hole in the center which will be your oval pattern. Now place the paper on your material and with a pencil or a pointed tool draw along the edge of the hole and, presto, you have your oval.
Hard at It.
Finally, you can make natural shapes of such things as leaves by pinning them flat on your paper and drawing your pencil around the edges. A little ingenuity in the use of the foregoing methods and you will be able to make hundreds of very artistic designs without ever having studied drawing.
Other Leather Projects
As you can guess, there are literally scores of projects that can be made from leather, using the methods that have been outlined here. A few of these objects are shown in pictures in this chapter. Those who wish to pursue leathercraft as a hobby will find it worth while to form a club, so that several can work together. It is well to try the simpler projects first and work up to the more difficult ones as your skill improves.
One Last Word
When some songs are ended, the melodies linger on. This little tune of leather that you have heard is just such a song. If you are skillful in buying leather and using it, you will find many happy hours ahead. Often it is possible to finance such handicraft projects by selling one of your own creations occasionally. If several persons form a club, they can use the same tools, buy their leather in larger quantities, and thereby get it cheaper. Around Christmas a sale of articles could be held to help finance additional projects. When you come right down to it, though, you will find that a hobby such as leather working does not cost any more than going to the movies once or twice a week or spending a few cents a day on candy. A few hours, and the movies are over. A few minutes, and the candy has disappeared. Years and years roll on and you continue to create, design, and produce leather articles that thrill the hearts of your associates, and cause a song of joy to ring in your ears.
Some Interesting Things To Do
1. Practice lacing on an edge, using cardboard and a shoelace. Try the different methods shown on page 230.
2. Make a paper pattern of some leather article. Outline a design to be tooled or stamped upon the surface. Find out how much it would cost to make it.
3. Write an article for your school paper called The Possibilities of Leathercraft as a Hobby.
4. Make a sample coin purse and decorate it according to the suggestions in this chapter.
5. Write to one of the leather-supply houses listed on page 248 for their catalogues. Find out what it would cost to make some simple leather article.
6. Make a set of leather stamps from nails. Make a simple article in leather, using these stamps to decorate it.
7. Spend some time with the books at the end of this section. See how many different kinds of articles are suggested. Which ones would you like to make? How much would each one cost?
Sources Of Leather Supplies
American Handicrafts Co., 193 William St., New York City; 2124 South Main St., Los Angeles, Cal.
Boin Leather Craft Studios, 6 Grove St., Madison, N.J.
Boy Scouts of America, 2 Park Avenue, New York City.
Edward E. Babb and Co., 22nd and Market Sts., Philadelphia, Pa.
Girl Scouts of America, Radio City, New York City.
Universal School of Handicrafters, Rockefeller Center, New York City.
Helpful References
Bang, E. E., Leathercraft for Amateurs. Belash, C. A., Braiding and Knotting for Amateurs. Boy Scouts of America, Leathercraft. Boy Scouts of America, Projects in Leather.
Cramlet, R. C, Fundamentals of Leathercraft.
Decker, M. H., Practical Home Tanning and Fur Dressing.
Decker, M. H., Working with Leather.
Fellowcrafters, Leathercraft for Beginners.
Followcrafters, Orange Book of Patterns and Designs. Francis-Lewis, C, The Art and Craft of Leather Work.
Griswold, L., Handicraft. Leland, C. G., Leather Work. Mickel, A., Leather Work. Mochric, E., New Leatherwork Decorations.
Reynolds, H. A., Complete Book of Modern Crafts.
Smith, F. R., Practical Leatherwork.
Snyder, W. EM The Leathercraftsman.
Stieri, E., Book of Indoor Hobbies.
Tanners' Council of America, Romance of Leather.
Trinick and Bristow, Portfolio of Designs for Leather Work.
Turner, H., Artistic Leather Craft.
Continue to:
My Books

