How To Make A Belt
Description
This section is from the book "Time Out for Living", by Ernest DeAlton Partridge and Catherine Mooney. Also available from Amazon: Time Out for Living.
How To Make A Belt
A belt is an interesting, useful, and rather easy project to make, once the stamping tools have been completed. You can secure the leather for such a belt ready cut from one of the leather-supply houses listed at the end of this chapter or you can cut it yourself from a hide, if a group buys a hide together.
As in other projects, plan the belt carefully before you begin the stamping or decorating. Cut a strip of paper the size of the belt and upon this draw the various designs in pencil to make certain about spacing and general appearance. And here is a word of caution: do not try to put too much on the belt. Over-decorating is a mistake many beginners make. Do not forget to measure the belt pattern and make certain it is the right length before cutting the leather.
In planning the design, remember to have a margin clear around the outside. Make the margin either with an edge creaser as described on page 227 or with a pair of dividers.
The section of a decorated leather belt on this page shows (1) a rosette made by combining the pine-tree and shell stamps; (2) tooled lines; (3) a nine-point star of pine-tree stamps;
(4) tooled lines around the pine-tree stamp;
(5) shell-stamp corner decorations; (6) tooled letters on a three-dot punched background; and (7) a six-point star of pine-tree stamps.
Fasten the buckle to the belt in the manner shown in the diagram on the next page. Use leather cement to fasten the keeper, the small piece of leather that fits around the buckle, before it is laced. Punch the holes in the leather and lace it as shown in the diagram.
Leather that has been stamped or tooled usually takes on a dark, rich color and needs no additional finish. If it is good leather, it will gain in luster with use. It is not a good plan to oil or varnish craft leather, as some people suggest. If the surface is dull, use a little neutral shoe polish on it, or, better still, some English saddle soap.

Section of a Deco-rated Leather Belt, showing pine-tree and shell stamps in combinations.

FIXING THE BELT BUCKLE.
Make Your Own Designs.* With a pencil, a sheet of white paper, a piece of tracing paper, and a small straight-edged pocket mirror without a frame or bevel, you are equipped to make a variety of designs. Page 240 shows you just how to go about it.
* Contributed by Francis J. Rigney.
You need not have had any previous experience in designing. All you have to do is make a loose open scribble of several lines, straight, curved, or straight and curved, crossing over each other in a regular tangled scribble covering an area of about two square inches on the sheet of white paper. For example, see figure 1 on page 240. Try, however, to avoid having the scribbled lines bunched or too close to each other, particularly at the crossings, so that you will have room for interlacing. (See figures 1 and 6.) By the way, your own initials scribbled over each other might form the basis of a good pattern.
Now let us see what we can do with this scribble. Take the pocket mirror and place it on one of its wider edges perpendicular to the paper and anywhere on the scribble. You will immediately see in the mirror a reflection of a part of the scribble, which part on the paper combined with the reflection makes a balanced pattern. This design may not be exactly what you need, so you move the mirror forward or backward or turn it around, a little at a time, until you find the design that suits your purpose.
We will take, however, the design shown in figure 2. Now, holding the mirror in place, draw a line along its edge to mark off the desired portion of the scribble. You now have the design as shown in figure 3. Remove the mirror and with the tracing paper trace the marked-off part which was reflected in the mirror. It is not necessary to trace the dividing line. Turn the tracing paper over and place it face down on another part of the white sheet. With your pencil press down and draw along the lines seen through the tracing paper. Again turn the tracing paper over and place the newly pencil-marked side in position, so that it fits against the part which you have just traced and which you will see easily through the tracing paper. You will see the design that you found in the mirror. Press and trace the second half, and when the tracing paper is removed you will have an impression of the design on the white sheet of paper (figure 4). Go over this with the pencil to make the lines clear and sharp.
Next take a fresh piece of tracing paper and trace the complete design. You now have the design ready to retrace on your leather, wood, or whatever material you are working on.
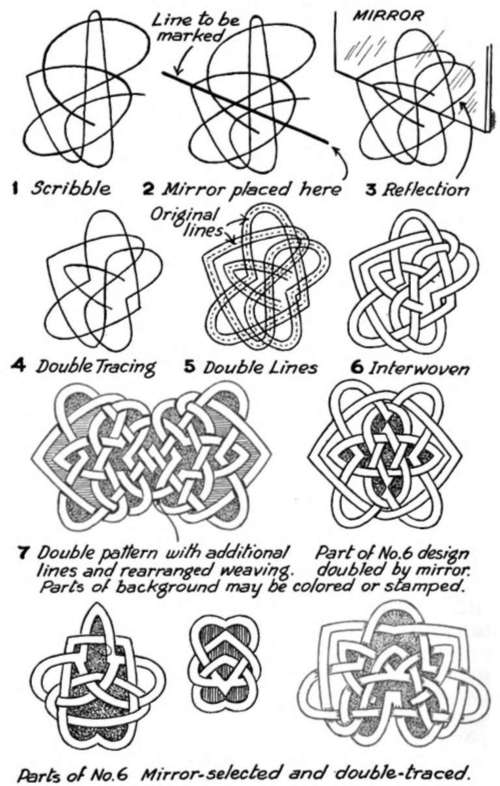
A single-line pattern, however, is not so satisfactory nor so artistic as a double-lined pattern. Let us see what we can do to improve the design. Turn the tracing paper over and retrace the design on a fresh piece of white paper. Then, when you have it traced, draw a line on each side of the traced lines. These penciled lines may be drawn at any desired distance apart, say one sixteenth or one eighth of an inch (figure 5).
It is suggested that at some of the corners the lines be drawn farther apart before they meet in a point, as shown later in the illustration (figure 8) on page 243. Now, for a still more artistic effect, carefully erase the crossings of the lines, the spaces between the lines having the appearance of bands, or ribbons, and redraw at the crossings so that two of the parallel lines will appear to go over, or under, the two which they originally crossed. Alternate the crossings over and under all through the design (figure 6).
Continue to:
My Books

