How To Build A Sailboat. II. Setting Up The Frame
Description
This section is from the book "Amateur Work Magazine Vol3". Also available from Amazon: Amateur Work.
How To Build A Sailboat. II. Setting Up The Frame
Carl H. Clark
Fig. 6 shows the method of setting up the foundation for building. It is supported as shown and braced fore and aft and sidewise very strongly, as there may be considerable strain brought to bear upon it. The wedge shaped pieces at the ends are cut out and put on to give further support to the keel. The curve should be carefully cut to fit the mould as nearly as possible at every point. The mould positions should be marked on the foundation for use in bending the keel. It would be possible to build up a foundation of blocks, beveling them off to fit the keel mould and bracing them securely. This method is not as good as the former, but with careful work, and sufficient skill, a good job may be done. In wither case, it should be formed that the load water line marked on the mould will be level. This will make it easier to set up the frame.
The keel is formed of a 2" oak plank about 20' long, and 10" wide. The half breadths at each mould point are given in line 6 of the laying off table, except that 1 1/2" must be added to each one to allow for the back rabbet mentioned above, and shown in Fig. 4. This will make the greatest width 10" on numbers 3, 4 and 5, the others being 4 1/2"5 5/8" and 5 1/2" respectively. The width at the stern board is 5" and where the stem joins the keel it is 4". It should be noted that the positions of the moulds as marked on the keel will not be evenly spaced, as the distance between them is not measured horizontally, but around the keel mould, as the keel is to be finally bent. This spacing can be obtained by measuring from one to the other around the keel mould. The batten is again used to draw the curved lines as before. The keel is trimmed to shape and then turned over and the outline of the under side drawn in the same manner with the table dimensions.
The rabbet is now to be cut 1 1/4" deep, along the line on the bottom, this allows the keel to project 1/2" below the 3/4 " plank. The rabbet may be left square for the present. The stem is a natural crook knee about 2" thick, worked out to the shape of the stem mould and scarfed to the keel. This scarf should be marked on the keel mould and transferred both to the keel and the stem, allowing the scarf to be fitted approximately before setting up. Following the rabbet line there is a rabbet cut in the stem to take the ends of the plank. It is 3/4" deep and can be cut only approximately until the stem is in place and the angle of the plank definitely determined.
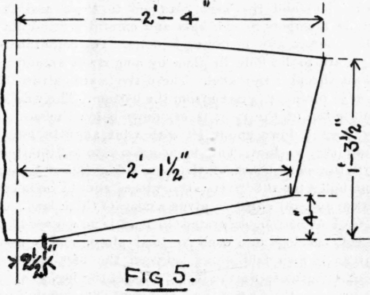
The sternboard is of 1 1/4" oak cut to the shape shown in Fig. 5. The rounded upper edge should be left full and trimmed off after the deck beams are in place. The edges also are beveled after it is set up. The two centre board logs are to be gotten out of 2" plank 11" long and 8" deep in the widest part. They should conform to the shape of the mould, so as to fit nicely on the top of the keel after it is bent. The edges must be perfectly square and even, as the joint between them and the keel must be water tight. The top edge must be straight and square as the sheathing of the centreboard box fits against it.
The keel is now to be bent into the form. To do this it will be necessary to thoroughly steam it, preferably by putting into a steam box, but if this is not at hand it can be steamed by wrapping it with cloths and keeping the latter saturated with boiling water for some time until the keel is limber enough to bend to shape easily. The ends, where there is no curve do not, of course need steaming. When it is limber enough to almost bend of its own weight it can be laid into the form and braced into place, being sure that the mould lines on it coincide with those on the foundation. Braces are placed as closely as possible, bearing against the beams overhead. These braces can be cut rather long, and by fixing the top and sliding the lower end along the keel, a wedge action may be obtained. All the braces should be forced down together to avoid straining in any particular place. It will be well to place a piece of board under the lower end of each brace to avoid any tendency to concentrate the pressure and split the keel.
The centreboard slot would best not be cut until after the keel has been bent, unless the buiider is a very skillful workman, as the removal of the material of the slot will cause a tendency to a sudden bend at the ends of the slot, which may be rather difficult to get out. The keel should be allowed to rest for a day or two until thoroughly dry, before being disturbed. Indeed the braces should never be entirely removed, and if, for any purpose one is taken away it should be replaced as soon as possible. It is a long time before a bent timber entirely loses its tendency to spring back. After the keel is in place the mould should be laid upon it to make sure that it is to the exact shape. The centreboard slot should be next cut. The dimensions for the length are as shown in Fig. 6 and it is 1 3/4" wide. It should be perfectly sraight and square all through. Holes should be bored along the centre line with a 1 1/2" auger and the remainder trimmed out. Braces may be removed one at a time while it is being cut. The centreboard logs are next carefully fitted to the top of the keel, one on each side of the slot. This joint, as before stated, is one of the most important in the boat and ought to be very carefully made. The uprights at each end of the box are 1 3/4" thick, 3" wide and about 27" long.

The forward one stands plumb, and the after one is curved on about a 5 ft. radius from the pin on which the centreboard is hung. As will be seen, these pieces extend down through the keel. They should be put into place and the logs clamped to them and the whole clamped to the keel and carefully fitted into place before any fastening is done. The centerboard logs are to be held in place by long rivets extending down through the keel. These rivets are galvanized iron 1/2" diameter, driven from the bottom. The washer on the top of the rivet is set down below the surface by boring down about 1/4" with a bit slightly larger than the washer. This is necessary, to not interfere with the next board of the box side. Before boring the holes for the rivets, the pieces should be taken down and all surfaces given a coat of thick lead. A thread of cotton, saturated in lead is now placed between the logs and each vertical piece, and a long thread is also laid along between the logs and the keel, quite close to the inside edge of the log, so as to be inside of the line of the fastenings. The whole may then be clamped up again into place, being sure that the centreboard uprights are back to the entreme ends of the slot and that everything is in its former place. Holes may now be bored for the rivets, and each rivet should be driven as fast as bored for, to avoid any chance of any parts slipping. To get these logs into place the braces will need to be removed, but they may be replaced, resting on the logs themselves, and thus aid in keeping them in position.
When the logs have been fastened into place the vertical pieces may each have three short rivets about 1/4" diameter driven through them and the logs. It will be seen that this makes ft very strong back-bone for the boat and tends to keep her in shape. The stem is now to be fitted on the scarf at the forward end of the keel. It is so fitted that when in place it and the keel will follow the mould. The scarf, or diagonal joint, should be about 15" long, and as good a fit as is possible to get. The keel should be tapered down to about |" thick at the forward edge. They are fastened together with 1/2" rivets, about four being used. The after two can be left until later if the foundation interferes with driving them now. The stem must be exactly in line with the two centerboard uprights, and also plumb. The after end of the stem is jogged down to allow the maststep to fit over it. The rivet through this part must, in any case, be left until the step is in place.
The sternboard, Fig. 5 is 1 1/4" thick, and is cut to those dimensions. The stern knee is 2" thick, each arm being 9" long. It should be natural growth if possible. The angle is obtained from the keel mould or from the original draft on the floor. Where the sternboard fits on to the keel, it is cut down 3/4" thus allowing the edge of the sternboard to lie even with the underside of the projecting back rabbet and allows the plank to fit on both the rabbet surface and the sternboard, as shown in Fig. 6. The under edge of the sternboard is beveled to fit the jog thus made in the keel. The centerline should be left on the stem-board to use in setting up. The sternboard and the knee should be clamped in place and adjusted until the centreline on the sternboard is in line with the stem and centreboard uprights already set up. The sternboard must also be square with the fore and aft line of the keel. These adjustments will be made easy by stretching a line from the centre of the stern-board to the centre of the stem. A sliding line carrying a plumb bob will then tell whether the parts are in their correct positions.
When the sternboard is adjusted, it and the knee may be fastened in place with galvanized screws. It will be found that a little soap or lead on the threads of the screw will make it drive much more easily. The whole should now be painted to prevent checking during the time the boat is being built.
Continue to:
My Books

