How To Use Glue. Continued
Description
This section is from the book "Things To Make In Your Home Workshop", by Arthur Wakeling. Also available from Amazon: Things to Make in Your Home Workshop.
How To Use Glue. Continued
Place the thermometer in the glue and be sure the temperature does not rise above 150° F. (Fig. 19). Glue does not have to be "cooked" to make it sticky. Heat is simply to dissolve it and to keep it liquid. When the temperature rises about 160° F., glue rapidly loses strength and if this temperature is continued for some time, the glue is ruined.
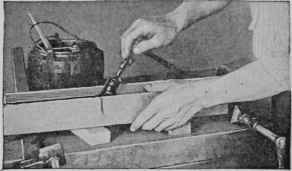
Fig. 20. - Hot glue always should be applied freely to both edges of the wood to be joined.
Casein glues of good grade usually are prepared by stirring rapidly 1 part of glue into 2 parts of cold water by weight. Continued mixing is required until all lumps are broken up. The mixture should stand from 15 to 30 minutes for the completion of the chemical action. Only enough glue for the day should be mixed, as these glues become solid like a piece of cheese after about 12 hours.
The preparation of the articles to be glued is important, especially if wood. The joint should be clean and dry. No wood that has not been thoroughly kiln dried should be used with either animal or fish glues. Wood not thoroughly dried can be glued with casein glue.
The wood should be jointed perfectly before applying glue. Uniform contact between the two pieces must be assured. Brush glue on quickly and vigorously and apply it to both parts to be joined (Fig. 20). Then clamp the work tightly bo as to force the joint together and allow the glue to dry.
When repairing furniture and other articles that have been glued previously, scrape away all old glue and have the joints perfect again before gluing.
In cold weather it always is well to have the parts warm before applying the glue. Animal glue sets quickly and if ii jells before the wood conies together firmly, the joint is worthless. When the wood is warm, it retards the "set" and gives the glue a chance to penetrate.
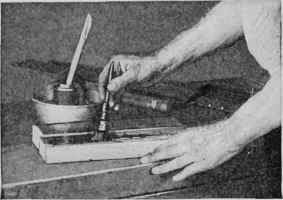
Fig. 21. - Liquid glue should be brushed on vigorously and all parts of the joint well covered.
When prepared liquid glue is applied to a joint, it is quite possible to obtain good results by giving one coat of glue to the parts and pressing them together immediately. This is the common way of using liquid glue, but it is not the best way. A little additional pains will insure a very much stronger joint.
First apply a thin coat of liquid glue and allow it to penetrate into the wood. It is not necessary to thin or dilute the glue; simply brush it out thinly. Then apply a second coating and allow the glue to become "tacky" to the finger before pressing the joint together and tightening the clamps, hand screws, wedges, or whatever means of pressure is to be used.
Liquid glue should not be heated except in cold weather when it has become chilled and is too thick. If the glue then is warmed or heated to a temperature not exceeding from 100° to 120° F., it is in no way injured. It is a common custom when liquid glue is purchased in a can to place the container with the chilled glue in a pan of hot water (Fig; 21). It soon becomes liquid enough to apply on any material.
When hot animal glue is used, coat the wood freely on both sides of the joint, press the parts together, and clamp immediately.
When glued wood is placed in the clamps or presses and these are set up (Fig. 22), the surface glue is squeezed into the wood as well as out to the surface of the joint. If the proper pressure is applied, the surplus glue is eliminated - that is, the surplus that is not pressed into the grain of the wood. When a joint is broken, no surplus glue should appear on the broken parts. The glue should be forced into the wood or squeezed out.
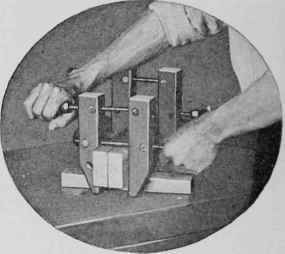
Fig. 22. - In using band screws, keep the jaws parallel with the wood and use moderate pressure.
Casein glues should be applied to both sides of the joint and clamped. Plenty of time can be taken to do this, as these glues set slowly. It is well to wipe off whatever surplus glue is squeezed out in clamping, as casein glue dries like flint.
In setting up wood in the clamps or hand screws, only enough pressure should be used to bring the two pieces firmly together. Too much pressure squeezes most of the glue out. The wood should be allowed to remain in the clamps 24 hours in a dry place.
There are many other purposes for which glue can be used in the home workshop, such as for sizing different materials to give them body and also to cover a surface so that other materials to be applied will not penetrate. Much liquid glue also is used in the preparation of plastic art clays, often called "gesso."
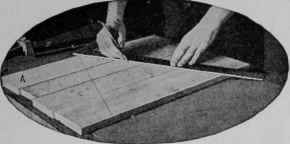
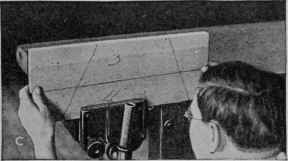
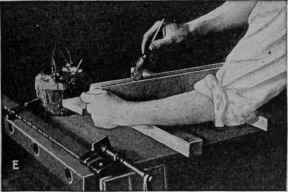
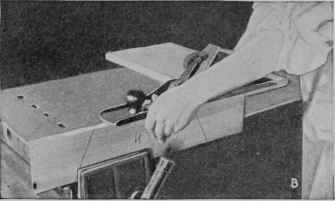
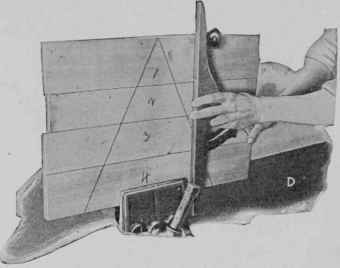
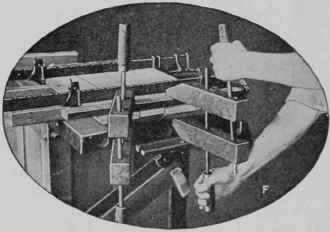
Fig. 23. - How to glue boards together : arranging them, planing, testing for trueness, applying the glue, and clamping.
The preparation of gesso is not difficult. Mix 1 gill of liquid glue, 1 ¼ cups of whiting, and 3 teaspoons each of linseed oil and varnish. These will give about 1 cup of high-grade gesso when mixed. If the paste is too thin, add more whiting.
Gesso is used for plastic or modeled decorations on picture frames, novelties, and furniture. It can be applied with a brush or by means of one of the tools ordinarily used in applying decorative frosting on pastry.
Gluing Boards Together
The first step in gluing boards together to form table tops or wide pieces for other purposes is to arrange them with reference to color and grain. Put the wider pieces toward the edges, if possible. Mark two lines across in V shape, as shown in Fig. 23 at A, and number the boards.
The inside edge of the first board at either side is planed straight and free of "wind" as at B. No squaring is needed as the facing edge is to be planed to the corresponding angle. Have the plane sharp. Note how the jointer plane is held parallel to the edge and how the fingers of the left hand help to keep it steady. When the edge of the next board has been planed, the joint is sighted as at C. At the ends the joint must be absolutely tight and true; the middle may be slightly open. When each joint has been planed, the whole piece is set up and tested for straightness as at D.
Two pieces are laid across the bench to support the work as at E. Clamps are adjusted for length before glue is applied. If the shop is cold, the joints should be warmed, but not made hot. Use freshly made glue of the best quality. If flake cabinet glue is used, it should be soaked beforehand in cold water. A good grade of liquid glue will serve, but warm the tin in water. Do not clamp too tightly. Level the joints on the face side with a mallet, or a block and a hammer. The glued-up boards are kept straight by the use of wooden cross-pieces and hand screws as at F. These are put on each end of the work. The work is left for about 24 hours so that the joints will dry thoroughly.
Continue to:
My Books

