General Rules For Basting
Description
This section is from the book "A Manual Of Home-Making", by Martha Van Rensselaer. Also available from Amazon: A Manual of Home-Making.
General Rules For Basting
1. In basting garments of any size, keep the work on a table or a lap-board as much as possible. For very long seams, such as are in a skirt, the basted edges will be much flatter if they are placed perfectly flat on a table and kept so while being basted.
2. When basting two edges together, the worker should always keep the more bias edge towards her.
3. When basting a gathered part to a straight edge, the worker should always hold the gathered part towards her. If an especially good line on the straight edge is desired, the work may be held with the straight piece toward one, as is often done when basting in a sleeve.
4. In basting bias edges, such as the edge of a gore, start the basting opposite the widest end of the gore, if possible. In this way, the hand will not ravel or push off the warp threads.
To baste a shirt-waist or other simple waist.
1. Baste and stitch all flat decorations, such as tucks, plaits, and set-in lace, before basting the seams.
2. Pin the seams before basting them, bringing together the corresponding points, such as the waistlines and armholes- of each. Whether the waist is basted with the seams on the right or wrong side depends on the kind of finished seam to be used. In the case of a tight-fitting waist, the seams are basted on the wrong side in order that the lines in the waist may be carefully observed when the garment is tried on.
3. In basting together parts of a simple waist, begin with the under-arm seam. Pin the parts together at the waist-line, keep the tracing or tailor tacking of the front and the back together, and pin the seam to the armhole and down to the bottom of the peplum. Baste the seam from the waist-line up to the armhole and from the waist-line down to the bottom of the peplum, using an even basting stitch.
If a yoke is to be used, read the directions under section 4. Baste the shoulder seams first and spread the garment out perfectly flat on the table.
Pin the yoke into place, and baste it. Then baste the under-arm seam as already directed.
For a tight-fitting waist, pin the side-front seam from the waist-line up toward the point of the bust, and from the shoulder seam down toward the same point. This brings a slight fullness at the correct place over the fullest part of the bust. Divide this fullness through a space of about 2 inches. Adjust the shoulder seams last in this type of waist.
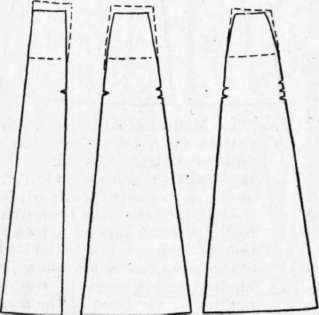
Fig. 77. - Another method of adjusting a gored skirt pattern for a figure with prominent abdomen.
4. Pin the shoulder seams together, first matching the markings of the neck-line and then the armhole. Baste the seams, holding the back of the waist toward you. It is often necessary to stretch the front slightly to fit the back. This is desirable, since the waist will then naturally spring down to fit the curve of the shoulder.

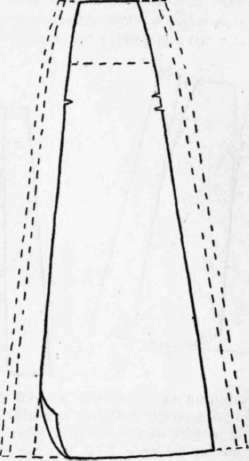
Fig. 78. - Method of adding material to a gored skirt pattern to form a tuck at the seam.
Continue to:
My Books

