Chapter IX. Joint Making - Continued
Description
This section is from the book "Plumbing Practice", by J. Wright Clarke. Also available from Amazon: Modern plumbing practice.
Chapter IX. Joint Making - Continued
In London it is not at all uncommon for plumbers to be at work on the lead-work of roofs of buildings for several months at a time; so that afterwards, when they try to make a joint, they sometimes fail to do it at the first trial.
After the joint has been prepared, so far as fitting, soiling, and shaving are concerned, the first thing is to firmly fix it, so that it cannot move when being wiped. If an underhand joint, it is easy to lay it on the bench on wooden blocks, and then load the pipes with weights, or rolls of lead, or other heavy material that may be laying about. It is not at all a good plan to drive chisels or spikes, for fixing, into the bench, as it makes it full of holes for solder to run into, and also makes it so rough that pipes cannot be straightened, or lead dressed out flat upon it. Very few plumbers have a decent pair of compasses in their kit, through using them for fixing small pipes; the points get broken, the legs bent, and the joint destroyed by driving them in with a hammer. When underhand joints have to be made in their places, it is necessary sometimes to drive chisels into the wall to support the pipe; these chisels should be strong, so as not to bend, and the pipe should be firmly lashed to them to keep it from moving, and also to insure the ends from coming apart. If these precautions are not taken, the joint very often cracks right around, and this crack, being fine, cannot be seen until the water is allowed to enter the pipe, and a leakage is found. The same care is required when fixing a joint for making in an upright position. For small-sized pipes, which are thicker in substance, proportionally, than those of a larger size, it is sometimes only necessary to fix the bottom part, but for larger-sized pipes, especially those made in 10 or 12-foot lengths, the upper part should also be firmly fixed, so as to sustain the weight of the pipe.
In one case a man was fixing a stack of 6-inch soil pipes, with branches on each floor; above the highest branch it was reduced to 4 inches, and continued to the roof as a ventilation pipe; the pipes were fixed on wooden blocks at each 10 feet. The 6-inch pipe had its top end reduced to 4 inches and tafted back on a lead collar on the block. By some means, when tafting the end, the pipe became slightly larger, so that when the 4-inch length was fitted, it was found necessary to slightly enlarge the end for it to fit into the other one. The solder was splashed on and the joint just going to be wiped, when, lo ! the 4-inch pipe disappeared down the inside of the 6-inch! If the top length of pipe had been properly lashed and fixed, this would not have happened.
It is a good plan to leave out the bottom length of all vertical stacks of pipes until the work is completed, so that any obstructions may be detected and removed before it is fixed. This was done in the above case, so that no harm was done beyond spoiling the length of pipe that fell through.
When fixing branch joints, the same care in firmly fixing must be taken, especially on large-sized pipes. The common way to prevent the branches of soil pipe from entering too far into the main pipe, is to cut tags, as shown at A, Figure 84. This is not a good plan, as there is a rough edge left inside for passing objects to cling to, and sometimes a little spur of solder will project through on the inside. A better plan, and one often practised, is to have a short wooden mandrel placed inside the main pipe to support the weight of the branch. Should this mandrel be forgotten until the pipe is fixed, there is great difficulty in getting it out afterwards. The best plan is to place two parallel pieces of 1 1/4 or 1 1/2-inch board inside the pipe, and a little longer than the opening for the branch, and then force in two small wooden wedges in such a way that the end of the branch pipe shall rest upon them, and not enter quite so far as the inside face of the main pipe. A glance at section, Figure 85, will illustrate what is meant. The advantage claimed for this is, that a plumb-bob on the end of a chalk line would displace it, should it be left in, so that it would fall out at the bottom of the stack. If not too long, the pieces would pass any bends, but care should be taken not to have them too short, so as to avoid a possibility of their becoming angled, or getting corner-wise, and so jam in the pipe.

Figure 84.
For fixing brass unions, ferrules, or bosses, on the ends of pipes for making straight-wiped joints, splints are often used. Splints are pieces of common lath, split up into long narrow strips and tightly fitted inside the pipe, etc. When joints are fixed together in this way, they can be "rolled,'" that is, instead of passing the cloth round the pipe to form the joint, the pipe can be rolled backward and forward on two wooden blocks - Figure 86, and the cloth simply pressed against the joint to form it into shape. Some men will make this joint with an ordinary underhand cloth; others make the joint partly with this cloth, and then finish with a smaller one, which the mate keeps warmed ready. Others use the small cloth only in this way: Take a ladle of molten solder, heated to the proper degree, in the right hand, cloth in the left, and pour on the joint, the mate slowly rolling the pipe toward the worker, so that he can keep patting the solder to keep it from falling off. When the heat is about right, lay down the ladle and take the cloth in the right hand, roll the pipe towards you, place the end of the cloth, which should be held with the thumb and forefinger only, on the pipe-end of the joint, and smartly roll it away from you with the left hand, pressing the cloth as hard as possible on the pipe; the end of the joint will be found to be wiped nice and clean. Smartly roll the pipe towards you, and then use the second or third finger on the other end of the cloth, and press it on the brasswork; quickly roll the pipe from you, and the other end of the joint is wiped clean. If, after doing this, the body looks too large and bulky, wipe the superfluous metal from right to left on the pipe, and wipe that end again, as before described. Now deliberately and carefully hold the cloth on the joint and press the ends hard on the two extremities; smartly roll the pipe away from you. If a good heat is got up, this can be done two or three times until the joint is as true as if it had been turned in a lathe. A slight pause can now be made, and the cloth should be looked at to see that there is no solder sticking to it. About this time the solder is almost set, and a light touch with the cloth will remove the small ridge that will be left at the last roll of the pipe. This will leave a slight dark mark, which a sponge of clean water, lightly passed over it, will remove. When making these joints, only two fingers are required, namely, those at the ends of the cloth. If the cloth is pressed in the centre, it will cause the joint to be too slender, and sometimes to split or open lengthways, so that it has to be re-made. Those men who like to wipe with the left hand, turn the pipe and joint the other way so that they can roll them with the right hand. The cloths used for these joints should be of moderate thickness, and if they are made of old fustian, which has ribs on the face, they score the face of the solder on the joint, giving it a smarter appearance than when only a small portion at a time is wiped, and thus leaving the cloth-marks crossing each other in all directions. The principal troubles a young joint-wiper has to contend against are to keep the solder from falling off, and to get the ends of the joint wiped clean, so as not to require trimming. To prevent it falling off, care should be taken not to get the pipe too hot, and also to keep it in motion So as not to have one portion of the solder heated more than another, one part in a fluid condition and the other almost set. When making underhand joints, and the pipe is made too hot, the bottom side of the joint sometimes falls off, and, even if made, it is a common occurrence for it to have less solder on the bottom than elsewhere. To wipe the edges clean, they should be done first. Some young men are so anxious to mould the body of the joint that they lose their heat. The body or centre should generally be left until last, as that part retains its heat longest. When wiping joints in an upright position, the top edge should be done first, and then, in some cases, the body. As the tin generally flows to the bottom edge, which is kept hot by the spare solder in the collar placed to catch it, it can be wiped last, but it should be done quickly, as the tin sometimes sets, leaving small projections which tear the cloth.
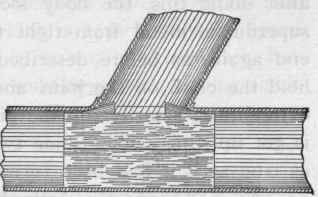
Figure 85.
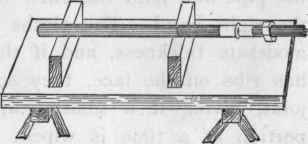
Figure 86.
Continue to:
My Books

