Chapter X. Pipe Fixing
Description
This section is from the book "Plumbing Practice", by J. Wright Clarke. Also available from Amazon: Modern plumbing practice.
Chapter X. Pipe Fixing
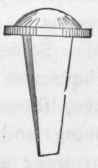
There are several ways for fixing lead pipes. For services, the common way is to drive into the wall a series of iron wall-hooks. If the pipe is horizontal and fixed on the face of the wall, and not recessed or covered with plaster, it frequently presents the appearance illustrated in Figure 93. The lead pipe being very soft, and having no support between the wall-hooks, it hangs down, and at the same time the whole of the weight is resting upon such a small portion that the hook cuts into the pipe and bruises it.
Sometimes, to save the pipe from being cut, a piece of sheet-lead is placed between it and the hook; or a small piece of plasterers' lath is used for the same purpose. Although this is a good plan, it gives the work a patchy appearance. A much better way is to have a wooden fillet nailed on the wall, with a hollow on its top side for the pipe to lie in, as shown in section, Figure 94. The advantages gained are, that the pipe is not cut, as predescribed, and it can be drained empty if fixed to a very slight inclination, as there are no baggy parts for water to lie in. This is of great importance, as, when out of use, the pipes can be emptied to avoid water freezing in them in cold weather. Another reason is, that when an intermittent supply of water passes through pipes fixed on hooks, water will be retained in the lower parts, and those over the hooks become charged with air. Under certain conditions this will prevent water from passing through, and when it occurs, some plumbers try to remove it with a force pump. Other plumbers, who know the cause, will simply straighten the pipe to allow the air to escape. If it is very old pipe, it will sometimes leak where cut with the hook. To avoid this, the plumber will drive a common pin into the highest parts of the pipe, and so let out the air, afterward closing the small hole made, by driving in the sides with a hammer and the side of the point-end of a chisel. Larger-sized pipes, when fixed horizontally, generally have lead tacks soldered to their sides, which are then hooked to the wall. These pipes frequently sag down, and the tacks tear away from the pipe (or the pipe itself tears), so that it is much better to have the wooden fillet to support it, as described for smaller-sized pipes. This wooden fillet will also answer as fixing for a casing for protection against frost or injury.
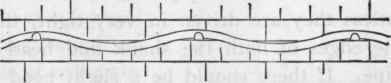
Figure 93.
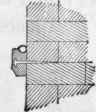
Figure 94.
When service pipes are fixed vertically with wall-hooks, unless they are driven in very tight, the pipe slips through, and the edges of both the shank and head of the hook cut into the pipe. If there should be a slight bend in the pipe, the hook will cut through the lead and the pipe will leak. If a waste pipe, through which hot and cold water pass at intervals, is fixed in this manner, this evil is aggravated by the expansion and contraction of the lead. Then, again, if the hook is driven in tight, so that the pipe cannot slip downward, the pipe becomes so bruised as to contract the water-way, as shown in section at Figure 95, so that a smaller pipe, full bore throughout its length, would allow as much water to pass through in a given time.
Pieces of lead, placed between the hook and pipe as prestated, save this to a certain extent, but do not prevent the evil. Pipe-hooks are so narrow in the shank and hook that they cut the pipe more than wall-hooks.
For fixing large-sized (say 4-inch soil) pipes, the usual way is to solder on " tacks," that is, pieces of lead, which should be thicker (rather than less in substance) than the soil pipe. These tacks are generally 9 inches square; one edge is soldered to the pipe, as shown in section, Figure 96, and then wall-hooks are driven through the tack into the brick wall, and the other half of the tack folded back to protect the hook and also hide the ragged appearance. These hooks must be driven into the horizontal joints of the brickwork - if driven into the vertical ones the mortar would crumble beneath them when the weight comes to bear, and so let the pipe gradually slide downward. The horizontal joints in brickwork are generally about 3 inches apart, and as the tacks are 9 inches long, it will be seen that only two wall-hooks can be driven in to be of any advantage; if a third one were used, as at A, Figure 97, a very slight settlement of the pipe would cause it to be useless by the lead tearing away. Lead tacks should never be more than 3 feet 4 inches apart from centre to centre, but it is much better to have four of these tacks to each 10-foot length of pipe. In one case a stack of soil pipe, with the tacks 5 feet apart, had gradually slid downward and broken in several places. The work had only been done about ten years, but when we come to think that three-quarters-of-a-hundredweight of lead (the pipe was 4-inch diameter, eight-pound lead) was suspended on four wall-hooks, the mystery is that it lasted so long.
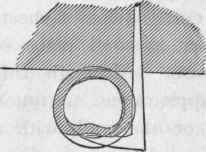
Figure 95.
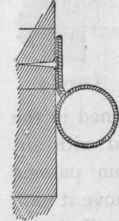
Figure 96.
Sometimes, where a lead soil pipe is fixed on an external face of a wall, the tacks are made of heavier lead, say nine or ten pounds per foot super, instead of the same substance as the pipe, and instead of common wall-hooks, specially-made nails, with flat stems and large heads, are driven in to support the pipe; instead of the tack being folded back the edges are trimmed, as shown in Figure 98, or to any other design that may be ordered. In this case the tacks should be put on in pairs for the sake of appearances, but where this is of no importance, it is better to fix them on alternate sides, and at equal distances apart. When tacks are soldered on in pairs they are generally both done together, so that the seam includes a portion of the pipe and the two edges of the tacks. This is not a good plan, as the thickness of solder keeps the pipe from fitting closely to the wall, and the piece of pipe is liable to be torn out, so that really the strength of the fixing is only equal to one tack instead of two. Pairs of tacks should always be soldered on separately, as shown in section at Figure 99, so that there are two portions of the pipe soldered to instead of one. The tacks are generally "wiped' on to the pipe, and if the plumber uses a thin cloth, he generally wipes the edges of the seam so bare that the lead shows through. When this is done it is weak, as the lead, being reduced in substance with the shave-hook, should have those parts well covered with solder to make up the substance. It is a much better plan to float the seam by pouring heated solder on to the parts and about an inch on each side of the shaving until a heat is got up, and then have an iron heated and well cleaned from scales, and slowly draw it backward and forward over the solder until it flows and the surface is flat, as shown at A, Figure 100. If the solder is too hot, it will run off the seam. The edges should be made straight so as not to require trimming. Alter doing this, pause for a few seconds, and then smartly draw a knife across the ends of the soldering - while still hot - to cut them straight, and then pass the end of a rule or thin straight-edge under the tack, close to the pipe, to remove any spurs of solder that may have run through; have a sponge of clean water ready and swab the seam. All this should be done in much less time than it takes to describe. When one tack has been done and the spare solder removed, have a piece of brown paper ready with one edge pasted and stick it on the soiled part between the two seams - not on the solder, as it would make it look dirty - and then float on the other tack in the same way. If all this is quickly done, the two solderings can be made at one heat, although it may be necessary sometimes to have another iron hot and ready, as the first one would have become too cool to cause the metal to flow nicely. On account of its appearance, this way of fixing pipes is very suitable for work when it is in sight, but when they are going to be fixed inside a building, and in a chase or other position where other pipes are run, or inside a casing where the projecting ears or tacks with the large-headed nails would fake up too much room, it is an advantage to use what are commonly called " face-tacks." These are narrow tacks soldered on the face instead of on the back side, and a considerable amount of solder left on for the sake of strength, so that the tack will not tear where the nail is driven in, as is so common with the ordinary lead-tack. The solder being a harder material' than lead it will withstand a greater strain. Figures 101 and 102 are respectively elevation and section of the kind of tack described. Some masters object to this kind of tack, because they think it takes more solder than the ordinary kind; but if properly done it does not take much more, and the saving in the size of the piece of lead will repay the value of the solder. When this kind of fixing is adopted, the ordinary nails used for fixing iron rain-water pipes answer the purpose very well, but if galvanized they are much superior and look better; they also last longer than plain iron ones, as those unprotected rust through where they are in actual contact with any lead; but this is only in the presence of moisture, or when not protected from rain. Sometimes iron nails with lead heads cast upon them are used, but they are not to be depended upon for any great length of time, as they soon rust through close to the head, so that it falls off. Where expense is not to be considered, copper or good gun-metal nails are to be depended upon, as these metals resist the influences of the atmosphere to a much greater extent than iron.
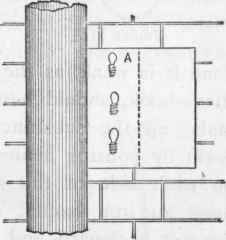
Figure 97.

Figure 98.
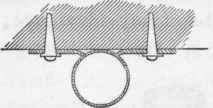
Figure 99.
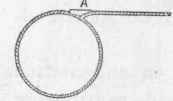
Figure 100.

Figure 101.
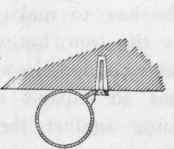
Figure 102.
Nail.
Continue to:
My Books

