Lining Sinks And Cisterns. Part 3
Description
This section is from the book "Plumbing Practice", by J. Wright Clarke. Also available from Amazon: Modern plumbing practice.
Lining Sinks And Cisterns. Part 3
To line a cistern in this manner, cut out the lead, leaving corner pieces on the top as before described, and 1 inch extra in length for each angle, and also enough for laying on the bottom and turning on the top edge. These surplus pieces for the ends and bottom should be turned up and dressed perfectly straight, by placing a piece of timber inside to insure this; the piece of lead should then be folded to fit the upright angle, and " set in" lightly, and then well dressed on the outside to a moderately sharp arris. The piece of lead should then be folded two or three times for convenience of removal, care being taken not to spoil the part which is prepared to fit the angle, and the inch margin on the bottom edge which is turned up should be doubled inward, not outward. The piece should then be carried and placed in the cistern-case and partly unfolded, so that the angle part can be placed in its proper position. Next proceed to unfold the sides and to belly them the reverse way, so that the ends can be forced back into their respective angles. Drive a clout-nail in temporarily - i.e., only half way in - to hold one angle until the other one is treated in the same manner. Force back the bellied parts a little, and then look to see that the angle is tight home; if not, pinch the ends of the lead toward it with a chisel, and then drive in a part of the small return pieces. Re-nail, temporarily, the ends, and force back the remainder of the bellied parts, and at the same time dress down the buckles on the bottom edge. Thin the outer edge of the bottom return with a shave-hook, and drive in clout-nails about a foot apart, to keep it back. Serve the ends in the same manner, and then use a leaden flapper to take out all bulgings or irregularities; work over the top edge and nail it. Prepare the other side and end in the same way, and fix it in its position as described for the other; but in this case the return pieces on the ends should be cut off, and only leave about 1/8-inch, which can be driven in afterward, so as not to project far enough to show through the soldering if it should happen to be wiped too bare by using a thin cloth. Put a nail in temporarily, near the top of each soldered angle, to keep it from rising when the top edge is being worked over, after which it should be taken out again, so that the lead can be properly shaved.
When nails are used for keeping the lead tight in the angle when soldering, they should be warmed first, as, if damp, they blow and leave a hole through the solder. It is scarcely necessary to add, the angles should be shaved before the nailing is done. The writer never uses nails for holding the lead back, excepting for the undercloak. After the sides have been placed in their position, the bottom piece of lead should be cut a little larger than the cistern, and the edges curled up, so that the lead will drop down into its position; or, if the piece is too large to move about when open, it can be folded up, and the edges which are curled up buckled inward, and afterward unfolded in its position; the edges must be worked tight against the sides - in fact a sharp-edged dresser and chase-wedge can be used so as to almost cut the lead through; the surplus should then be trimmed off. When all is ready, and the whole of the lead flapped nice and smooth, measure the requisite distances at various points, and then use a chalk line to mark the space for soiling; this is generally done with a pair of pointed compasses, with the result that the lead is scratched and sometimes partly cut. When the soil is dry, shave one upright angle and about a foot each way on the bottom; punch the corners at intervals instead of using nails, and touch and solder this angle before preparing any more, as the sooner the soldering is done after shaving the better.
It is a good plan to keep a shave-hook especially for cistern angles, one just the right size, so that it will take off a shaving the proper width, without the trouble of measuring and gauging or using a straight-edge. This shave-hook should not have a very sharp point, but one slightly rounded, as Figure 56. For getting into the corners where the ordinary straight hook will not reach, some men will use a bent hook, as shown in Figure 113, while others prefer what is called a spoon-hook, as illustrated in Figure 114. When soldering the bottom, great care should be taken not to move about more than can be helped, especially in a small-sized cistern, as great risk is run of breaking the soldered parts before they are thoroughly set. This sometimes happens, and the crack is so fine as to escape observation. When the bottom is being wiped there is sometimes a little trouble when passing the soldering of the upright angles. Some plumbers will paste a piece of brown paper over them, while others will only smear them with chalk to prevent the bottom solder from tinning too high up; others can get away very well without doing either, by simply being careful not to splash the solder too high up the angles, and not getting too much of a body so as to be unmanageable and beyond control.
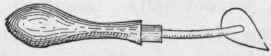
Figure 113.
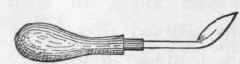
Figure II4.
Continue to:
My Books

