Chapter IV. Shelves In General
Description
This section is from the book "It's Fun To Build Things", by W. T. R. Price. Also available from Amazon: It's Fun To Build Things.
Chapter IV. Shelves In General
One thing is certain about shelves, wherever or however you build them. Make them a little stronger than necessary. There are too many amateur-built shelves that barely sustain their own weight and catastrophically collapse if you put anything on them.
Above all, get some kind of good nailing. Never rely on nails or screws driven into plaster, particularly if you are putting up shelves on iron angle brackets.
There are various ways of putting shelves up, and the way you do it will depend largely on where the shelves are, that is if they are to be generally seen, or are just utility shelves in attics or cellars.
The simplest scheme, whatever the wall-conditions may be is to put up vertical strips (3/4" x 3") from floor to ceiling. At several places you will find secure nailings for these, and on them the iron brackets may be securely screwed. (Screws come with the brackets.)
If this type of shelf, which has no side pieces, is put up close to a door, or where there is much passing by, you had better cut off the corners at a 45° angle, or, if you want to be fussy, give them a 2" radius curve-cut with your compass saw, and sandpaper the curves smooth. To get a nailing for the vertical strips in a brick wall, chip out some mortar, drive in a wooden wedge, saw it off flush-and you have a nailing.
Other utility shelves may be built with side pieces, but here, as the appearance of the cleats does not matter as it does in bookshelves, the shelf-rest easiest to make is a simple cleat, cut from a 3/4"x 2" strip. To make a good-looking cleat, it is customary to bevel the lower exposed edge with your plane-about a bevel.
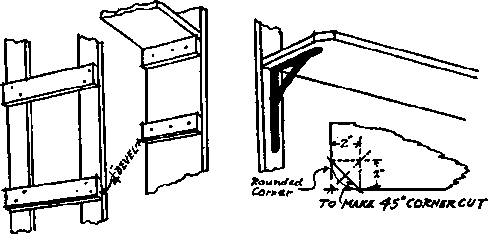
The construction of service shelves-not for looks.
If you are making wide storage shelves you certainly do not want to buy the expensive wide lumber, either for side pieces or for shelving. Strips 3/4"x 3" are the economical and easy things to use for the side pieces, made like a ladder, with cleats of the same dimension to give the whole thing more rigidity.
The shelving may be of two 8" boards, (not of No. 1 grade), or may be very satisfactorily made of masonite, supported by more of the 3/4"X 3" strips. This is the simplest way of doing it, because you need only to order one kind of lumber for the whole job, and if the shelves are for utility only, in cellar or attic, you don't need No. 1 grade lumber.
To install shelving in closets, the uprights for the cleats on which to rest the shelves may be of the same ladder construction as just described. If the shelves are cut exactly to fit, with no play, they may be driven into place so tightly that they will need no nailing to the cleats, and the ladder supports themselves will be so snugly wedged in by the sideways pressure of the shelves that they won't have to be nailed into the wall. This is shown in a drawing in Chapter IX (Closet Fittings).
Who has not struggled through life with a suppressed desire for one of those oh-so-pretty fitted closets such as are illustrated in full color in the women's magazines, or tantalizingly displayed in the department store? Well, why not have one? The various covered boxes and scalloped shelf-edging to tack on with harmoniously colored thumbtacks (from the five-and-ten) do not run into much money, and you can build the necessary shelves yourself. Of course you must plan it, but that ought not to discourage you, if you really want one of those tricky closets.
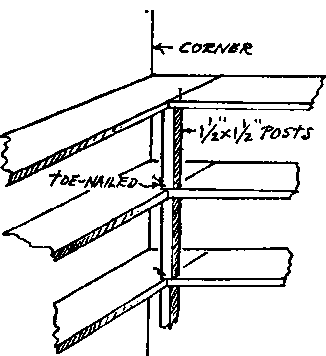
A method for supporting the inner corner of closet shelves.
There is only one problem that may perplex you a little: how to support open shelves that come around a corner. The best and neatest solution of this problem is to get some finished 11/2"x 11/2" sticks, cut them to height, and toenail them in as explained for the intermediate supports in long bookshelves. Otherwise-a wide iron angle-bracket- though this needs a fixed upright against the wall for screwing. Hardware stores have little iron cleats that screw into the lower edge of both shelves.
One makes kitchen shelves according to the kitchen and its needs. In the modern kitchen, which is usually efficiently equipped, you're not likely to need many shelves, but in remodeled studio-like apartments in old houses, or in oldish houses in the country, there are never enough shelves.
It is very convenient to have a shelf made of 1/4 "x 3" lumber over the sink, also a 6" or 8" shelf over the range, and a rack for pot-lids. These things depend so much on the special conditions and needs involved that it's difficult to specify them. The main point is that they're all awfully easy to build, and there is no use struggling along without them. Half a day's work and three or four dollars' worth of lumber, at most, will give you all the kitchen shelves you want.
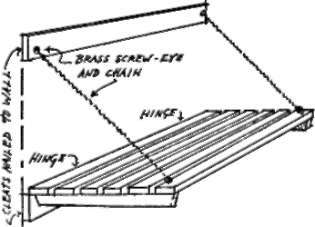
Sometimes you may find yourself faced with one of those thoroughly unequipped kitchens, and the first time you come to wash a stack of dishes you find that the landlord or his minions have thoughtfully failed to provide even a pocket-handkerchief size drain board, or any place to build one.
In such a case, get some 3/4"x 2" strips, surfaced, and a 3/4"x 3" cleat, the length you would like to make a drying rack. With this material, build a rack (see sketch), nailing it together with finishing nails, countersunk, filled with plastic wood and sandpapered. Hinge this rack with stout hinges to the cleat, and get a few feet of brass chain and four brass screw-eyes. Open up the screw-eyes to admit the chain, drive them shut again, and rig the whole contrivance up as sketched. You will need another cleat for the other ends of the chain, and a small brass hook to hold the shelf back when not in use. Paint white, then enamel white-and go on with the dishes.
Continue to:
My Books

