Canvas-Covered Canoes. Part 2
Description
This section is from the book "Woodworking For Beginners: A Manual for Amateurs", by Charles G. Wheeler. Also available from Amazon: Woodworking For Beginners.
Canvas-Covered Canoes. Part 2
Great care must be taken with all this adjusting of the framework, measuring, sighting, and testing in every way you can think of, to see that all the curves are " fair," without sharp or irregular turns, and also to see that both sides of the boat are alike. This is very important. The pieces may be all of the correct lengths, but still the boat may be one-sided, or twisted, or have a list.
A glance at Fig. 436 will show (as an exaggerated example) that pieces of the right dimensions can easily be put together in such a way that the boat may be ill-shaped, - an unfortunate result which is sometimes seen in home-made boats, due to lack of care in testing the angles and curves when putting the work together.
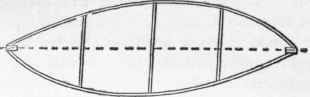
Fig. 436.
The ends of these strips will be more securely fastened to the stem- and stern-posts if depressions or "gains "are cut in the posts to receive them (Fig. 437), but this is not absolutely necessary if the ends are properly bevelled and carefully screwed to the stem- and stern-posts.
For additional stiffness, insert a series of ribs (Fig. 435), from 3" to 6" apart, according to their size and stiffness, from bow to stern. Barrel-hooping can be used and if sound is excellent, or strips of ash, oak, or elm, about 7/8" x 1/4", can be used. It will not be necessary to bend these around a form. Those near the middle can be at once bent into place. As the ends of the boat are approached, the ribs will require to be rendered more pliable be fore being put in place (see Bending Wood). The ribs can be nailed or screwed to the keel and finally be fastened to the ribbands, at their intersection, with copper nails clinched or riveted. Cheaper fastenings can be used, however, but copper is the best.
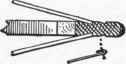
Fig. 437.
To hold such pieces in place temporarily, clamps can be easily made which will be sufficiently strong for the purpose (see Fig. 548).
When all these parts are fastened together, the frame will be complete.
To make a first-class job, the entire frame should be thoroughly painted, or at least given a soaking coat of oil, or it can be varnished.
For the canvas, get firm, closely-woven duck or sail-cloth of good quality and of sufficient width to reach from gunwale to gunwale. It is not necessary or advantageous to get the heaviest-weight grade, but beware of covering your boat with light drilling or the like, which, although you can make it water-tight, will not be sufficiently durable for anything but a boat for temporary use.
Find the middle of the canvas, lengthways, and stretch it on this line directly along the keel, the frame of the boat being placed bottom up. Tack at each end, and then, starting at the middle, strain the canvas around the boat, working along a little way at a time towards each end alternately and tacking to the top or inside of the gunwale as you proceed. Do not try to cover the top with the same piece as the bottom. If you can get a large needle and some stout cord, you can pull the canvas into place by lacing the edges across the top or deck of the boat, working from the middle towards the ends. In lieu of a needle use an awl or a nail. By lacing in this way and by manipulating the canvas with the hards you can, if you are careful, stretch it to fit the frame so that it will be smooth to a point considerably above the water-line. At the upper part, as you approach the deck line or gunwale, you may be unable to prevent some fulness, which you can dispose of by pleating if necessary. At the ends some little folding under may also be required, but you need have no great difficulty in adjusting the canvas neatly and so as to make tight joints. It is a good plan to cut a shallow rabbet on each side of the stem- and stern-posts, just deep enough so that when the edge of the canvas is folded under and tacked, the surface of the canvas will be flush with the side of the post (Fig. 437). Small tacks should be used - not large carpet-tacks. Copper are best, but galvanized ones can be used. In all pans where leakage could occur, the tacks should be driven closely together, so that their heads touch, seeing that a good coat of lead is laid on the wood underneath. After the bottom of the canoe has been covered, the deck can be treated in the same way.
When the canvas is all on, dampen it slightly and paint thoroughly, painting, also, the coaming around the well-hole and the exposed parts of the stem- and stern-posts (see Painting). The dampening is supposed to cause the first coat of paint to penetrate the canvas more thoroughly than if the canvas is quite dry. Oil is sometimes applied before painting. After it has dried thoroughly, apply another coat. Do not spare the paint, for though the canvas absorbs a great deal, which adds to the weight of the boat as well as to the cost, it is really essential in making a good canvas-covered boat that it be well painted.
A light removable flooring, or grating of slats, should be placed on the bottom of the well, resting on the frames.
To make a canvas canoe with a keel, you have only to make the keel of a piece of 1 1/4" or 1 1/2" stock (with a depth of, perhaps, 1 1/4" or 1 1/2), thinning it somewhat towards the ends so that it will join smoothly with the stem- and stern-posts. It can be fitted to these posts as shown in Fig. 438, and screwed directly to the keelson.
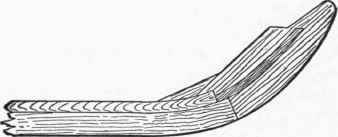
Fig. 438.
Continue to:
My Books

