Canvas-Covered Canoes. Part 3
Description
This section is from the book "Woodworking For Beginners: A Manual for Amateurs", by Charles G. Wheeler. Also available from Amazon: Woodworking For Beginners.
Canvas-Covered Canoes. Part 3
Particular care must be taken that the keel be got out straight and that it be fitted exactly on the centre line. In this case the canvas may be put on in two parts, being nailed to the keelson on each side of the keel; or the canoe can be made as previously described and the keel simply screwed on outside of the canvas, the latter being first thoroughly painted. Oak is excellent for a keel, but is rather heavy for a light canoe. Ash will do. Pine can be used. The keel will wear better if got out so that the concentric rings (annual rings) of the wood will be horizontal or parallel with the bottom of the boat and at right angles to the screws with which the keel is fastened on. If these layers incline slightly upward at the bow the keel will wear better.
A more advanced form of construction, and one more in line with the methods of a regular boat-builder, is shown in
Fig. 439, the essential difference between this and the form previously described being that regular bent ribs are substituted for the frames made of board, and the latter, after serving as moulds around which to build the boat, are taken out, the bent ribs being sufficiently stout to ensure strength and stiffness.
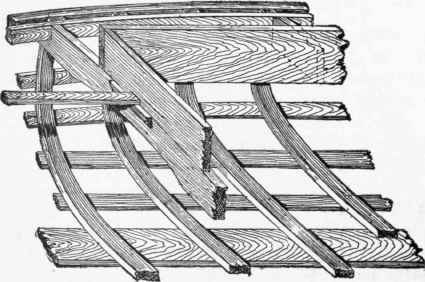
Fig. 439.
If you attempt this method the ribs must be carefully bent (see Bending Wood). Oak, ash, or elm is suitable for ribs. If a cooper's shop is within reach you can get the material there. It must, of course, be of good grain and free from flaws.
The process of construction is similar to that already shown. A suggestion for the arrangement of deck timbers (which can be of oak, ash, spruce, or any strong wood) is shown in Figs. 439 and 440, and for putting in a curved wash board or coaming in Fig. 440. For the latter a thin piece of straight-grained oak, elm, or ash can be used.
An excellent way to make a canvas-covered canoe is shown in Fig. 441. The essential principle of this consists in having a stiff gunwale, stiff keelson (inside the ribs), and ribs stout and numerous enough to ensure a permanently strong and stiff framework without the assistance of the lengthways ribbands. The outside is then sheathed with very thin strips of basswood, pine, or any reasonably strong and light wood (perhaps 3/16" thick and 2" or 3" wide), fitting them carefully to the shape, but without any attempt to make water-tight joints. If this boat, which is complete in all respects except that of being water-tight, is then covered with canvas as already described, the result will be a strong, smooth boat, without the irregularities of surface which are a necessary feature of the unsheathed form,
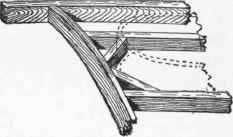
Fig. 440.

Fig. 441.
This method is adopted in making canvas-covered canoes after the model of the birch-bark canoe, and the result is an admirable boat, which, while perhaps hardly equal to a genuine "birch" of Indian manufacture, is certainly the next thing to it for an open paddling canoe. Of course, if you can work up your design after the model of a real birch, you will have accomplished as much as you could wish in this line - but to design and construct a good canoe upon the birch model is not an easy thing for the beginner to do, and had best not be attempted until after considerable experience in simpler and less graceful forms. This mode of construction can well be applied, however, to a canoe of almost any type. The sheathing can be painted and the canvas laid on the fresh paint.
Another form of construction is to omit the keelson and fasten the frames and ribs directly to the top of the keel, having previously cut a rabbet for the canvas (as in case of the stem- and stern-posts) on each side of the keel at the top; the canvas by this arrangement being put on in two parts, one on each side of the keel.
It is, of course, possible to construct a canoe with nothing but two gunwale-strips, stem- and stern-posts, a strip for a keelson, and a number of barrel-hoops for ribs; and such affairs are quite often put together by boys, but they are apt to be of light and flimsy construction and to lack sufficient stiffness to keep their shape after being used for a while. A certain degree of flexibility and lack of rigidity is desirable in a canvas-covered boat, and, in fact, it is to this quality that it owes much of its merit; but it should have enough stiffness to hold its general shape permanently.
An extremely simple method is to omit the stem-pieces and simply bend the keelson up at each end to meet the gunwales at bow and stern, where all the lengthways pieces can be fastened to a block, canvas being stretched over the whole as already described. A canoe which turns up so excessively on the bottom at bow and stern has some disadvantages, but still a useful and cheap boat can readily be made in this way. It should have a quite flat cross-section in the middle.
Most canoes can be sailed on the wind, often very successfully, by having a deep keel - which can be rockered or increased in depth towards the middle - or by adding a centre-board. But the latter is quite a nice operation, particularly so in case of making your first boat (see page 330).
The holes and the steps for the masts should be arranged before the canvas is put on, fitting extra thwarts across if needed, and it is a good plan to fit tubes for the masts. In case of sailing, the steering can be done with the paddle, or a rudder can be used (in which case a straight stern-post should be put in, for which a knee is good) and lines be led forward to the well-hole from a yoke at the top of the rudder. Many arrangements have been devised for steering sailing-canoes, but these details, as well as those for the rigging, can be found in any good book on the subject. If you are a novice, begin with a simple leg-of-mutton sail (Fig. 448).
It is better to buy oars than to try to make them. You may, however, have occasion to make a paddle. A good shape is shown in Fig. 442, but you can choose from a variety of forms.
The length can readily be determined from some paddle which suits you or you can experiment with a strip of wood. Five inches is a good width, and 5' to 5 1/2' a good length, but these are matters of individual preference. Spruce is a good wood for your first attempt at paddle-making. It makes a good paddle and is easier to work than birch, beech, or maple, or any of the harder woods. Pine can be used. Use a centre line in making your pattern. After the pattern is marked on the wood have the outline sawed at a mill or do it yourself with the turning-saw, or make a series of saw-kerfs to the line with the hand-saw and remove the superfluous wood with the draw-knife, spokeshave, or chisel (see Paring). Having the outline correct, mark a line along the middle of the edge of the blade, and gradually and carefully shave the surfaces down towards this middle line, also tapering the thickness towards the ends. The draw-knife, spokeshave, plane, rasp, file, scraper, and sandpaper can be used (see all of these tools in Part V. and also Paring and Rounding Sticks). Great care is needed to trim a paddle nicely to shape. A little hasty cutting may ruin the work.
Fig. 442.
The double-bladed paddle can be made of a single piece, or two pieces can be joined by a ferrule (Fig. 443). The double-bladed paddle can be from about 7' to 8' or 9' long and the blades are made broader and shorter than that of the single paddle. A couple of round rubber rings on each end of the handle will stop some of the dripping of water from the blades as they are raised.
Fig. 443.
Continue to:
My Books

