Small Sail-Boat
Description
This section is from the book "Woodworking For Beginners: A Manual for Amateurs", by Charles G. Wheeler. Also available from Amazon: Woodworking For Beginners.
Small Sail-Boat
The boat shown in Fig. 444 is a good form for the amateur to attempt, and makes a serviceable craft for sheltered waters. From twelve to sixteen feet is a good length, and the beam should be wide, as shown. The depth can be from twelve to sixteen inches.
Before beginning work read carefully Marking, Rule, Square, Saw, Plane, Nailing, in Part V., and look up any other references.
Care should be taken to select clear, straight-grained stock, free from knots, checks, and other defects, and thoroughly dry. Pine is excellent.
The general principle of construction does not differ from that of the flat-bottomed boats already described, and detailed directions are therefore omitted. The sides should each be of one 3/4" or 7/8" board. The arrangement of the details is obvious. Knees can be used to good advantage. The deck should be of wood, the boards (1/2") resting on cross-beams or carlins, reaching from gunwale to gunwale (as already shown) and slightly arched. Around the well-hole, brackets can be used (Fig. 445). The deck can be covered with canvas.
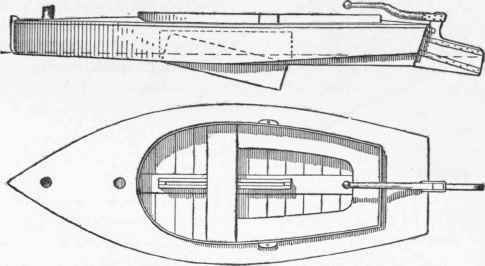
Fig. 444.
This boat, as shown in the illustration, is planked across the bottom like the other flat-bottomed boats already described, but the bottom boards can run lengthways instead, if preferred. In this case knees should be inserted, or cross-frames of some kind, to reach across the bottom and to which the bottom boards can be nailed. The bottom boards should be not less than f" thick and the edges must be carefully jointed (see Jointing). They can be laid slightly apart and the seams caulked (see page 302). Strips of flannel laid in thick white-lead paint can be placed between the edges of the sides and stern and the bottom boards, or the edges can simply be painted.
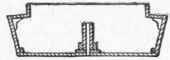
Fig. 445.
The construction of the case or trunk for the centre-board can be understood from Figs. 446 and 447. By either method of construction the trunk consists of two upright posts, or "headledges," cut with shoulders at the lower end, and sides of board screwed to these posts. A slot is sawed through the bottom of the boat of sufficient width and length to give the centre-board free passage - that is, of the dimensions of the opening at the bottom of the trunk. To cut this slot several holes can be bored close together until an opening is made sufficiently large to start the saw.
By the arrangement shown in
Fig. 446, a plank is taken and a slot is cut in it enough longer than that in the bottom of the boat to include the lower ends of the headledges, which should fit snugly. The sides of the trunk are screwed to this plank from underneath, and the plank is in turn screwed to the bottom of the boat. The headledges can be additionally fastened from the edge of the plank, horizontally. Unless the bottom of the boat is straight, the plank must be accurately fitted to the curve on the under side, - not an easy task (see Scribing and Paring). All the joints should be laid in thick white-lead paint, and at the bottom flannel can be laid in the seam, with lead, or caulking can be resorted to.
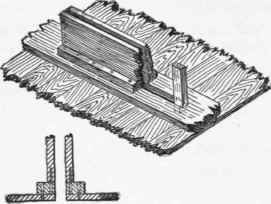
Fig. 446.
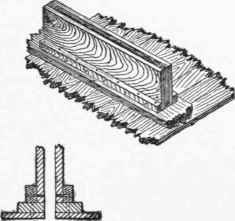
Fig. 447.
By the method shown in Fig. 447, the headledges and sides are fitted to a board on the bottom, or to the keelson, and, after being put in place, strips of plank are fitted lengthways on each side at the bottom and bolted or screwed to the bottom and to the sides of the trunk. The lower edges of these strips must be fitted to the curve of the bottom and the whole made tight, as just shown. Much care must be taken with this work to make tight joints. The inside of the trunk should be painted before putting together, and holes be bored carefully for all the screws (see Boring and Screws).
The centre-board itself can be of wood or of galvanized plate iron and is pivoted at the forward lower corner, and can be raised and lowered by a rod attached to the after corner.
Remember to paint the inside of the boat carefully with at least two coats before putting on the deck, and also that copper nails and brass fittings are better than those of galvanized iron (particularly for salt water) if you can afford them.
The coaming or wash board can be of 1/2" oak, ash, or elm. The deck can first be laid, lapping slightly over the space to be left open. The line for the coaming can then be marked on the deck, and the projecting wood sawed or trimmed to the line, when the coaming can be bent into place and fastened.
The gunwale-strip, like the stern-post, the rudder, and the tiller, should be of hard wood, as oak. Hackmatack is good for the stem.
The mast should be of spruce. A strong thwart, with a hole in it, can be fitted across between the sides, just under the deck, and a block with another hole fastened to the bottom. The place at which to step the mast must depend upon the style of rig you adopt.
One who is used to sailing a boat will not seek for information on this subject in a manual on wood-working, but for the novice it may be well to state that a leg-of-mutton sail (Fig. 448) is undoubtedly the simplest, easiest, and safest rig for the beginner, and it will be wise to learn to manage this rig first. The spritsail (Fig 449), with or without the boom, is an easily managed sail, which works well with this boat. Either of these rigs can be unshipped in a moment, the mast, sail and all being lifted out when desired. For other styles of rigging you should consult someone used to sailing or some book on the subject. For the painting, see Painting, in Part V.

Fig. 448.
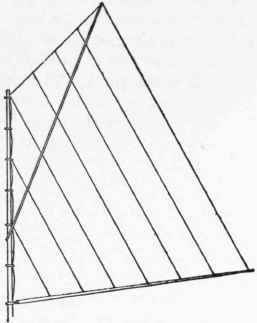
Fig. 449.
Continue to:
My Books

