Small Ice-Boat
Description
This section is from the book "Woodworking For Beginners: A Manual for Amateurs", by Charles G. Wheeler. Also available from Amazon: Woodworking For Beginners.
Small Ice-Boat
The main framework of even the most elaborate ice-boat consists merely of a lengthways centre timber or "backbone" and a cross-piece or "runner-board " (Fig. 450), the whole resting on three runners, one of which acts as a rudder.
Before beginning work read carefully Marking, Rule, Square, Saw, Plane, in Part V., and look up any other references.
A small boat can be made as shown in Fig. 451. The dimensions can easily be altered. The particular rig given is merely for illustration, for this is not a book on sailing, and you can find all the facts you need about rigging in any good book on the subject. If you are a novice you had best be content with a simple leg-of-mutton sail (Fig. 448), which is, for the beginner, the safest and most easily managed. A sprit-sail (Fig. 449) or some other simple form can be used if desired. If you know how to sail a boat, you can adopt such rig as you think best.

Fig. 450.

Fig. 451.
First get out the backbone. Get a piece of clear spruce, or pine, perhaps 12' x 3" x 4". A round spar may be used. Be careful to select good lumber, as great strain is put upon it. A piece which has naturally sprung lengthways should be placed with the convex edge upwards. Next get out the runner-board, perhaps 6 1/2' x 2" x 9", of spruce. Pine is also good, or any strong wood will do. Choose a clear, sound plank. If naturally sprung in a bow-like curve, put the convex side upwards. Smooth the pieces sufficiently to avoid splinters and roughness. Thin the runner-plank on top each way from the centre down to about an inch in thickness at each end, if you can have it sawed at the mill. It is hardly worth while to do this by hand. Fasten the runner-board, at exactly the middle of its length, across the backbone, at a point perhaps 6\' from the stern end, with a strap-hanger (Fig. 452) screwed up with nuts and broad washers on the under side. If you cannot afford this, put a bolt through both pieces
(see Boring), tightening underneath with nut and washer, and putting cleats on the runner-board (Fig. 453). Be sure that one edge of the runner-board is straight and at right angles to the backbone. Nail a piece of board, 18" long and 3" wide, across the stern end of the centre timber. Add the two side pieces a b and c d (Fig. 450), of 2" spruce joist, nailing them firmly in place, thus forming the sides of an irregular box (see Nailing). Turn the frame over and nail a bottom on this box, laying the boards crosswise and nailing to the backbone as well as to the sides and end.
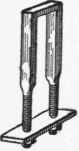
Fig. 452.
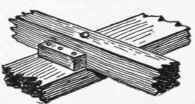
Fig. 453.
Next, to make the runners, get out six pieces of oak, or other hard, strong wood, 9" x 3" x 4". Mark with the square from the straightened edge of the runner-board the positions for the inner blocks, equally distant from the backbone, screwing them in place (Fig. 454), with one screw in each. Measure across with a stick from one to the other at each end to see that they are just parallel, and also test their being at right angles to the runner-plank, which in turn must be at right angles to the backbone, in order that the runners may be parallel and not slewed sideways. Having tightly screwed these inner blocks, brace them with angle blocks, as shown. The outer blocks can next be fitted, leaving just space enough for the runners to play freely, but not loosely, between the blocks. The holes for the pins for the runners can be bored in the outer pieces before they are screwed on. Then, using these holes as a guide, those in the inner blocks can be bored in line. The runners themselves should be carefully made and fitted, for they are a very vital part of the boat. On the large boats they have usually been made of oak, with a shoe of cast iron at the bottom attached by bolts, but this is quite a piece of work for a small boat and you can get the blacksmith to work out the whole runner, with a hole bored for the pin-bolt. Make a pattern about 18" or 20" long, rocking very slightly in the middle and more quickly near the ends. The hole for the pin should be back of the middle, so that more of the shoe will be in front of than behind the pin. This is to lessen the shock when the runner strikes an obstruction. The cutting edge may have an angle of about 450 for trial (Fig. 455). If too blunt or too sharp you can alter it. It will take considerable filing to get the edge true, straight, and uniform (see Filing). Finish with an oil-stone.
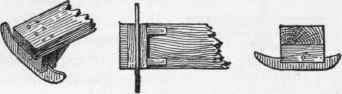
Fig. 454.
Fig. 455.
The rudder-runner can be a little shorter. Screw a piece of 2" oak plank on top of the rudder-blocks and on top of this fasten a plate or socket to which is attached a piece of gas-pipe about a foot long, for a rudder-post. At the top of the rudder-post screw an elbow and a short piece of pipe for a tiller (Fig. 456). If suitable gas-pipe cannot be found, the blacksmith can fix an arrangement that will answer, but it must be strongly fastened to the rudder-blocks, and there should be some kind of metal bearing between the wooden top of the rudder and the under side of the backbone, if nothing more than a washer. The two surfaces of wood should not rub against each other. Wind the handle of the tiller with cord, cloth, or bicycle tape.
Stay the bowsprit (or forward end of the backbone) by stout wires to the runner-plank. These can best be of wire rope passed through eye-bolts or attached to iron straps and tightened with turnbuckles, but to save that expense strong wire can be used. Notches can be cut at the edges of the runner-plank and the backbone, and wire be wound around to hold rings to which the wire guys can be fastened, but it is hard to make such an arrangement taut and to keep it so. Next fasten a mast step with square hole to the backbone (Fig. 457), forward of the front edge of the runner-plank. Put i n eye-bolts at ends of the runner-plank and at the bow for shrouds and a few inches from the stern of the backbone for the main sheet. Wire rope is best for the shrouds, but common wire or rope can be used. For the mast and spars use natural sticks of spruce. The sides of the box can be built up higher at the stern with boards, if you wish, to prevent being thrown off by the sudden movements of the boat. A rubber washer under the backbone where the rudder-post passes through is sometimes used to lessen the jar when passing over obstructions. A curved piece of wood fastened on the under side of the backbone just in front of the rudder will act as a fender for the rudder, in case of slight obstructions.
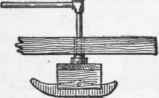
Fig. 456.
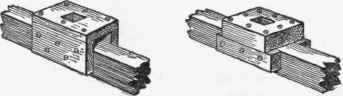
Fig. 457.
The whole boat can be oiled, painted, or varnished if desired (see Finishing and Painting).
If you use a cat-rig, sprit-sail, or other rig without any head-sail before the mast, it would be well to place the runner-plank further forward.

Fig. 458.
The latest and best way to brace the frame of an ice-boat is to strain guys of wire rope (Fig. 458), tightened with turnbuckles, omitting the side pieces, and fastening a car or box to the backbone, but this arrangement, though lighter and more elastic, is more expensive and not so easy to make for a small boat as the one just described.
A somewhat simpler way to arrange the framework is shown in Figs- 459, 460, and 461. In place of the runners already described a cheaper arrangement can be made by the blacksmith of 5/8" bar iron, steeled, and bent up at the ends, as shown in Fig. 461.
A much smaller affair can be made by simply arranging two pieces of joist or plank in the form of a cross (bracing them so far as may be necessary), putting cleats under each end of the shorter cross-piece or runner-board and fastening common skates to the cleats, using another pivoted skate at the stern for a rudder. The runners of the skates should be ground, or filed, as shown above.
The details of such a small ice-boat you can work out for yourself by modifying and simplifying according to your ingenuity the suggestions for a larger boat given above. The hardest part to fix is the rudder-post and tiller. Some iron arrangement is best, but something can be contrived in the following manner, which is not, however, recommended as very satisfactory. Fasten the rudder skate upon a piece of board in which is cut a mortise. Into this mortise a short piece of hard wood, like a large broomstick with squared end, is fitted for a rudder-post. The upper end of the rudder-post, squared just like the lower end, is fitted into a mortise cut in the tiller piece. A washer should be placed between the skate-block and the backbone, and the rudder-post should turn freely in the hole in the backbone, but not loosely enough to wobble around. Cut the mortise in the tiller and fit to the post before cutting off and shaping the tiller, to avoid danger of splitting. An extra block may have to be put under the backbone at the rudder to level the boat so that the skates will bear properly on the ice, for if the stern is much lower, so that they drag by the heels, the boat will not sail properly. Wooden arrangements of this sort are, however, only justifiable as makeshifts, and require good workmanship to be strong and effective.
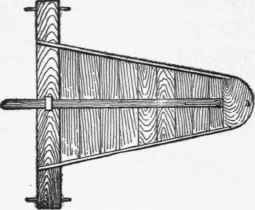
Fig. 459.
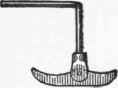
Fig. 460.
Fig. 461.
Continue to:
My Books

