Finishing-Bench. Continued
Description
This section is from the book "Woodworking For Beginners: A Manual for Amateurs", by Charles G. Wheeler. Also available from Amazon: Woodworking For Beginners.
Finishing-Bench. Continued
Hang saws against the wall on pegs, or nails, or at the end of the bench. Hang all tools which you put on the wall well above the bench, to be out of the way.
'Lay planes on their sides or ends, for obvious reasons, or arrange a little block to raise one end of the plane slightly from the surface of the bench or shelf. The last way is usually more convenient than to lay the plane on its side or end. Keep planes either at the back of the bench or against the wall, or on a shelf under the front of the bench.
Such tools as squares, bit-braces, and the like are usually most accessible on the wall, in some such arrangement as shown in the fronti sp iec e . A conv e n i e n t way to arrange such tools as chisels, gouges, and the like, is to keep them in racks either against the wall or fastened to the back edge of the bench, according to circumstances. Keep each tool in a particular place in the rack and you will soon learn to reach for it instinctively without any waste of time.
Bits can be kept in a drawer or box, care being taken to arrange them in racks or between partitions, or they can be stuck on end in the racks at the back of the bench. A good way is to stick each bit point downwards in a hole bored by itself. Various forms of tool-racks, which you can easily arrange for yourself, are suggested in Fig. 93.
Fig. 94 shows a rack to fit on the back of the bench, an excellent way, in common use with movable benches. Get a board, say 3" or 4" wide and the length of the bench, a strip from 1/4" to 1/2" thick, perhaps 1" wide, and the length of the bench, and a strip 1/2" thick, perhaps 1* wide, and perhaps two thirds of the length of the bench. Saw from this last strip a number of blocks from 1" to 2" long. Arrange these along the top edge of the board, according to the kinds and sizes of the tools, as shown in Fig. 95. Then lay the long strip on them (Fig. 96) and nail it through each block with wire nails long enough to reach perhaps two thirds through the large strip. You can put this rack together by first nailing at each end. Then all the intermediate blocks can easily be fitted in place and nailed one at a time. The whole can then be screwed to the back of the bench so that the tools will be at the back (Fig. 94). You can make part of this rack solid and bore small holes of various sizes for bits, gimlets, nail-sets, and such tools, which would drop through the larger spaces. Good metal tool-racks and -holders can be bought, but the home-made ones answer every purpose.
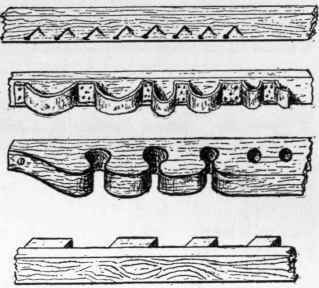
Fig. 93.
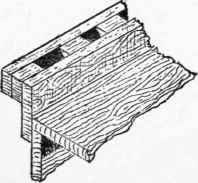
Fig. 94.
The large steel square can be hung very well with nails or small blocks of wood bevelled toward the wall (Fig. 97). For the try-square nail a rectangular block against the wall (Fig. 98). A smaller block nailed in front will hold another smaller square. Slanting saw-kerfs in another block will hold scrapers (Fig. 99). Always keep your oilstones in shallow boxes for protection from dirt. You can easily make one, or cut a depression in a block to fit the stone, with another for a cover. Fasten one end of your strop to a strip of thin board (Fig. 100) with a hole by which to hang it. You can then use the strop lying flat on the board or loose in your hand for curved edges.

Fig. 95.

Fig. 96.
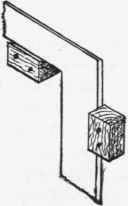
Fig. 97.
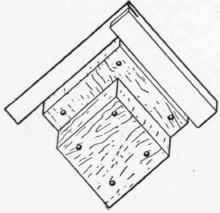
Fig. 98.
Do not keep nails and screzvs after the usual domestic fashion, -all sizes, shapes, and kinds mixed up promiscuously with a lot of metal rubbish and carpet tacks in some old box or pail. You will waste twice as much time trying to find what you want as it takes to keep them in separate boxes, or trays with divisions. A good way is to use either small open boxes or flat open boxes with divisions, so that they can be reached as conveniently as possible. Tin boxes or canisters or pails (of various sizes), such as cocoa, coffee, lard, and such substances come in, are good. Put labels on them and arrange them neatly in some accessible place, as on a shelf over or at the end of your bench, or in a cupboard or a drawer.
Keep scrap boxes for old pieces of metal (iron, brass, etc.? in separate boxes), so that you will know just where to look for what you want. Keep a brush for cleaning off the bench and the work, a broom for the floor, and a box for shavings, sawdust, and chips.
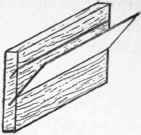
Fig. 99.
Fig. 100.
Any workman is liable to cut or pound his fingers, so have a small box in a handy place with some neatly rolled bandages of cloth, some surgeon's plaster, and a bottle of witch-hazel (hamamelis) or some other preparation for cuts or bruises. In case of a bruise, or if you pound your nail, put your finger at once in as hot water as you can bear. Do not, as is often done, put glue on a cut, because of danger of infection, for the glue is made, as you know, from animal refuse and is not always in a pure state.
Do not leave oily rags lying around in your shop to get wadded into a pile in some corner and catch fire by spontaneous combustion. Either put them in the stove at once, or, if you want to keep a few, put them in a stone jar or covered tin box. Matches should always be kept in a covered metal box in a wood-working shop.
Lay in a supply of strips, waste junks, and odd pieces of wood, which you can usually get at any shop at little or no expense. They will be very useful until you accumulate a stock from your own work.
Continue to:
My Books

