Horizontal Bar
Description
This section is from the book "Woodworking For Beginners: A Manual for Amateurs", by Charles G. Wheeler. Also available from Amazon: Woodworking For Beginners.
Horizontal Bar
A design suitable for the amateur wood-worker is shown in Fig. 265.
Before beginning work read carefully Marking, Rule, Square, Saw, Plane, in Part V., and look up any other references.
First make the upright posts or guides. These are somewhat like a trough in shape, side boards about 6" wide being screwed (see Screws) on the sides of a 2" x 3" joist. Fig. 266 shows sections in the middle and at each end, blocks being inserted at the ends for strength. The joist can be of any strong wood. The side boards, which serve as guides for the bar, had best be of hard wood. Hard pine, oak, maple, ash, or any strong wood can be used. You will require two of the joists and four side boards, all sawed squarely off the exact height of the room.1
The usual way would be to get out the pieces a little too long and, after they are fastened together, to saw off the ends so as to give the required length. Gauge lines on each side of the upright pieces (see Gauge) and intersect these lines at regular distances by others squared across and around three sides of the uprights, thus determining the places for the holes for the pins which hold the bar in position. These can be bored from each side with a -3/8" bit (see Boring).
Another way sometimes adopted when you have one or two stout timbers on hand or already in position for the posts is to screw two upright cleats of plank to the inner side of each timber, thus forming the groove for the bar, as shown in section in Fig. 267.

Fig. 265.
Fig. 266.

Fig. 267.
1You can get this height by taking two sticks whose combined length is somewhat greater than the height of the room. By letting the ends lap over one another in the middle, the sticks can be slipped along on each other until they just reach from floor to ceiling. Hold them tightly together (or fasten them with a clamp) when in this position and you will have the exact length required,
The uprights can now be fastened in place, taking care to have them exactly vertical and in line with each other. The distance apart will depend on the length of the bar. The uprights can of course be mortised into the floor, or the woodwork above, if the conditions admit, but it will usually answer every purpose to hold each end in place by four cleats firmly screwed to the floor or ceiling. It is usually simpler to have these uprights extend to the ceiling, but this is not necessary, and in some cases it may be advisable to brace them to the floor only, by wooden or iron braces, in some of the ways already shown, or they can be guyed with wire rope and turnbuckles.
The bar you had best have made or buy already made, in which case you can arrange the dimensions and position of the uprights to fit the bar. It can be from 5' in length to perhaps 6' 9" (6' is a good length), and should be not less than 1 3/4" in diameter, nor over 2". It should be of the best clear, straight-grained white ash or hickory (air-dried, not kiln-dried).
One having a steel rod for a core is the best. The ends can be left square and bound with a square ferrule or band of iron of the right size to slip easily up and down in the grooves of the upright guides (Fig. 268). Any blacksmith can arrange this, as well as the pins to hold the bar. This apparatus can be finished in the same way as the parallel bars just described.
A suggestion for a post for outdoor apparatus is given in Fig. 269. The post should be set in the ground at least 3' and the earth well tamped down around it with a pointed bar or stick. The lower ends of the braces can themselves be set in the ground or abut against heavier posts set in the ground. This apparatus should be protected from the weather as in the cases described above.
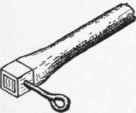
Fig. 268.
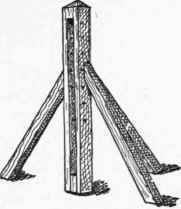
Fig. 269.
Continue to:
My Books

