Shooting-Board
Description
This section is from the book "Woodworking For Beginners: A Manual for Amateurs", by Charles G. Wheeler. Also available from Amazon: Woodworking For Beginners.
Shooting-Board
The shooting-board is very useful for jointing edges, particularly for short, thin stock. The carpenter or cabinet-maker will make you one for a moderate price, or you can make one yourself as soon as you become a good enough workman (see page 93).
To use it, the board to be jointed is laid flat on the raised part of the shooting-board, where it is firmly held with the left hand, with the end of the board pressing against the stop of the shooting-board, and the edge to be jointed lapping over the edge of the raised part. The planing is done with the plane lying on its side on the lower part of the shooting-board (Fig. 677). The cutting-edge of the plane thus being at right angles with the surface of the board, the edge will be planed squarely across. The shooting-board should be fastened on the bench in some way, to prevent it from slipping around.
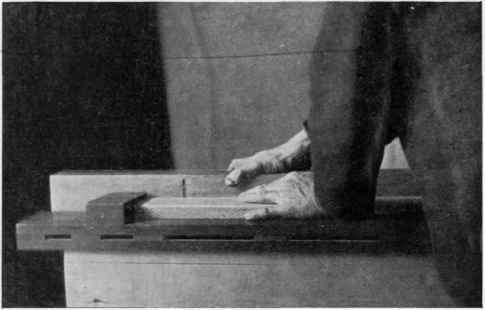
Fig. 677.
Attachments to keep the sole of the plane at right angles to the surface of the piece can be had at any hardware store, and serve the same purpose as a shooting-board for thick stock, but not equally well for thin pieces.
You can reverse the sides of two pieces to be jointed for gluing, as described on page 406, giving a joint like that shown in Fig. 678 (which is exaggerated). The iron of the plane is sometimes purposely set to project unevenly beyond the sole.
Fig. 678.
If you have many joints to make, you can have the edges jointed at slight expense at any woodworking mill on a planer made for the purpose. See Jointing.
Shooting-Board
This is useful for squaring edges and small surfaces and ends with the plane, and for jointing edges, the plane being pushed forward on its side (see Shooting-board, in Part V.). It can be of any wood which holds its shape well. Clear white pine or mahogany is good. If carelessly made it will be of but little use. The stock must be planed free from winding. Several forms are shown in Figs. 122, 123, and 124.
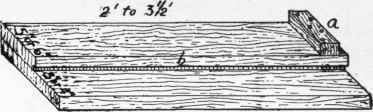
Fig. 122.
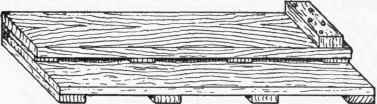
Fig. 123.
Before beginning work read carefully Marking, Rule, Square, Saw, Plane, in Part V., and look up any other references. The construction is plain (Fig. 122). Approximate dimensions are given, Fig. 122 being made of 7/8' stock, Fig. 123 of 1/2" and 1/4" stock, and Fig. 124 of 7/8" stock. Screw the pieces together from the under side (see Screws). See tha.t the stop or cleat a is put on at right angles to the edge b. Mark the lines for this accurately with knife or chisel. A groove is sometimes cut for this stop, but this is a refinement that is not at all necessary if you do your work well. This board must have a rabbet or groove cut out of the upper piece, as shown, to give room for shavings. In Fig. 123 the top board overlaps the ends of the cleats a trifle, which (with the spaces between the cleats) allows the escape of the shavings. Arrange some way to hold the board firmly on the bench. Care is necessary in using the shooting-board not to plane slices from your left hand. Guides, to attach to the plane to ensure square edges, can be bought and used instead of the shooting-board. Some of them are serviceable, particularly those adjustable at various angles.

Fig. 124.
A mitre shooting-board (Fig. 125) is also useful. It requires to be made with even more care than the board just given, but on the same principle. The angular stop or stops must be fitted to make the angles exactly 450. A sawed mitre holds glue better than a planed mitre, but sawed mitres often require trimming with the plane to get a perfect fit.

Fig. 125.
Continue to:
My Books

