167. To Make A Pin (249). Part 4
Description
This section is from the book "Bench Work In Wood", by W. F. M. Goss. Also available from Amazon: Bench Work In Wood.
167. To Make A Pin (249). Part 4
183. Brad-awls are useful in preparing the way for small screws. The cutting edge should always be placed across the grain so that the fibers will be cut, and not simply pressed apart to close up again when the tool is withdrawn. The difference in effect may be seen by comparing, Fig. 214, A, which shows a proper action, with B.
Fig. 214

Exercise No. 15. - Paneling.
This exercise consists in making that portion of the panel door, Fig. 211, included within the rectangle efgh.
Fig. 215 Scale, 3" l'

Side.

End.
Three pieces of stock are required, each jointed to dimensions as follows: stile 1 1/8" X 2 1/2" x 9"; rail 1 1/8" x 2 1/2" x 6 1/2"; panel strip 1/2" X 1 3/4" X 18". The completed exercise is shown by Fig. 215.
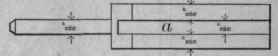
184. In considering the joint between the stile and rail as shown by Fig. 216, three new features will be observed; the groove, or "plow," which is to receive the panel, as shown at a, Fig. 215; the beads f,f; and the mitered corner cd, which allows the parts to be plowed and beaded as shown, without affecting the mortise-and-tenon joint.
Follow the dimensions, and line for the mortise and tenon as in the preceding exercises, supposing the rail to be of the form indicated by the dotted outline d'jc', Fig. 216, and the stile to be of the form indicated by efd. This done, add the lines ec, cd, and c'd', by means of gauge and bevel. Cut the mortise and the tenon, after which plow the groove a.
Fig. 216
Scale, 3" - 1'

Edge. Side.

Plan.
Elevation.
185. No special direction can be given for using the plow (85), except that it is to be used from the working-edge; but it will be safe to practice with it on a piece of waste material before applying it to the work.
Fig. 217

Side.

End.
186. Next, the beads f,f, Fig. 215, are to be formed on the inside edge of both rail and stile, that is, along the edges marked b, Fig. 216. What has already been said regarding the use of the plow, may also be said of the beading-plane (84). The mitered corners are now to be formed by cutting with the back-saw to lines already made, and then the joint between stile and rail, fitted and wedged as in Exercise No. 14.
The frame having been made ready, attention may be given to the panel. The panel strip, already jointed, must be "matched" by forming the tongue b and the groove a, Fig. 217. This operation brings into use the 1/2" match-ing-planes (82), which should first be tried on a piece of waste material. The bead c, Fig. 217, is to be made with a 3/16" beading-plane.
Cut the panel strip into lengths suitable for forming the complete panel, Fig. 218, using either the bevel or the miter box in obtaining the angle of the ends. The fitting of the pieces one to another will be most easily done if they are cut in order, as a, b, c, etc.
Fig. 218
Scale, 3" = 1'

Side.
End.
187. In using the miter-box, Fig. 219, the work a, while resting on the bottom of the box, must be pressed against the side b, in which position, the saw, guided by the box as shown, will cut the piece at a miter. The opposite guide cc may be used in the same manner. By using d the work will be cut off Plan square. To hold the pieces of the panel together, and to fasten the panel to the frame, light brads may be inserted in the oblique ends of the panel strips shown at b, Fig. 215, or, what is, perhaps, better, glue may be used. If the door were complete, as shown by Fig. 211, the panel would have perfect support in the frame.
Fig. 219

Continue to:
My Books

