Moldings, Practical Illustrations In Embellishing Work. Part 3
Description
This section is from the book "Carpentry for Boys", by J. S. Zerbe. Also available from Amazon: Carpentry for Boys.
Moldings, Practical Illustrations In Embellishing Work. Part 3
Lessons From The Doric Column
As an example, suppose we take a plain cabinet, and endeavor to embellish it with the types of molding described, and you will see to what elaboration the operation may be carried.
Applying Molding
Let Fig. 197 represent the front, top and bottom of our cabinet; and the first thing we shall do is to add a base (A) and a cap (B). Now, commencing at the top, suppose we utilize the simplest form of molding, the band.
This we may make of any desired width, as shown in Fig. 198. On this band we can apply the ogee type (Fig. 199) right side up.
But for variation we may decide to use the ogee reversed, as in Fig. 200. This will afford us something else to think about and will call upon our powers of initiative in order to finish off the lower margin or edge of the ogee reversa.
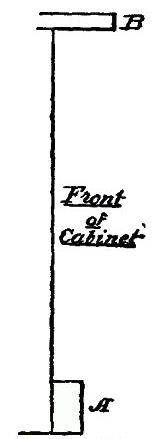 Fig. 197.
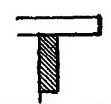 | 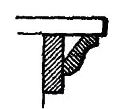 |
Fig. 198. | Fig. 199. |
If we take the ogee recta, as shown in Fig. 201, we may use the cavetto, or the ovolo (Fig. 202); but if we use the ogee reversa we must use a convex molding like the cavetto at one base, and a convex molding, like the torus or the ovolo, at the other base.
In the latter (Fig. 202) four different moldings are used with the ogee as the principal structure.
Base Embellishments
In like manner (Fig. 204) the base may have the casement type first attached in the corner, and then the ovolo, or the astragal added, as in Fig. 203.
 |  |  |
Fig. 200. | Fig. 201. | Fig. 202. |
Straight-Faced Moldings
Now let us carry the principle still further, and, instead of using various type of moldings, we will employ nothing but straight strips of wood. This treatment will soon indicate to you that the true mechanic or artisan is he who can take advantage of whatever he finds at hand.
Let us take the same cabinet front (Fig. 205), and below the cap (A) place a narrow strip (B), the lower corner of which has been chamfered off, as at C. Below the strip B is a thinner strip (D), vertically disposed, and about two-thirds its width. The lower corner of this is also chamfered, as at F. To finish, apply a small strip (G) in the corner, and you have an embellished top that has the appearance, from a short distance, of being made up of molding.
Plain Molded Base
The base may be treated in the same manner. The main strip (4) has its upper corner chamfered off, as at I, and on this is nailed a thin, narrow finishing strip (J). The upper part or molded top, in this case, has eleven distinct lines, and the base has six lines. By experimenting you may soon put together the most available kinds of molding strips.
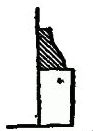 | 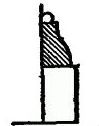 |
Fig. 203. | Fig. 204. |
Diversified Uses
For a great overhang you may use the cavetto, or the apophyges, and below that the astragal or the torus; and for the base the casement is the most serviceable molding, and it may be finished off with the ovolo or the cymatium.
Pages of examples might be cited to show the variety and the diversification available with different types.
Shadows Cast By Moldings
Always bear in mind that a curved surface makes a blended shadow. A straight, flat or plain surface does not, and it is for that reason the concaved and the convexed surfaces, brought out by moldings, become so important.
 Fig. 205.
A little study and experimenting will soon teach you how a convex, a concave or a flat surface, and a corner or corners should be arranged relatively to each other; how much one should project beyond the other; and what the proportional widths of the different molding bands should be. An entire volume would scarcely exhaust this subject.
Continue to:
My Books

