Chapter X. An Analysis Of Tenoning, Mortising, Rabbeting And Beading
Description
This section is from the book "Carpentry for Boys", by J. S. Zerbe. Also available from Amazon: Carpentry for Boys.
Chapter X. An Analysis Of Tenoning, Mortising, Rabbeting And Beading
In the chapter on How Work is Laid Out, an example was given of the particular manner pursued in laying out mortises and tenons, and also dovetailed work. I deem it advisable to add some details to the subject, as well as to direct attention to some features which do not properly belong to the laying out of work.
Where Mortises Should Be Used
Most important of all is a general idea of places and conditions under which mortises should be resorted to. There are four ways in which different members may be secured to each other. First, by mortises and tenons; second, by a lap-and-butt; third, by scarfing; and, fourth, by tonguing and grooving.
Depth Of Mortises
When a certain article is to be made, the first consideration is, how the joint or joints shall be made. The general rule for using the tenon and mortise is where two parts are joined wherein the grains of the two members run at right angles to each other, as in the following figure.
Rule For Mortises
Fig. 206 shows such an example. You will notice this in doors particularly, as an example of work.
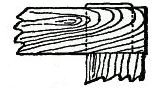 Fig. 206.
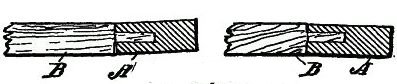 Fig. 207.
The next consideration is, shall the mortises be cut entirely through the piece? This is answered by the query as to whether or not the end of the tenon will be exposed; and usually, if a smooth finish is required, the mortise should not go through the member. In a door, however, the tenons are exposed at the edges of the door, and are, therefore, seen, so that we must apply some other rule. The one universally adopted is, that where, as in a door stile, it is broad and comparatively thin, or where the member having the mortise in its edge is much thinner than its width, the mortise should go through from edge to edge.
The reason for this lies in the inability to sink the mortises through the stile (A, Fig. 207) perfectly true, and usually the job is turned out something like the illustration shows. The side of the rail (B) must be straight with the side of the stile. If the work is done by machinery it results in accuracy unattainable in hand work.
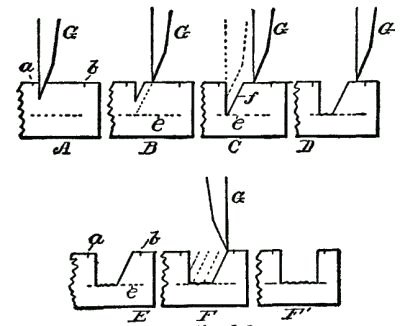 Fig. 208.
True Mortise Work
The essense of good joining work is the ability to sink the chisel true with the side of the member. More uneven work is produced by haste than by inability. The tendency of all beginners is to strike the chisel too hard, in order the more quickly to get down to the bottom of the mortise. Hence, bad work follows.
Steps In Cutting Mortises
Examine Fig. 208, which, for convenience, gives six successive steps in making the mortise. The marks a, b designate the limits, or the length, of the mortise. The chisel (C) is not started at the marking line (A), but at least an eighth of an inch from it. The first cut, as at B, gives a starting point for the next cut or placement of the chisel. When the second cut (B) has thus been made, the chisel should be turned around, as in dotted line d, position C, thereby making a finish cut down to the bottom of the mortise, line e, so that when the fourth cut has been made along line f, we are ready for the fifth cut, position C; then the sixth cut, position D, which leaves the mortise as shown at E. Then turn the chisel to the position shown at F, and cut down the last end of the mortise square, as shown in G, and clean out the mortise well before making the finishing cuts on the marking lines (a, b). The particular reason for cleaning out the mortise before making the finish cuts is, that the corners of the mortise are used as fulcrums for the chisels, and the eighth of an inch stock still remaining protects the corners.
Continue to:
My Books

