Folding Game Table
Description
This section is from the book "Shop Projects Based On Community Problems", by Myron G. Burton. Also available from Amazon: Shop Projects Based on Community Problems.
Folding Game Table

Materials
Chestnut (Chap. III., Par. 35) or any soft wood.
Sufficient number of pieces to make 1/2"x31"x31" S 2 S Top.
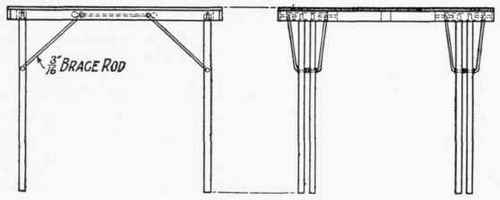
2 pcs. 7/8"x2 "x30" Top braces.
4 pcs. 13/8"xl3/8"x27" Legs.
2 pcs. l 3/8"xl 3/8"x 9" Leg braces.
1 pc. 1 3/8"xl 3/8"xl8" Center braces.
2 pcs. 1 "x3 1/4"x25" Cross braces. 12-1 3/4" No, 10 F. H. B. Screws.
3 pr. Hinges.
36-1/2" No. 6 F. H. B. Screws. 2-2 1/2" No. 12 R. H. Blued Screws.
3-1 3/4" No. 12 F. H. B. Screws. 10-1 1/4" Brads.
Introductory Statement
The need of some sort of small, easily handled table quite frequently arises in connection with games or sewing work. A folding table which will occupy but little space when closed and can readily be moved from the house to the porch or lawn is a handy article of household furniture.
This table is sufficiently large to be quite serviceable, and while it cannot be expected that a folding table will be as rigid as one which is permanently built, yet if carefully constructed it will be reasonably solid.
References:
Home Furniture Making, G. A. Raeth. Fredrick Drake Co., Chicago. Mission Furniture - Part III., Windsor. Popular Mechanics Co.
Folding Game Table

Suggestions For Original Design
Folding Game Table Specifications
The Top
As the top is to be made of several pieces glued together, you should prepare it first in order that the glue may have plenty of time to dry. The edges of these boards must be perfectly fitted. These should be joined with dowels, but the dowels are sometimes omitted. However, the top will be very much stronger if the dowels are used. As this material is furnished S 2 S, and since it will be necessary to resurface it after it is glued, you will not need to resurface it now. Carefully plane the edges of all the pieces (Chap. II., Par. 4). Lay the pieces in position on your bench top and press them closely together to see whether all the joints fit perfectly. When they are properly fitted, lay out and bore for the dowels (Chap. II., Par. 18). Glue the top. Clamp it and leave it to dry for at least twelve hours. All surplus glue should be cleaned off before it hardens.
The Skirt Boards
The skirt boards serve as battens to hold the top perfectly straight. Square the stock for these pieces very carefully (Chap. II., Par. 2, 3, 4). Resurface them on all sides. Cut them the required length and shape at the ends. You will note from the drawing that the skirt boards are to be fastened with screws. You will also observe that these screws are buried in the edge of the skirt board about half its width. In spacing the screws arrange them so that none will strike the joints in the top. These holes must not be bored too deep or they will allow the screws to extend entirely through the top.
Continue to:
My Books

