Slide-Rest Work In Metal. Part 4
Description
This section is from the book "Turning Lathes", by James Lukin. Also available from Amazon: Turning Lathes: A Guide to Turning, Screw Cutting, Metal Spinning and Ornamental Turning.
Slide-Rest Work In Metal. Part 4
One precaution has always to be taken, in order to produce two edges equally sharp, and that is, to keep the front line formed by the two faces, and which will be upwards when grinding the last face, in the "run" of the grindstone. It does not follow that the line in question will be in the centre of the tool, because it is to be clearly understood that there is no restriction as to the direction of the edges. Fig. 20, A, B, C, may represent the grindstone forming the third, or top, face - the back of the tool, being, of course seen. Then it may chance that, to get the middle line between the front faces right in the run of the stone, the bar may have to lie like B or C; for it may seem convenient to grind the first edge like the left hand of D, all on one side, so that the second edge, making 120deg. with the first, may lie square across the end of the bar. When the tool is reversed, it will have to lie as seen at C, or the edges will not be equally sharp. Such a tool, having its leading edge very much to one side, may be useful on the side of a flange or shoulder. The position of this leading edge is the first consideration. It will depend on the work: is the tool to cut more towards the right or left, or straight ahead? Grind that face to suit the case, and then grind number two at 120deg. 90deg., or, for a small corner, 60deg., or 55deg. for screw-cutting, and then the top face at such a slope or rake as to give the cutting edges desired. Consider, also, if you are likely to find in the way any part of the tool edge that will not be actually engaged. Generally speaking, only a small part of the edge is in cut. Then, if you like, file away all that is of no use. Never mind the shape thus produced: all you want are the edges.
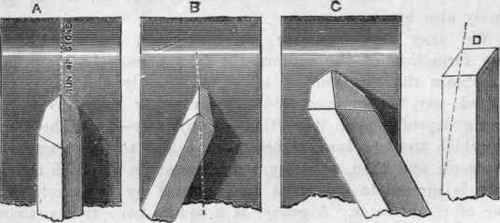
Fig. 20. - Grinding the TOP Face.
It is very advisable that every turner who wishes to take up this Haydon bar, and to work it thoroughly, should begin by what may be called the normal tool for outside work on cylinders. This is the simplest of the many possible forms; the angles are of a size easily remembered, and the work which it will do is of the very best. The front angle, formed by the meeting of the lower faces, is to be 120deg., and the angle made by the front line with the top face is to be 55deg., giving 60deg. as the angles of the edges. A notch in a sheet of tin, made by two three-square saw files held together, will make a gauge for 120deg.; a second notch made by one such file will be 60deg.; and a third notch, marked for 60deg. by a bit of tin filed to fit the 60deg. notch, and then cut a little within the marks, will serve nearly enough to measure the profile of 55deg. Of course, it may be done with mathematical accuracy, by means of a proper protractor, but the plan suggested serves fairly well as a workshop expedient. In grinding the two faces, the clearance may be stated at 3deg., as it has been shown that the smaller this angle is the better. After grinding to gauge, give a rub, face down, on an oilstone, and also take off with it the extreme point, rounding it just visibly and no more. This tool will, if rightly placed, do the finest and most beautiful outside work, needing no further finish of any kind. To place it, gauge height by the Lathe centre, after the bar is fixed in the rest, pushing up the cutter in the sling until it is exact to height; then clamp it by the screw. To adjust it now to the work, remember the principle is to be carried out of two edges - a leader to cut down the shoulder, and a follower to cut the shaving from the cylinder in such a manner as to leave it perfectly smooth, and, if desired, as bright as a looking-glass.
For this the follower is to lie almost parallel to the work, but not quite so. About two-thirds of that edge may, in fact, be allowed to cut. If the result is not a continuous shaving clean cut, examine for the cause, specially for the following - viz., too great clearance angle, and the tool point too high or too low; the latter, having, perhaps, resulted from screwing down the bar in the tool-holder, after adjusting height of centres, with the bar merely lying upon the rest. Also, see to possible softness of the tool, a defect often overlooked. Nothing has, indeed, been said about hardening and tempering the cutters; but this is a matter of necessity, and a very easy one to accomplish. Just heat each, after forming it, to a full red, and drop it in a basin of water. This gives perfect hardness; and, though brittle, the tools will, with ordinary work, seldom break. But they are easily let down a little by heating a bar of iron, or shovel, red hot, and placing them on it until they take a light straw colour, or deeper straw, beginning to verge into blue. Then drop again into cold water, and they will stand well upon most bars of rolled iron. The latter may itself cause broken and short shavings, owing to cracks and defects; but, after a little practice, it will soon be seen whether this or the tool is at fault.
Never rest satisfied with bad work or hitching, chopping, scraping, or anything but an evidently clean cut. If not obtained, the grinding is faulty, or the tool badly placed. When both these conditions are correctly carried out, the tool cannot possibly fail to work well.
After thoroughly getting hold of both the principle and practice, by the use of the normal tool, another simple form should be tried - e.g., one ground to 90deg front angle and 45deg. top rake, which is exactly the graver used as a double-edged tool, instead of as a single-edged one, as it is when used by hand in the way already described. Then, taking the normal tool as a foundation, file away one edge almost to nothing, taking a great sweep out with a round file, and you have a tool for the side of a shoulder or an odd corner. File out both sides till you get a parting tool - and, in fact, see how many useful shapes you can obtain out of that one plain tool. You thus learn, step by step, the real value of the cutter-bar system. Even workmen who have never heard of double edges, or who scorn to depart from their ancestral inheritance of rule of thumb, do unconsciously adopt the principle when they give more top rake to that side of a round-end tool that is leading. They set the tool "end on," at right angles to the Lathe bed, and then find it cuts badly, unless the leading edge is higher than the other.
It is a rule in double-edged tools that, if any difference of acuteness exist, this extra sharpness of the leading edge shall be secured by leaning the tool slightly over in grinding the top face. But not only is this the case, but, whether recognised by the workman or ignored, it is a fact that nearly all his tools are double edged, and, in fact, must be so, unless he is content to tear off the shaving instead of cutting it. If a shaving has breadth and thickness (and some are of considerable thickness), it must be cut in two directions, and, therefore, two edges are a necessity, although they may be, and are, often disguised by being rounded off into each other. It is much better to admit this fact, and then to think out the result of it.
A workman thus using his intelligence will soon prove a better practical workman than he was before. There has been a vast amount of prejudice in this matter, which still exists to some extent, because a latheman who has learnt practically how to grind a tool, and how to use it, will not listen to any theory of why the tool in question was to be so ground or placed. But the result is that a great deal of Lathe work is very badly done, and that if any unusual job of turning is called for, demanding a special tool, the workman is at his wits' end to produce it; and if any tool works inefficiently, it very often happens that the latheman has no knowledge of where the fault is.
Technical schools are doing something to rectify matters; and probably before long the rule of thumb will find itself deposed, and that workman will get the highest wages who understands the theory of cutting tools, and can reduce it to practice.
Continue to:
My Books

