Exercise XI. Towel Rails
Description
This section is from the book "Wood Turning", by George Alexander Ross. Also available from Amazon: Wood Turning.
Exercise XI. Towel Rails
Material: Birch, oak, ash, cherry, or maple
In the figure is shown the assembly drawing of this piece of work. The student should study out the pieces from it, instead of having a detail drawing of each piece.
In regard to the "arms" or pieces that support the arms, the worker will notice that they are pieces which are turned up on centers, and previous instruction will suffice for these. The balls on the supporting pieces are turned in the same manner as that given in connection with the convex curve on the upright piece of the candlestick, Figs. 54 and 69. The curves are pared, using a right and left cut; the shape of the balls is judged by the eye instead of using a templet.

Fig. 67.
To turn a ring. The ring is turned in the following manner: The stock is prepared by cutting off the corners. The face plate or screw-center chuck is then fastened directly on the piece, care being taken to see that the screws are not placed into that portion of the piece from which the ring is to be cut.
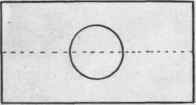
To make the templet. The templet is made by boring a hole of the exact diameter, through a thin piece of stock; the piece is then cut in halves, as shown by the dotted line in Fig. 68.
When everything is ready, screw the face plate on to the spindle of the lathe, set the rest, and turn off the outside to the required diameter and also "face" off the side of the piece. The next step is to measure in from the outside edge the thickness of the ring, and then cut away as much of the surplus stock from the center as is possible without striking the screws. Round off the corners, using the templet frequently so that the correct shape may be obtained. In Fig. 69 is shown the piece ready for rounding.
When the ring is formed as far as it is possible to do so on the first side, sandpaper it smooth; then take it from the face plate and chuck it.

Fig. 68.

Fig. 69.
To chuck the work. The scheme of chucking will be understood from Fig. 70. When the piece is chucked, cut out the center and proceed to finish the ring. Care should be taken to see that the "section" of the ring is a true circle.
When all the rounding is done, sandpaper, and then flatten off the side as shown in the drawing. Finish by using any of the finishes given in the Appendix.
Continue to:


