Chapter V. Bench Work. Exercise I. Marking, Sawing, And Chiselling
Description
This section is from the book "Manual Instruction: Woodwork. The English Sloyd", by S. Barter. Also available from Amazon: Manual Instruction: Woodwork.
Chapter V. Bench Work. Exercise I. Marking, Sawing, And Chiselling
Tools Used
Small try-square, say 4 1/2-in. blade; marking gauge; tenon saw, 10-in. blade; 1/2 -in. or 3/8 -in. firmer chisel, and the 2-ft. jointed rule.
Material Required
A carefully machine-sawn piece of wood, 11 ins. long, 2 ins. wide, and 7/8 in. thick, is to be finished, as shown in fig. 97.
The preparation by the pupil of his own wood at this stage is not advisable, as the operation is too difficult, and the danger of spoiling timber consequently great.
Measure the wood to test its dimensions, and then proceed to make a drawing, fall size or to scale, of the completed exercise. At first only the outline of the plan, side elevation, and isometric projection should be executed. This makes a picture of the piece of wood as given from three aspects. Now mark off 5/8 in. from one end, and draw a line across the plan at right angles to the side. Repeat this to the end of the plan at intervals of 5/8 in., and project the lines half way into the side elevation. Mark off the isometric projection in the same way.
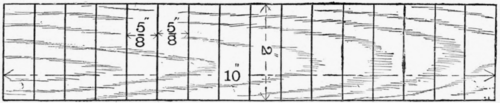
Plan.

Side elevation.

Isometric projection.
Fig. 97.
From Series IV. 'Hand and Eye Training' Cards, by kind permission of Messrs. Cassell & Co., Ld.
Care should he taken to impress the pupil with a proper understanding of the values of the divisions of the rule, and he should be made to add each 5/8 in. to the next 5/8 in., as he marks off each division, and shown that this equals 1 1/4 in., 1 7/8 in., 2 1/2 ins., and so on to the end.
Select the better side and the better edge of the wood and mark from these always. These are called the face side and face edge, and it will be found very useful to make all measurements on the face side from the face edge, and on the face edge from the face side.
This is of great importance and must always be adhered to. When once chosen, the face side and edge should be marked in pencil, to distinguish them.
The wood should now be placed in the vice, and the divisions marked off on its face side, as in the drawing of the plan. To do this the stock of the square should be held firmly against the wood, and the blade kept down with one finger, as shown in fig. 98.
Having measured off the first 5/8 in., commencing from a cut line about 1/4 in. from the end, place the point of the chisel at the further edge, with the face towards the square. Bring the square gently up to the chisel and draw this firmly to the other side, making a good clean cut. It will be seen that the handle of the chisel slopes away from the operator in this movement. If the chisel sloped the other way, the mark made would be a scratch instead of a cut, and would damage the surface of the wood.
Now take the wood out of the vice. Re-insert and screw it up again with the face edge upwards.
The next operation is gauging, and the adjustment and use of this tool should be carefully taught here.
The gauge is a tool which requires to be carefully set before using. The edge of the sliding block must be placed at the required distance (in this case 7/16 in.) from the spur or tooth. The adjustment of the gauge is not as a rule accurately done by boys, unless they .are properly taught, and it will be found well to teach the whole class collectively to carefully follow the instructor as he manipulates his gauge.

Fig. 98.
The tool should be held in the left hand throughout the operation of adjusting and using it. This is not essential, but will be found an invaluable rule to prevent confusion in the methods adopted. Loosen the screw with the right hand (fig. 99), till the block can be moved up and down the stem, by tapping the latter on the bench at either end, as required. Measure the distance required (fig. 100), and having obtained this correctly, secure the block with the screw. Now compare with the rule to finally test accuracy before use.

Fig. 99.

Fig. 100.
Having adjusted the gauge, mark a line down the length of the wood which will be at mid distance from the face side and back (fig. 101). To do this, hold the block of the gauge firmly against the face side, with the spur lightly touching the wood. Still holding it well up, push the gauge to the other end of the wood, making a fine cut with the spur. Repeat if the cut is not deep enough, but do not make it too deep.

Fig. 101.
Now with the chisel mark off lines similar to those on the face down to the gauged line, and commencing from the ends of the lines on the face - in fact, a continuation of them on the edge, but only extending to the gauged line. Now take the wood out of the vice, and again screw it up with the face side upwards.
Saw off the waste piece at one end and then proceed to saw across the grain along the lines already marked and down to the gauge line. Observe the method of holding the saw (fig. 102), and be careful to extend the forefinger and firmly press it against the back. Place the left hand on the wood, as shown, and raise the thumb to steady the saw as it enters. A later illustration (fig. 170) shows this better. In sawing a certain amount of wood is cut away as sawdust. This is called the curf, and care should be taken to make this waste occur in that part of the wood which is not wanted - in this case the grooves.

Fig. 102.
The sketch (fig. 103) shows the position, a, of the saw as it enters the wood. When once a cut is made, the handle of the saw should be gradually lowered, causing the plane of the edge to pass successively through b b till it reaches c, in which position the blade should be kept till the cut is deep enough. The dotted lines show that at the commencement of sawing the strokes are short, but when the saw arrives at c c, good free horizontal strokes, using the whole length of the blade, should be maintained.
Short strokes, and forcing the saw too hard, are common faults. Of course the saw should be held perfectly upright when in use.

Fig. 103.
Now pare out the waste wood with a chisel. To do this well, the operator should stand in a firm position, with his legs, say, a foot or more apart, and should lean with the whole of his left forearm against the top of the vice. The butt of the chisel should press against the back portion of the right palm, with the fingers holding it firmly and easily, as in fig. 104. The left hand should hold the chisel to steady and guide it.
After paring nearly down to the gauge line by successive planing cuts, turn the wood round in the vice and finish from the other side. This reversing will be found of great assistance in getting the bottom of the groove flat.

Fig. 104.
Continue to:
My Books

