The Surface
Description
This section is from the book "Turning And Mechanical Manipulation", by Charles Holtzapffel. Also available from Amazon: Turning and Mechanical Manipulation.
The Surface
The irregular surface at the end of the cylinder, may be turned flat and true with the gouge, held after the manner for softwood. Surfaces of small diameter, are turned with a smaller gouge, also lying on its side with its cutting bevil in coincidence, but held in the horizontal manner; the tool is pushed forward to the center, sliding against the left thumb, which serves as a stop to keep it in position. The manipulation does not materially differ from that for softwood, but more care is necessary to keep the bevil in coincidence, the hardness of the material giving the gouge a tendency to slide away from the cut.
A strong point tool is also convenient and much used, for first roughing the surface. For large surfaces the rest is placed rather high, that the point tool either in a long or short handle, may be held a little underhand; for smaller surfaces the tool is presented more nearly horizontally. In either position, it is supported on the front edge of the rest, the face radial and slightly tilted on the left under corner of its shaft, with the left cutting bevil in contact with the work; gently twisting the shaft, varies the tilt, causing the edge to cut a shaving of greater or less thickness. Thinner finishing shavings, result from simple pressure of the cutting edge given by both hands, or, when the tool is held much underhand, by the pull of the left upon its shaft.
Fig. 411. Fig. 412. Fig. 413.
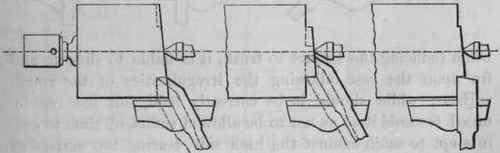
The irregular end of the cylinder forming the surface, is not usually at right angles to its axis, exaggerated in fig. 411, the first contact with the tool therefore varies, being deep on the one side and perhaps missed on the other; such a surface is turned true a small width at a time. The point tool is first held to the work, with about a quarter, or three eighths of an inch of its cutting edge advanced to be within the margin. The tool is then made to travel, by pressure, laterally upon the rest, towards the end of the cylinder, its shaft retained in the same position; until, first engaging against the high side, which the intermittent cutting gradually reduces to the level of the low side, it has cut a ring sufficiently deep to become a true plane all around the edge of the surface. The point tool is then advanced towards the center to cut a second ring, in moderate surface agreement with the first, fig. 412, and so on until it reaches the center. If the tool be insufficiently held while reducing the surface to truth, it is liable to slide to and fro upon the rest following the irregularities of the rough surface; while should it be correctly held, but too rapidly urged towards it so as not to be allowed sufficient time to cut, it is apt to catch against the high side, tearing the surface or perhaps forcing the work out of the chuck. The irregular surface end of smaller work, may also be reduced to truth with the flat, or other rectilinear edged tool, fig. 413, applied upon the end of the cylinder. The left corner of the cutting edge is placed to fall within the lower angle formed by the face and the end of the cylinder, and the tool, held in the horizontal manner, is gradually advanced cutting continuously down to the center.
Fig. 414. Fig. 415. Fig. 416.
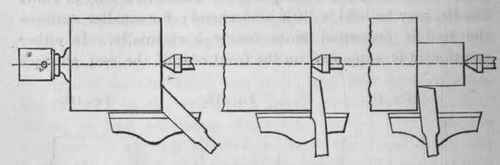
The rough surface produced by any of the foregoing methods, may then be turned smooth and flat, first by connecting the separate rings turned upon it nearly to one level, still by separate cuts, under the guidance of the straight-edge; and then b y continuous shavings, obtained by traversing the slightly tilted point tool, to and from the center. The bevil, right side, and side of the flat tool, figs. 414 to 416, are also used to finish the surface, the last, when it abuts upon a cylinder. When the work is supported by the popit head, the point or the bevil tool may cut quite to the center, but the cut is not then allowed to obliterate the center mark in the wood; the point of the popit head being slightly advanced, as the reduction of the surface requires it.
The surface is finished by a series of cuts, taken alternately from the center, halfway or two thirds towards the circumference and from the latter, over the remaining distance. The thickness of the shavings taken by each pair of cuts, being made gradually to diminish as they overlap each other, by reduction of pressure, by raising the handle, or reducing the tilt, according to the tool used; so that an equal amount is removed all over the surface, every time it is completely traversed by the tool. The traverse being also slightly quicker near the center and lingering near the circumference, to agree with the varying surface velocities, to equalize the amount of cutting action. Work that does not require the support of the popit head, may have the surface roughed in the manner already described, but is usually finished with the flat tool, with the rest placed at right angles fig. 417, or, with the flat tool supported on the arm rest.
Fig. 417. Fig. 418. Fig. 419.
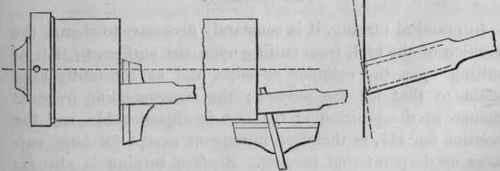
The flat tool lies flat upon the tee rest, but to prevent its corners leaving marks upon the work, the straight cutting edge is presented to the surface at a slight horizontal angle, nearly imperceptible except by its effects, but carefully maintained throughout the traverse. As the flat tool advances from the center, the cutting edge is inclined to give it a trifle more penetration at the right hand corner, exaggerated for illustration, fig. 419; the cutting action entirely ceasing about two thirds up the edge towards the leading corner, which is just free of the surface. In travelling from the circumference towards the center, the inclination is reversed, the left hand corner having the most penetration; a slight motion of the wrist reversing the inclination of the tool for each pair of cuts. When the surface approaches completion, the last finishing cuts are made to remove very thin shavings overlapping each other, with the horizontal inclination of the tool no more than sufficient to prevent the leading corners marking the work. In all the cuts starting from, or terminating at the center, the right hand corner of the cutting edge is placed exactly to it, and neither above nor below it; either of which positions, leaves a portion of the surface at the center standing above its plane, as high as the thickness of the shaving removed.
Continue to:
My Books

