Milling Cutters. Part 6
Description
This section is from the book "Modern Shop Practice", by Howard Monroe Raymond. Also available from Amazon: Modern Shop Practice.
Milling Cutters. Part 6
Backing Off By An Eccentric Arbor
An arbor may be made having a pair of centers located to give the cutter tooth the required amount of clearance; such an arbor is shown in Fig. 221. The eccentric centers are shown at the sectional portions at the ends. The amount of eccentricity depends somewhat on the size of the cutter to be backed off, but for cutters not exceeding 4 inches in diameter, from 3/16 to 1/4 inch will give excellent results.
Fig. 221. Special Arbor lor Backing Off.
The screw at the end of the arbor should be of a fine pitch, about 12 threads per inch for arbors one inch in diameter. The object in cutting a fine-pitch thread is that the cutter, being backed off, can be held more securely with the same amount of force exerted in tightening the nut; again, the depth of the thread is not so great as for a thread of coarser pitch, and, as a consequence, the plane portion at the end of the arbor, which is made the size of the bottom of the thread, can be left large enough to get in a center hole of good size having 1/4-inch eccentricity.
Fig. 222. Eccentric Arbor for Backing-Off Cutter.
The spline should be cut at least 1/8 inch wide and about 1/8 inch deep; the walls of the cut should be parallel in order that the screws shown in Fig. 222 as passing through the collar and entering the slot in the arbor, may have a good bearing. These screws are to keep the collar from turning when the necessary force is applied to the nut for fastening the cutter in place. The collar on the opposite side of the cutter has a spline cut the same width as that in the arbor, and it is held in position by a spline, as shown. The cutter itself cannot be held by a spline, as it is necessary to move it each time a tooth is brought into position for backing off.
The cutter blank, when machined, is given the desired shape by means of a forming tool. If there is much variation in size, the shape should be roughed out before using the forming tool. After it has been machined to the desired size and shape, the cutter should be placed between the centers of the milling machine and a number of grooves cut its entire length. The number of grooves must correspond to the number of teeth the mill is to have; the grooves cannot be cut to finish width until after the teeth are backed off, because the forming tool cuts a trifle deeper at the point of contact, making it necessary to mill a small amount from the face of the tooth after backing off. The grooves are sometimes cut with a thin milling cutter, or a metal slitting saw 1/8 inch thick. When a groove of this description is cut, the cutter has the appearance shown in Fig. 223. A groove of this form makes more work for the operator than one cut as shown in Fig. 224, in which the distance across the tops of the teeth is decreased by using an angular cutter of the shape shown in Fig. 225.

Fig. 223. Cutter Blank with Straight Grooves.

Fig. 224. Cutter Blank with Grooves Made by Angular Cutter.
After the grooves have been made, the cutter is placed on the eccentric arbor, which is held between the centers of the lathe in the ordinary manner. A forming tool that will produce the desired shape of tooth is placed in the tool post; the top face of the tool must be set at the exact height of the center of the lathe in order to produce the proper shape. Fig. 226 shows an eccentric arbor in a lathe in position to back off the teeth in a formed mill. The arbor is operated by means of the lever, and is entirely independent of the spindle in its action, the eccentric centers being placed on the centers of the lathe, and the necessary motion given by means of the lever which strikes the carriage at the end of the stroke. In order to avoid bruising the lathe, a strip of leather is attached to the lever, as shown.
To set the cutter tooth in the proper location before backing off, a piece of thin sheet metal is placed on the top face of the tool, as shown in Fig. 227. The lever is brought down upon the carriage, the tooth of the cutter is brought down upon the sheet metal, and the nut is tightened. The tooth to be backed off is the one below that set to the thickness of the strip above the tool. The object in raising the tooth a given distance above.the face is to prevent striking the tool at the end of the stroke. This operation must be repeated for the setting of each tooth before backing off. The forming tool is fed by means of the cross-feed screw; a tooth is backed off nearly the desired amount, leaving a little for a finish cut; the tool is withdrawn, the nut loosened, and the cutter turned on the arbor to bring the next tooth in position to be backed off, this operation being repeated until all the teeth are backed off alike. The amount of backing off must be determined by the cross-feed stop or by a graduated dial on the cross-feed screw. After the roughing cut has been taken on all the teeth, the forming tool should be sharpened by grinding or by oil-stoning, and the finish cut taken on the teeth.
Backing Off By Stud In Faceplate
Another method of backing off cutter teeth is shown in Fig. 228. A stud is screwed in the faceplate of a lathe near the outer edge, as shown. The cutter, which must be a fit on the stud, is clamped by means of the nut. The finger A is movable in the slot in the stationary block B, which is so located on the faceplate as to bring the tooth to be backed off into its proper location, and to keep it from turning during the operation. The forming tool is fed in gradually until the tooth is formed. The finger is then disengaged from the space in the cutter, which is revolved by means of the set screw until the next tooth is in position. Each tooth is machined separately; that is, the forming tool is fed in the required distance for each tooth when it is in position, the cutter is turned until the next tooth is in position, and the process repeated until each tooth has been backed off. In backing off cutters in this device, it is necessary to cut the notches (the spaces between the teeth) somewhat wider than the teeth.
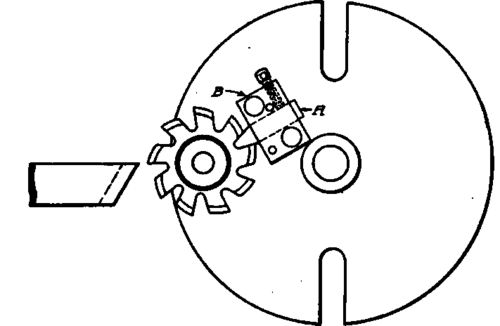
Fig. 228. Set-Up for Backing Off Cutter on Faceplate.
Continue to:
My Books

