Filing And Setting Saws. Part 3
Description
This section is from the book "Spons' Mechanics' Own Book: A Manual For Handicraftsmen And Amateurs", by Edward Spon. Also available from Amazon: Spons' Mechanics' Own Book.
Filing And Setting Saws. Part 3
In order to get the correct pitch of the tooth, the loose bushing, through which the file carrier passes, must be perfectly free, and by pressing the file down between the teeth, you have the pitch. This bushing is held in its proper position by a set screw. Always file from the handle toward the point of the saw, and never press down upon the file when it is being drawn back. Having filed one side of the saw, it should then be reversed with the handle at the left. Then swing the handle of the file to the left, bringing the file across the saw to the correct bevel. The pitch of the tooth is again to be obtained as before. The price, including 1 file, is 20s. It is sold by Churchills.

The files employed for sharpening saws include flat (" mill "), triangular, round (for gulleting), and special shapes, varying of course in size and in grade of cut. The width of the file should always be double the width of the surface to be filed. Preference is given to files in which the grade of the cut (distance between the teeth) increases progressively from point to heel; with this exception, hand-cut files are esteemed superior to machine-cut. For small teeth set at 60° it is convenient to use a file which will sharpen the back of one tooth and face of the next at the same time. "Float" or single-cut files are the best. Double-tapered triangular files are not to be recommended; when used, they should have a button at the point end. Files for band-saws are made with rounded angles to suit the gullets of the teeth. Order and regularity in filing are essential. Common rules for filing are : (1) File the faces before the backs; (2) if the teeth are to be square, file in regular succession - 1, 2, 3, 4; (3) if they are to have fleam, file 1, 3, 5, 7 to right, and 2, 4, 6, 8 to left; (4) file the fronts of all teeth set from you, and the backs of those set towards you. (Grimshaw.)
In sharpening saws by means of emery wheels, the speed of the wheel has great influence on the cutting action. The coarseness or fineness of the grit composing the wheel must be suited to the nature of the work. The average speed of periphery adapted for most purposes is 4500-C000 ft. per minute, the slower speed being for wheels of 12 in. diam. and less. These wheels are only employed satisfactorily on large circular saws.
Setting, whether of the bent or spread kind, is performed both by simple hand-tools, and by more modern and complicated appliances.
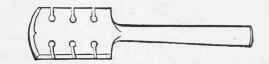
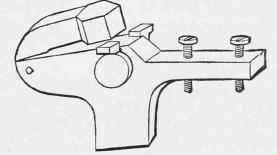
(a) In bent setting by blows, the saw is laid nearly flat with its teeth along the ridge of a round-edged anvil held in a vice, of varying curve to produce an angle suited to the character of the saw, or the saw blade is gripped in a horizontal vice close to the ends of the teeth. Alternate teeth are then struck in a most careful and uniform manner with a peculiar hammer, the object of the blow being to bend every tooth in exactly the same degree sideways. When half the teeth have been so treated, the saw is reversed, and the second half are similarly served, only in the opposite direction. There is a risk of giving either too short or too long set: the former results in bending the tooth too sharply near the point, while the latter requires greater expenditure of force. Over-setting may be corrected by slight blows in the opposite direction. A very simple apparatus for bent setting may be made as shown in Fig. 311. It consists of a wooden framework a, carrying at the base a movable steel anvil b, each of whose 8 edges may be chamfered to a different bevel.
The framework also supports a steel punch c free to-slide up and down; the end of the punch is bevelled, the angle corresponding (there are 8 punches) to the angle of the side of the anvil to be used, which varies with the kind of saw required to be set. To set the saw, it is laid on the anvil with the teeth overhanging the bevel desired and under the line of fall of the punch, which latter is applied to-alternate teeth in succession by striking it with a hammer. The advantage of the apparatus is that the amount of set given to each tooth must agree with the bevel of the punch and anvil.
(b) Bent setting is perhaps more commonly effected by leverage. The simplest form is a notch cut in the end of a file, which is applied to each tooth in order, and the requisite set is given by a turn of the wrist. Fig. 312 shows a handsaw-set with 6 different gauges to suit the thickness of the saw blade; and Fig. 313 is an improved set for fastening to a bench. In using these tools, the saw must first be securely clamped. For bent-setting band and circular saws by leverage, special machines are necessary, of which there are several forms in the market. Goodell and Waters, Philadelphia, make a band-saw set suited to saws 1/8 in. to 2 in. wide, holding the saw in a rigid position and setting the teeth without straining the blade. It works by an easy, uniform crank motion, and when the tooth to be set is fed into position, the blade is firmly locked between the steel jaws of a vice, and remains immovable while the tooth is set to any degree required. As the crank goes forward, the blade is released, when the next tooth is fed up to the dies, the blade again locked in vice, and this tooth set in the opposite direction. All these movements are automatic, and can be carried on at a speed of 300 teeth per minute.
The feeder picks up only the tooth that is to be set, consequently each tooth is fed to its proper position, regardless of their irregularity. The band-saw is simply hung up over the machine on a wooden bracket, and the lower part left pendent near the floor.

(c) Spread setting is generally performed by "crotch punches" or "upset dies" having suitable outline and faces, applied to the tooth-point by sharp blows from a hammer. There should be 2 notches, one for spreading the tooth-point and the other for regulating the side play and making the cutting edge concave when necessary. Care should be taken to always leave sufficient metal behind the corners of the saw teeth, or they will break off. The accompanying illustrations, reduced from Grimshaw, represent the edges of teeth when "swaged" or "upset." In Fig. 314, a is the best attainable in practice; b has extremely weak corners. In forming the swage, the tool should be held so as to deliver the blow in a straight line with the face of the tooth, otherwise cracks may be started in the gullet, especially in frosty weather.
Continue to:
My Books

