Repousse On Wood
Description
This section is from the book "Elementary Metal Work", by Charles Godfrey Leland. Also available from Amazon: Elementary Metal Work.
Repousse On Wood
O begin, let the pupil obtain a good panel of soft pine wood, let us say of six inches by six, or any other suitable size. It must be free from knots or defects, and about three-quarters of an inch in thickness.
The next thing to lay in a stock of is material. Brass is sold in sheets of from six to twelve inches, but may be had of greater width. It is of all thicknesses, from that of note paper up to half an inch. No. 25, or about 10 W.G., or, as we may say, so thick that it can just be cut without great effort with the shears, is suitable for beginners and for most work. Be sure that you get good clean metal, free from red or copper spots, holes, or scales. By obtaining it from someone who makes a business of supplying amateurs and artists, you will get the best.1
1 Messrs. Barkentin and Krall, of 291, Regent Street, will supply the necessary material.
Copper, red metal, tin, and even thin pewter sheets, are also worked in repousse.
The tools needed are as follows :
A Chaser s Hammer. An ordinary light shoemaker's hammer with a sound broad head may be used when the former cannot be obtained. Fig. 74.
Most writers represent the light elastic-handled hammer, as used for the most delicate silver chasing, as absolutely necessary even for strong heavy metal, which is by no means the case. In Italy, where very beautiful repousse is made in abundance, it is usual to beat with a wooden stick. Fig. 75.
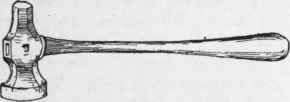
Fig. 74.
Fig. 75. Italian Wooden Beater.

Fig. 76. Tracers and Matts.
Tracers. These are tools which look like large headless nails, or pieces of nail rod. The simplest is the straight tracer, which is at the end exactly like a screwdriver. I have sometimes used one of the latter when I had no other tracer. There are also curved tracers, meant to indent all kind of curves, such as the entire side of a leaf at once, a whole small circle, every bend in an S of any size, so that some workmen possess them by scores or hundreds. But it may be here borne in mind, once for all, that the first thing to do is to master the plain straight tracer in two or three sizes, and learn to make with it any kind of a line or curve. To do this - which can be effected in a few days, with determined application - is to master the whole art of repousse in low relief, or on the face. There is another kind of tracer, the edge of which is like an extremely fine saw. This is used for finishing, and produces a neat dotted line. Vide Fig. 76a.
Matts or Stamps. The simplest of these is a round nail with a dulled sharp point. They are used to roughen or indent the ground between the patterns. This, as a tool, is called a pick. Other matts are cross hatched, like office-seals, or with points like a small o, or stars or crosses, leaves or flowers. One like the flattened point of a round nail is most common. Vide Fig. 76b.
Border Tools are large matts or stamps. Where we have, for instance, a border of two lines run with a tracer, we may repeat in it at regular intervals, side by side, a circle or a cross of four semicircles, a diamond or a leaf. For these special stamps are made. But even these figures can be made with a flat small tracer of one-tenth of an inch ( - ) with care.
A Ball Tool, Fig. 78, a, is a punch or matt with a round end, like half a pea. It produces an indentation. A Cup Tool, Fig. 78, b, is the reverse of the ball tool. It produces a round rising relief. Similar tools, both hollow and in relief, of diamond, or oval, or star, or other shapes, are sometimes used. In addition to these, the beginner will require a very black soft lead pencil, thin but very tough strong paper, carbon paper, black or blue, and an agate or bone or steel point. Also small screws.

Fig. 78.
The panel of wood and the brass should be of the same size, and the brass should be fastened at the edges with the small screws. Do not use tacks or small nails, as they are apt to pull out. Let them be about one inch apart. Fig. 79.
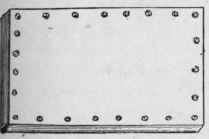
Fig. 79.
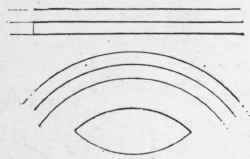
Fig 80
Then draw on the brass a straight line, or a number of lines, either with a lead pencil or ink, or a crayon pencil, half an inch apart. Take the flat or smooth tracer in the left hand, hold it vertically, and while moving it along keep tapping on its top with a hammer. The motion of the tracer and the tapping must be simultaneous. As a preparatory exercise you may take a piece of cardboard or very thin metal and draw a line by hand without the hammer. This will give you an idea of the line to be produced. It must be even, or without a break. Do not first stamp the tracer, as many do, and then repeat the mark. Run it on continuously.
The tracer with a dotted edge for finishing is not however run along. With it you make successive marks, taking great pains to unite them in a clean line. This finishing may or may not be executed, according to the work.
When you can run a clean straight line, and not before, draw long curves and run them in like manner. Such curves joined form leaves. Fig. 80, Do not make these lines too lightly nor too heavily.
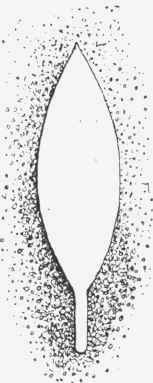
Fig. 81.
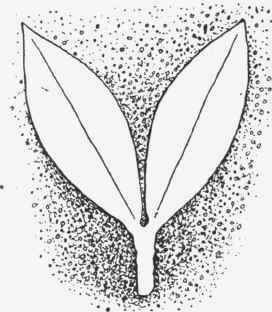
Fig. 82.
Simple Exercises

Fig. 83. Study of Simple Flower Form.
You may now draw a simple pattern, say a circle or leaf. Take any simple matt, and with care indent the ground round it. Bring this indentation close to the line made by the tracer. Then go lightly over the line made with the tracer. Figs. 81-83.
Continue to:
My Books

