Needle Book
Description
This section is from the book "School Sewing Based On Home Problems", by Ida Robinson Burton, Myron G. Burton. Also available from Amazon: School Sewing Based On Home Problems.
Needle Book
Materials
Art Canvas (Chap. I. Par. 8).
Outing Flannel (Chap. I, Par. 30) or
Felt (Chap. I. Par. 58).
1 piece art canvas 41/2" x 61/2".
1 piece outing flannel, or felt, 6" x 7".
Crewel or raffia needle No. 5.
Colored san silk, or similar mercerized embroidery cotton.
Introductory Statement
A place for everything and everything in its place is a rule that applies particularly well to the sewing basket, which easily becomes so hopelessly out of order that a great deal of time may be wasted in looking for the articles which it contains.
A needle book is a very convenient article to have for the work basket, as it provides a place in which to keep needles of various sizes. It is also a very convenient way of carrying a few needles in the traveling bag as it folds flat and occupies very little space. Cretonne makes a pretty needle book cover, but being a figured material, leaves but little opportunity for hand decoration.
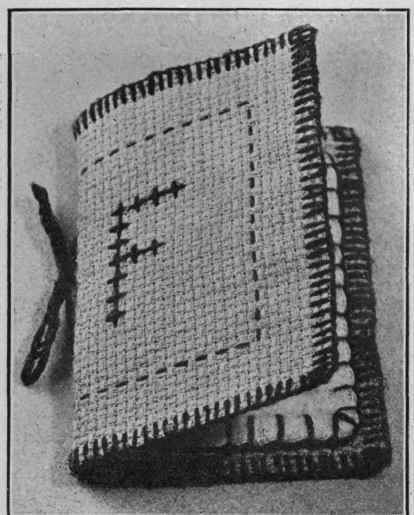
The art canvas used for the cover of the needle book in this lesson is suggested because it gives an opportunity not only to make a pretty cover, but also to practice some of the stitches which will be used later.
References:
Needles, How We Are Clothed, Chamberlain. Needles, Great American Industry, Vol. III, W. F. Rocheleau. Pins, The Making of America, Vol. VII, Chas. M. Karch. Pins, Great American Industry, Vol. III, W. F. Rocheleau.
Suggestions For Optional Modification
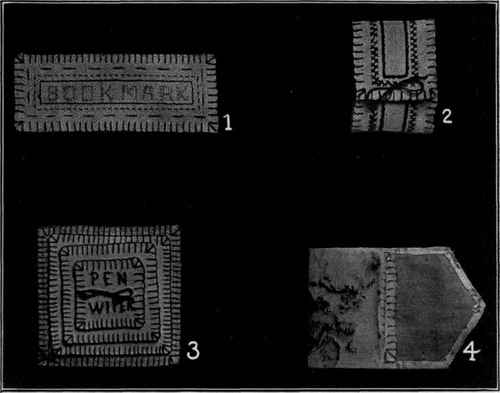
Bookmark
No. 1. A bookmark may be made of one strip of art canvas about 2" x 8", blanket stitched the same as the needle book, with neat stitches for trimming.
Napkin Ring
No. 2. The napkin ring is made very much like the bookmark, with a row of catch stitching and chain stitching inside. The ring is formed by over-lapping and fastening the ends.
Penwiper
No. 3. The penwiper is made of art canvas with leaves very similar to the needle book. The leaves are fastened to the base by taking a short stitch and tying the thread.
Needle Case
No. 4. A needle case may be made of cretonne about 3" wide by 7" long. A contrasting plain color is basted to the wrong side, and the edge of the cretonne is turned over it and hemmed in place. The leaf is made of outing flannel or felt. The book is folded over like a pocket book and fastened with a snap.
Working Directions For Needle Book
Straighten one short edge of the art canvas by drawing a thread and cutting on the line (Chap. II, Par. 102). Straighten one long edge of the material in the same manner. On the short edge measure out 4". (The length of the needle book), draw a thread, and cut on the line. On the long edge measure out 6" (twice the width of the needle book). Draw a thread and cut on the line.
Decorating The Cover
Finish the edges of the art canvas with blanket stitching (Chap. II, Par. 128), making the stitches at least 1/4" deep and 1/8" apart. As the canvas ravels easily you must avoid pulling the thread too tight while working.
The stitches used in decorating the surface of the cover may be selected as desired, but the running stitch (Chap. II, Par. 106) is used in the booklet shown in this lesson. A short stitch like the running stitch, backstitch or cross-stitch, is better to use for this purpose than a long stitch, on account of the corners that must be turned.
The Initial
An initial with square corners should be used if it is to be worked with the cross-stitch, as you cannot work very satisfactorily on curves with this stitch. First design the initial desired on a piece of paper, copy it with a pencil in the center of one side of the cover, as shown in the illustration, or if necessary, transfer it with carbon paper, as follows: Pin a piece of carbon paper slightly larger than the initial, carbon side down on the needle book. Place design over it, pin it down at the top and bottom and trace it with a lead pencil. Remove design and carbon paper and work the initial by taking first a vertical stitch, then a horizontal stitch on the lines of the drawing. The slanting cross-stitch may be used instead, if desired, by following the directions given in Chap. II, Par. 124, or the backstitch will make a pretty initial (Chap. II, Par. 107).
Preparing Material For Leaves
Straighten one short edge of the outing flannel by drawing a thread and cutting on the line (Chap. II, Par. 102), Straighten one long edge in like manner. To lay out the large leaf, measure out on the long edge of the material 3 1/2", the length of the leaf, and draw a thread. Measure down on the short edge of the material 5 1/2" (twice the width of the leaf); cut on the lines. Make the second leaf 3" long by 5" wide, in the same manner.
Blanket stitch (Chap. II, Par. 128) completely around the edges of these pieces with the mercerized cotton. If felt is used for these leaves, the edges may be finished with small notches. Outing flannel would ravel if finished in this way.
Fastening The Leaves To The Cover
Fold the narrow ends of the cover together as you would close a book and crease firmly on the fold. Open flat on the table or desk. On the upturned side lay the largest piece of outing flannel. On this piece place the second, arranging them so there is a uniform distance between the edges of each leaf and cover, all the way round. Hold the leaves against the cover as you have placed them, then turn the cover side toward you and with a needle and double thread sew through the crease formed by the folding, inserting the needle about 1" from the upper edge of the cover, leaving about 6" of the thread extending to tie in a bow; bring the needle through again about 1" from the lower edge of the book cover, on the same fold. Cut the thread off near the eye of the needle and tie the two ends in a neat bow. Trim the thread if necessary.
Needles may be arranged in vertical rows in the leaves of the needle book where they will be ready for use when needed.

Continue to:
My Books

