Chapter 22. Working With A Helper. Part 2
Description
This section is from the book "Reichian Therapy. The Technique, for Home Use", by Jack Willis. Also available as a hardcopy from Amazon.com.
Chapter 22. Working With A Helper. Part 2
The Pencil (New Exercise)
This exercises uses a common pencil with an eraser. You will use the eraser end, specifically the metal cylinder which holds the eraser. This metal cylinder is the point of focus.

Figure 139
While the worker continues the breathing, the helper stands behind the worker at the head end. Holding a pencil by the lead end, the pencil is moved about in a random and jerky manner.
The idea is for the worker to follow the eraser/metal end of the pencil without moving his (her) head and while continuing the breathing. If the worker is frequently losing the focus, the movement can be slower until the worker is able to relax the control of his (her) eyes enough for them to follow the more rapid jerky movement.
At first do this for only a few minutes. At latter sessions the time can be extended gradually to a full 15 minutes.
The Flashlight (New Exercise)
This exercise uses a pen light flashlight. When the batteries get low and the light is dull, replace the batteries. If it can be done, lower the lighting in the room to a very low level.
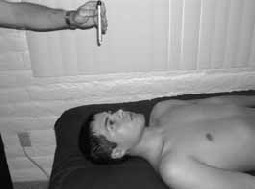
Figure 140
There is an error in Figure 140: the light is held too high in the photograph. It should be about eight inches above the head.
Initially, the light is moved around in a circle making sure that the light moves far enough in all directions that the eyes, to follow the light, have to move to the extreme positions of up, right, down, and left. The helper can see if the light is being followed correctly since the light will reflect from the pupil in the center of the eye. Also the helper should occasionally stop the movement to see if the worker's eyes continue to move. Many people, if not perhaps most, instead of following the light, begin to anticipate where it will be and thus actually the eyes lead the light rather than follow it.
When the worker has the circle down well (and the light can be moved fairly rapidly), then the helper should start moving the light in jerky and random directions for the eyes to follow.
This exercise, like the pencil exercise, requires that the worker to be able to let go of conscious, controlled movement of the eyes and allow them simply to be controlled by pure stimulus.
The Face
move the face slowly
The only help here is to mention to the worker if he (she) is either moving rapidly instead of slowly or if the jaw is being used extensively rather than the facial muscles. With 22 muscles in the face, there are a lot of possible things that can be done with the lips, the mouth, the checks, the eyes and the forehead. Again, don't nag or criticize. The worker is doing as best he (she) can. There is always another session.
smile inhale, frown exhale blow through lips
Generally, no action by helper. However, if you look at Figure 77 on page 200 you can see that our model is using his face to smile rather than just pulling the corners of the mouth up and he is nearly unable to pull the corners of his mouth down. Things like this can be pointed out without nagging.
shit on a stick
The helper can hold a hand mirror over the worker so that he (she) can see whether the nose is being wrinkled.
pout exhale
spread the nostrils
No action by helper. The helper can note whether the worker is or is not able to spread the nostrils. And if on a given breath it is done correctly, the worker can note that so the worker can get a feel for the face when the nostrils are flared.
the mirror look
Here the helper can hold a mirror over the worker. This is better than the worker having to hold the mirror. This is the not quite the same thing as above in the shit on a stick exercise. In the shit on a stick exercise the mirror is held fairly close to the face so that the focus can be on the bridge of the nose. Here the mirror is held away from the head at a level such that the full face can be seen in the mirror (but not so far that the trunk also is in view).
Let me hark back all the way to Chapter two, the daily exercises, where I explained that there were two ways to use the mirror. In the first way, the worker views the face as belonging to someone else. In the second way, the worker views the face as his (her) own. Either or both of these approaches can be used here. It all depends on which way works better in aiding the worker in expressing emotion in the eyes.

Figure 141
The Jaw
jaw left jaw right
No action by the helper. In general if the worker is having problems with the jaw exercises, some pressure may be put on the jaw muscles (Figure 142). They can be quite painful so don't overdo it. Mild pressure held for many minutes will do more than strong pressure.
Actually, there are, in most people, 22 muscles in the face and most all of them can use pressure work. Even though this chapter is devoted to the helper, it is also the case that the worker can apply pressure to the jaw (page 216). In Chapter 13 on the jaw, I made an issue of the direction of thrust of the worker when he (she) is working on his (her) own jaw. The issue of direction is less of an issue with the helper. The helper should use a direction of thrust which meets the most resistance or where the helper can feel the most tension. Since the mouth should be in the normal working position (fairly widely open as in Figure 142), the helper will not be pressing the muscle against the teeth.
Three pressure points for the jaw muscles should be sufficient. The first one should be about one inch back from the mouth (that will get mainly the buccinator). The second will be about the middle of the jaw (the external masseter). The third will be near the back of the jaw but NOT ON BONE. To locate the spot, place your thumb next to the bottom of the ear and then come forward and downward until your thumb falls off the bone. That is the right place (the internal masseter).

Figure 142
jaw back
This action is anatomically difficult. The helper can aid the worker by pushing LIGHTLY on the jaw. The joint of the jaw is very small and can be easily damaged by pressure; better too light than too heavy. Keep it light. I really mean that about keep it light. It is real pressure, it is not just patty-cake pressure; but the jaw joint is a very small joint and once it is damaged it does not repair. If the jaw joint is damaged it probably means surgery and often unsuccessful surgery. No kind of self-improvement work is worth damage to the jaw joint. I especially want to warn males about excess pressure. Men often do not realize quite how strong they are and so they need to be especially vigilant not to use excess pressure.

Figure 143
The arrow shows the direction of pressure. Just 20 or 30 seconds is enough pressure for any given session.
jaw out
No action by helper except to see that the teeth are not clenched, that is the mouth is open and out. That is shown in JAW OUT on page 213.
mouth open
If the mouth is really being stretched open, you will see a tiny muscle stand out at the side of the neck (see the arrow on the bottom left side photograph in Figure 86 on page 215).
If the helper does not see this muscle, he (she) can say "open wide, pull" a few times. But don't overdo it such that you are perceived as being critical.
The helper can also use light pressure to force the jaw open. If there is any pain in the worker's jaw joint, stop immediately the use of any pressure. Pain in the jaw muscles is not a problem, but again this is not an excuse for sadism on the part of the helper.
Just as I have many times stated the rule: always too slowly; so there is the similar rule: always too light on the pressure. Better too light or no pressure at all than to overdo it.
Also in Figure 144 note the two arrows pointing to the muscle (the omohyoideus muscle) that should stand out if the jaw is being fully pulled open.

Figure 144
clench teeth
Here the helper can be of major benefit. We have all seen a dog clamped on a piece of cloth while the owner moves it back and forth as though to pull it out of the dogs mouth.
The helper here is not pulling the towel side to side, but is rather lifting the towel so that the worker's head is pulled off the bed.
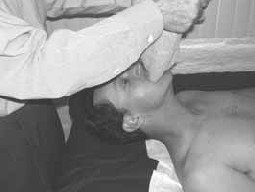
Figure 145
Continue to:
My Books

