Chapter V. Pipe Bending And Elbows - Continued
Description
This section is from the book "Plumbing Practice", by J. Wright Clarke. Also available from Amazon: Modern plumbing practice.
Chapter V. Pipe Bending And Elbows - Continued
When, in spite of all the pains taken to properly make a bend on a soil pipe, it is found that the heel is thinner than the ordinary substance of the pipe, the throat can be worked or dummied out a little more, and the heel dressed in so as to thicken it. It is possible to so dummy up the throat of the bend as to make the lead as thin as a wafer at that part, especially when the pipe is pulled up too much at a time, so that there is only just room for the dummy to work in the centre after the cheeks are flattened. When this occurs it will be found that the lead has gathered in a hard, thick mass about half-way between the throat and the cheeks. It is a good plan to make bends a little larger in diameter than the rest of the pipe, and then, when as many tool marks as possible have been worked out with the dresser, use strips of six or seven-pound lead about 1 1/2 to 2 inches wide as flappers, keeping one piece, which will bend itself by using, for the throat, and another piece for the heel of the bend, and so work in the surplus size to that of the pipe itself. Figure 32 is a good shape for a bending dresser, with the back (or top) side a little more rounding than the face, so that the back can be used for the centre of the throat of the bend, and the face for the hollow of the sides. For the back and sides an ordinary flat-faced dresser can be used, but it should not have any sharp edges, as those for lead laying, and it should be used lengthways as much as possible, so that any marks made by the grain of the wood may correspond with those on the pipe made by the die of the pipe-making machine. When a bend is properly made, the die marks will be found as illustrated at A, Figure 33, showing that instead of the metal being driven into a body in the throat it has been distributed sideways.
Figure 32.

Figure 33.
It is generally acknowledged by most plumbers that a trap to be kept clean must not exceed in diameter the size of the inlet and waste pipes, so that when a 1-inch waste pipe is used the trap should be of the same size. To make a 1-inch S trap is a very troublesome bit of bending. The first bend, when it is like a U, is all right, because it can be reached with a bolt and hammer from both ends to work up the throat, but when the second bend has to be made these tools are useless. The best plan is to make the U first and let that be the outgo end of the trap, and then make the other bend, being careful to always keep the sides so flat that the distance between the throat and heel is the same as the diameter of the pipe itself. By the time this is done the waterway will be very much contracted, but one object is gained - the substance of metal in the heel is kept nearly, not quite, as it was originally,, and the throat perhaps has buckled a little. Now cast a flat lead cake with a sinking equal in depth to half the size of the outside of the pipe, and the same width and shape as the trap, as shown at Figure 34. Cast another one, so that when they are put together there is a space for the trap to lie in. These castings should be of a good thickness and weight to resist any movement; weights can be placed upon them afterwards, or a wooden strut from the ceiling can be used so as to keep the flask quite tight and closed. Place the partly-made trap inside the flask, fasten down tight, and drive through the trap a small box, or other hard wood, well-greased bobbin, then a larger one, and so on until the pipe is the same bore throughout. These bobbins will have pushed out the flattened cheeks and any buckles that were in the throat, and at the same time the heel will have been affected very little. This last bend should be the bottom of the trap, as it is usual to solder a brass cap and screw in that part, and if the lead should have been reduced in substance, this would strengthen it.
By using heavier pipe, and extending the bends, the trap can be made very well without going to the above trouble, but traps made in this way do not look so workmanlike, and hold more water. This is a consideration where only driblets pass down. Traps with a long raking outlet, and not well supported, are apt to drop at the outlet and lose their seal.
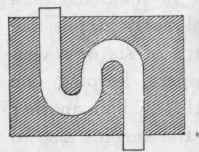
Figure 34.
Sometimes, when it is necessary to make bends of a large radius on a 3-inch or 4-inch pipe, it is a good plan to fill it with sand. First of all, fit a wooden plug in one end of the pipe and drive in four or five clout nails to prevent its coming out; stand the pipe on its end and gradually fill with sand, free from stones or shingle, and keep ramming the whole time so that it is tightly packed. When the pipe is full, fit in another plug and nail as described for the other end. Lay the pipe with the ends on blocks or trestles, then carefully, with the naked hand, press downwards where the bend is required; keep the hands continually moving to a fresh position, so as to get the sweep gradually, and not by a series of bends. The sides will be found to bulge outward a little, but they can be pressed in by laying a soft board on them, and using a lever, so as to squeeze them in. The pipe being full of sand, as the sides go in the throat and heel go out, and the bend will look clean and smart, and free from tool marks when finished.
If the bend is required to what might be called a medium radius, and with straight ends, it is a little more trouble. The pipe has to be loaded as described, and then lashed on to a board or plank with strong cord or a small rope, with pieces of hoop iron arranged something like a cart spring between it and the pipe, Figure 35, so as not to cripple the pipe, and also insure its bending in the required place. The plumber, after lashing and arranging the pipe, stands on the plank and lifts up the end of the pipe a little. If he tries to do too much at a time he will most likely pull it in two or tear it across the outside of the bend. After a slight pull he must unlash it and lay it on its side, and dress the bulged part in, using felt or a piece of carpet, or sometimes his cloth cap, if he wears one, to prevent the dressers marking the pipe. He then relashes it as before, taking care that it is not fastened in exactly the same place, but an inch or two on one side of it, and gives another pull up, and then dresses the sides in again, and so repeats the process until the bend is completed. These bends can be made to look clean and smart, but they are usually very thin on the back side. If they are going to be fixed thus,┐, with the bend upward, it does not much matter, but when they are to be fixed with the bend downwards, thus L, everything that comes down the pipe helps to drive the bottom, which has already been reduced in substance, downward, and in time perhaps a hole is made. Water bends are not good. If the pipe is filled with water, and the ends soldered over, we still get a weak part on the outside of the bend, so that we may come to the conclusion that those made in the ordinary way, by heating and contracting the lead in the throat with the dummies, are the best, as the heel or outside of the bend can be kept the original substance, and if required can even be made thicker by a good plumber, for what is the good of having seven or eight-pound pipe, if in certain places it is only equal to five or six-pound lead? It might as well be all that substance throughout, and besides there would be an economy in materials.
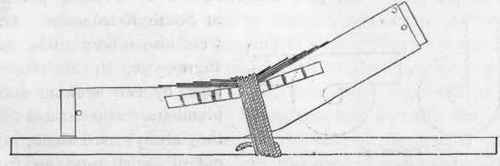
Figure 35.
Continue to:
My Books

