Pipe Bending And Elbows - Continued. Part 2
Description
This section is from the book "Plumbing Practice", by J. Wright Clarke. Also available from Amazon: Modern plumbing practice.
Pipe Bending And Elbows - Continued. Part 2
It has been stated that some hand-made traps made out of ordinary 3 1/2-inch soil pipe were exhibited by working plumbers at South Kensington. There were also others made, as in Figure 36, in all sizes of pipe, by two working master plumbers, who stated that they always used them, made out of 4-inch pipe, for fixing under water closets. There were several remarks made as to the merits of these traps, and also as to the time it takes to make them. Opinions were divided as to the S, Figure 31, but a good many thought the knot was easier to make, for the reason that the bend is continued in the knot, while in the other it has to be reversed for the second half, by doing which the first bend is partly pulled open again. It was considered by some that a light hand dummy with iron handle could be so bent as to easily reach any part of the bend in the knot, whilst there is great difficulty in doing so with the S. One man had the misfortune to get a bruise in his trap that he could not reach with the dummy, so he had to resort to the old dodge of soldering on a copper wire loop, and pulling the bruise out, after which the wire was unsoldered, and the marks cleaned off the lead trap.
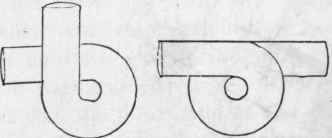
Figure 36.
Some men who do not have much practice in bending so as to become experts, are in the habit of making bends in two halves and soldering a seam on each side - Figure 37 is one-half. These bends can be quickly made, and sometimes it is convenient to do them so. For instance, perhaps a bend is wanted to connect the eaves gutter of the house to the down pipe, and be made to fit around the cornice or sailing course of brickwork. To make these bends the lead is cut out the proper width and rather longer than required, the edges are then planed straight and the lead dressed rounding on a wood mandrel or on the plain part of the iron rain-water pipe if no mandrel is to be had. It is then bent as shown in sketch, which causes the sides at that part to open out flat. The throat is then worked in at A, so that it is hollowed in the same way as the straight parts, taking care not to make it too sharp and get it into a hard, thick mass, but keeping it well rounded. Some men get working up the sides, with the result that they are very much reduced in substance. It is much better to have the throat thicker than the sides thinner. When this half is made, the other half is rounded and then placed by the side of the first, to mark the proper distance; it is then bent the reverse way to the other, which causes the sides to open out. These sides have to be worked in, holding either a hand dummy or a mallet head inside so as to draw out the lead into a substance equal to the rest of the pipe, instead of getting it thicker.
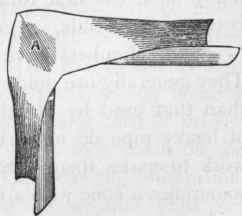
Figure 37.
If for a swan-neck or double bend, the last piece is then bent and worked - as before described for the first piece - to form the throat of the second bend, after making which the other half is bent and fitted to it. The edges of the parts that have been worked are then rasped to fit each other quite closely so that no solder will run through; they are then soiled and shaved with the gauge hook in the usual way and soldered. The edges of the inside of the pieces should be soiled so that should any solder run through it will not tin to the lead, and so can be easily knocked or melted off with a hot iron or copper bit. Before making these bends, the required shape should be set out on the bench with chalk, so that the work can be laid on it to mark the distance. A good many men, the first time they attempt them, make them too short between the bends.
Ship plumbers have very awkward bends to make sometimes. They generally use much heavier pipe, that is, of thicker substance than that used by plumbers on a building. Although bends made of heavy pipe do not cripple so much in the throat, it is harder work to make them. Some pipes have to be made tapering, or sometimes a cone with a bend on it is required. These are generally made in two pieces and then burned together, as described in an earlier paper. If they are well burned the seam can be cut off and cleaned up, and then burnished with the back of the boxwood dresser, so that when finished the work has the appearance of being made of one piece of lead.
There are several ways, besides those described, of making bends on soil pipes. For instance, several small V pieces can be cut out to form the throat, and a wide soldering wiped over them, or else solder them with a copper bit and clean them up afterwards, so as to make them look like a properly made bend. A slit can be cut in the pipe where it is intended the throat of the bend shall come; the slit is then pulled open and the pipe bent, which causes the sides to bulge out. This bulging is then carefully worked in and closed, and a wiped seam is made over it, or it is soldered with fine solder and cleaned off. The above ways of making bends cannot be compared, either for strength or appearance, to those made in the ordinary way with dummy and dresser.
In the shop that I was apprenticed in we used to bend some of our soil pipes; at the same time, we used to make as many elbows as bends, but now-a-days a man would be put down as an indifferent tradesman if he was seen making an elbow. Although I do not advocate them, one made in a proper manner is a very good substitute where, for want of the proper tools and convenience, a bend would be difficult to make.
When a man is going to make a bend, the ordinary way is for him to first of all make a template, or set a bevel to the required angle - he does the same for an elbow; he then cuts a V piece out of the side of the pipe where he requires it, and then bends it up and places his bevel to see if he has cut it right - he makes the remark that it is better to cut twice than cut too much the first time - and so, working by rule of thumb, he cuts another small piece off and tries again. Sometimes he has to cut two or three times before he gets it right, and then, probably, by bending the pipe so many times, he finds that he has nearly torn or broken it in two at the heel. By setting out the bend with chalk on the bench or floor, all this could be avoided. Consider the illustration, Figure 38, as representing the required angle - the lines are supposed to be the outside of the pipe. Now, if the pipe is laid between the lines E F, the throat G, can, by placing a small set square against it, be marked on the pipe; make a mark on the back side, represented at H; now lay the pipe so that it is between the lines K L, and so that H is in its original position; transfer G on to the pipe again. Now, if the V piece, as represented by the three marks on the pipe, G H G, is sawn out, and the pipe bent so that the opening would be closed, it will be found to be the required angle, and if it is going to be soldered with fine solder and copper bit, that would be all that is required; but if the joint is going to be wiped, a piece must be left on - as shown by dotted lines, Figure 39 - which must be slightly opened outward for the other side to enter. The back side of the pipe should not be cut, but should be left as shown at M. After the piece is cut out, the pipe can be soiled and shaved (before it is bent) as it lays on the bench; it should then be touched and bent round and laid on the lines, so as to ensure its being the right angle. It will be found that by bending the pipe, the part M will have bulged out a little; this must be worked in by a few gentle taps of the dresser, and if the extremity of the heel has flattened, that must be worked out from the inside with a dummy; or this flattening can be anticipated, and it can be worked out with the mallet head or hand dummy before the opening is quite closed. If both sides of the opening are worked out a little in the throat, the elbow when made would be more like a bend in shape, Figure 40. After the pipe is placed at the required angle, and before it is moved off the lines, it should be " tacked." The best way is to pour a little melted plumbers' solder on the upper side of the part to be soldered so that it " tins " to it, and let it remain until set. The elbow is then turned over and placed on two pieces of 1 1/2 or 2-inch boards, long enough for the pipe to roll on without slipping off, and high enough for the spare solder to drop clear and out of the plumber's way, Figure 41. The plumber then begins to wipe the joint as it lays, and as soon as he has done 2 or 3 inches his mate swabs it with cold water, taking care not to cool it too much or to go too near the part the plumber is working upon. The mate then raises the end of the pipe marked N in a slow and careful manner, and slightly presses it toward the throat so that it shall not open. As he slowly moves it the plumber keeps wiping until he has got right round.
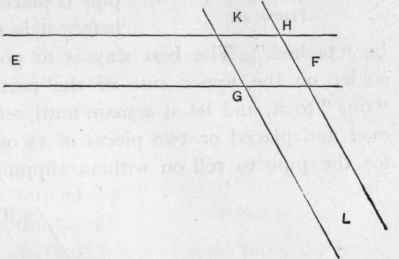
Figure 38.
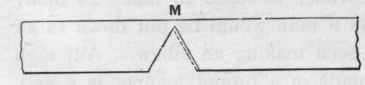
Figure 39.
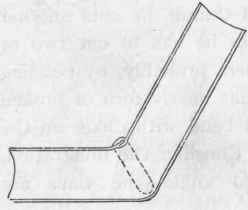
Figure 40.
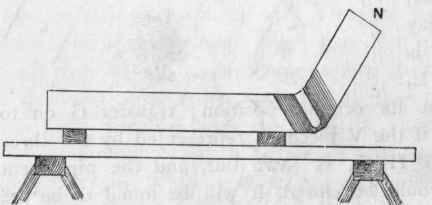
Figure 41.
Continue to:
My Books

