A Workshop. Part 3
Description
This section is from the book "Woodworking For Beginners: A Manual for Amateurs", by Charles G. Wheeler. Also available from Amazon: Woodworking For Beginners.
A Workshop. Part 3
It will be a convenience in working to lay the floor next. For this you will require a number of floor-joists. If the building is only 8' or 10' wide, 2" x 4" studding will do; but if the width is as great as 12', 2" x 6" will be better. These are to be placed on edge on top of the sills, as shown. Place one at each end against the corner-posts (to which it can be nailed), sawing off each end so that it will be flush with the outside of the sill. Distribute these floor-joists so that they will be about 18" apart, and hold them in position by " toeing " a nail through them at each end so desirable as regards strength, its only advantage consisting in the readiness with which the joints can be made by simply cutting one of the two pieces shorter than the other, into the sill beneath, or nailing them to the studding when practicable. Before laying any of these floor-joists trim them off on the under edge, which will rest upon the sills, if necessary to ensure a level surface on top for the floor. Do not neglect this, as such joists frequently vary in width. Now measure the diagonals again, before laying the floor-boards, to be sure that the base of the house is rectangular. If one diagonal is longer than the other, push those corners towards each other until the diagonals are of equal length.
Next lay the floor-boards, lengthways of the building, driving them together tightly by pounding on a waste piece, and nailing them firmly to each floor-joist with two nails. If your floor-boards are not long enough to reach the entire length of the house, you will take pains, of course, to saw them of such a length that the ends of the boards will meet over the middle of one of the floor-joists, arranging the joints so that they will alternate or come at different points of the floor. Saw off neatly all projecting ends of the floor-boards.
You will frequently wish to use more force in driving the floorboards to a tight joint at the edges than you can easily apply with the hammer. You can easily apply all the pressure required by using two short boards on the principle of the toggle-joint. Arrange these as shown in Fig. 390, one end resting against a temporary cleat or any firm object and the other against the edge of the floor-board. By stepping upon this toggle-joint at its apex, the floor-board will be forced into place. A common way is to pry the board into place with a chisel driven down at the edge.
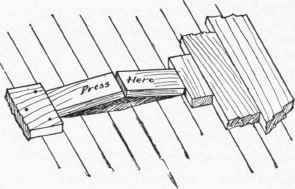
Fig. 390.
If the building is to be used in cold weather, by all means lay double flooring. The under floor can be of cheaper stock and laid less carefully. Between the two lay sheathing- or roofing-paper, and you will have accomplished much towards keeping the room warm.
The frame is now ready for the roof-timbers. These can be of 2" x 4" studding, except the ridge-board, which can be any common board about 6" wide.
To obtain the length of the rafters and the angle at which the ends are to be cut, you can easily make a full-sized pattern on the floor by simply laying off a right-angled triangle of the required height and base, which will give the length of the rafters and the angle at each end, after cutting off a little piece at the upper end to represent one half the thickness of the ridge-board; or two pieces of the rafter stock can simply be laid on the floor in the right relative positions for the roof, when their points of crossing can be marked on each edge and the bevel marked on the sides of the pieces. The bevel at the lower end can be found in a similar manner. Take off enough at the upper end to allow for one half the thickness of the ridge-board, and saw off one rafter as marked. This will serve for a pattern by which to mark the others. The end rafters and the ridge-board (which should first be sawed the length of the house) can easily be nailed in position by two persons, one at each end, being temporarily stayed in place by a board nailed outside (Fig. 389).
The roof-boards can be nailed either lengthways, or up and down. If the former way, the rafters must be put quite near together to give sufficient support to the boards. If the latter, purlins, or lengthways stringers, should be added between the ridge-board and the side-plates, as shown. If the roof is to be shingled, the boards can as well be laid lengthways - otherwise they should be laid up and down. If not to be covered in any way, matched-boards (or battened joints) should be used. If well painted, such a roof will last for some time, but shingling is much better.
Saddle-boards should be put along the ridge, as they add much to the tightness and durability of the roof.
The sides require to be sheathed before covering the roof, leaving open spaces for the door and windows. Shorter pieces can be used above and below these spaces. The boarding can be put on vertically and battens (narrow boards 2" or 3" wide, or strips of " half-round " moulding) nailed over the cracks, as shown in Fig. 391, or, of course, the sides can be clapboarded or shingled if preferred, in which case the boarding can be put on horizontally.
The door can be made of boards, cleated, as already shown, or one can be bought ready-made. A casing should be nailed around the door-space, previously putting at the bottom a threshold upon which the lower ends of the casing can fit. This you will at once understand by examining the arrangement of these details in almost any dwelling-house. The arrangement of the windows (which you can buy ready-made of almost any desired shape and size) does not differ from the cases already shown.
The smoke-pipe can be arranged as shown on page 258.
A few floor-beams put across on top of the plates and wholly or partly floored over will provide a loft useful for storage. If the building is for a shop, this will be a good place to keep lumber.
The roof can be covered according to the methods already shown, but shingling will be much better. If a building is worth shingling at all, it is usually best to use a good quality of shingles. The cheapest ones are apt to be unsatisfactory for a permanent building, but, on the other hand, for such structures as these it is not necessary to get an extra quality, for some knots or defects at the thin ends where they will be covered by two or three layers may do no harm. Cedar shingles are better than spruce.
It is a good plan to lay roofing-paper over the roof before shingling. Begin the shingling at the eaves and work upward. Lay a row the length of the roof, letting the butts slightly overhang the edge. Directly on top of this row lay another, breaking joints with those underneath; that is, lay the first row double, taking pains that the spaces between the shingles of the lower layer are covered by the shingles of the upper layer. Leave a slight space (perhaps 1/8" to 3/8) between the shingles in laving them. This gives room for swelling, and allows the water to run off freely. If the edges are close together at the lower end, the tendency is to dam up these water-courses and retain the moisture, which is injurious. Some people pare off the edges to make the butt-ends narrower, in order to obviate this; but simply laying the shingles slightly apart answers the purpose. Fasten each shingle with two shingle nails (one near each edge, within perhaps i"), far enough up from the butt to be covered by the next row of shingles. Common shingles can be laid about 41/2" to the weather, that is, with that portion of the length exposed at the butt. If shingles of extra length are used this distance can be varied accordingly. Lay the butts of each row by a chalk-line or against the edge of a narrow board, which can be adjusted and temporarily held in place by two strips nailed to the board and to the ridge of the roof. The upper ends of the top row of shingles can be trimmed off and saddle-boards can be put on at the top, letting the edge of one overlap the other.
It is doubtful economy to paint shingles after they are laid. The paint tends to clog the spaces between them. It is better to dip them in paint before laying. A much better way is to dip them in some one of the prepared " creosote stains," which can be had in a great variety of colours. These are excellent, although, except to obtain some desired colour effect, it is hardly worth while to use any preparation on the roofs of such buildings as these. Cut nails are considered better than wire nails for shingling, on the ground of durability. Take pains to keep the lines of the rows straight and at equal distances apart.
For the painting, see Painting, in Part V.
If this building is for a workshop, various suggestions about the interior arrangement will be found in Part I.
The cottage Is one of the embellishments of natural scenery which deserves attentive C6n-sideration. It is beautiful always, and everywhere ; whether looking out of the woody dingle with its eye-like window, and sending up the motion of azure smoke between the silver trunks of aged trees ; or grouped among the bright cornfields of the fruitful plain ; or forming grey clusters along the slope of the mountain side, the cottage always gives the idea of a thing to be beloved : a quiet life-giving voice, that is as peaceful as silence itself." - Ruskin, The Poetry of A rchitecture.
Continue to:
My Books

