A Workshop. Part 2
Description
This section is from the book "Woodworking For Beginners: A Manual for Amateurs", by Charles G. Wheeler. Also available from Amazon: Woodworking For Beginners.
A Workshop. Part 2
Set another post in the same way at the next corner, fixing it accurately in position by means of the strings, as in the case of the first post, and seeing that the distance from the outside of this post to the outside of the first one is that required by the plan.
Set the other corner-posts in the same way, testing all the distances (including the diagonals) as before. You can try the height of each post now and then as you dig, and thus avoid making too deep a hole.
If you prefer, you can set all the posts in the right positions at first, but without trying to level the tops, merely seeing that the tops all stick up above the line. You can then strike a horizontal line all around with a cord, and saw all the posts off by this line - a process which you very likely have seen when watching the work on a pile-bridge or wharf. Sawing off the posts squarely will be much easier, however, before they are set in the ground.
The posts may be of locust, cedar, cypress, or chestnut. Locust is considered very durable, but is the most expensive. Cedar is excellent, and will be perfectly satisfactory. Chestnut will do very well for a house of this sort, and is comparatively cheap. If you do not mind the slight increase in cost, cedar is better. If you wish to be as economical as possible, chestnut will answer.1
1 The part of the post which is embedded in the ground is sometimes charred or painted to preserve it from decay. This can be easily done, but the process is advisable only with thoroughly seasoned wood. It is highly injurious to
The reason for selecting wood of greater natural durability for the posts than for the rest of the house is to withstand the greater exposure of the posts to alternate moisture and dryness. Timber will last for centuries if placed in a sheltered position and exposed to a free circulation of air. It will also last for a long period when immersed in fresh water or sunk underground, so as to be beyond the influence of atmospheric changes. But the alternate exposure to dryness and moisture, as in the case of posts partly above and partly below ground, or piles for a wharf or bridge, causes decay in a comparatively short time (see Appendix).
If your site is too rocky for posts, you will be saved some digging, but must provide a level and stable foundation in some other way. It rarely happens that the surface will be quite level, and you must use stone or timbers for underpinning. If there are one or two corners that must be raised, owing to inequality of the surface, and you cannot find large stones that will be sure to stay in place, you can rest the raised parts of the house upon posts securely braced. Rock is not the most desirable foundation for a building with a regular underpinning and cellar - the biblical parable to the contrary notwithstanding - and there is no foundation superior to sand or gravel (only the sand or gravel must be confined and not free to slide or move). But as your house merely rests on the surface, and has no cellar to be dug or drained, there is no disadvantage in putting it on a rock, provided you support it properly. Do not rest one end of it on a pile of loose cobble-stones, five feet high, only to have the stones slip some wet, stormy night and let the building down.
Green timber, as by closing the pores and obstructing evaporation from the surface it prevents the seasoning of the wood and causes fermentation and decay within (see Appendix).
Having the foundation set, the next thing is the frame, which for a small building of this kind can be made of almost any kind of wood which you can readily obtain, provided, of course, that it is dry enough and not weakened by large knots or other defects.
Before beginning work read carefully Marking, Rule, Square,
Saw, Plane, Nailing, Screws, Painting, in Part V., and look up any other references.
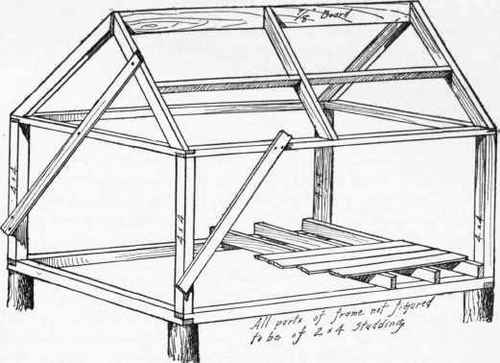
Fig. 389.
The sills, or the lower timbers of the frame which rest upon the foundation, should be got out first, and can be of 4" x 4" stock, and halved at the ends (see Halving) (Fig. 389). Upon these sills is to be set up a 4" x 4" post of the desired length at each corner.1
1 These posts, and even the sills, can be built up if necessary of 2" x 4" studding, two pieces being placed side by side and nailed together, but this is not
On top of these are placed the plates, which can be of 2" x 4" studding laid flat and halved at the ends. Be sure to get out these pieces before beginning to put them together. Toe-nail the posts to the sills and nail the plates directly down on top of the posts, keeping the latter in a vertical position by temporarily nailing on strips of board diagonally, adjusting these until the posts are vertical and at right angles to the sills (see Plumb and Square).
Next put in vertical studding (2" x 4") at each side of the door-space, and at the sides of the window-spaces, allowing a little more space than the exact widths of the door and window-frames. In the same way horizontal studding should be fitted in above the door-space and above and below the window-spaces, and in any places where it will be a help in stiffening the frame or for nailing on the boarding. Another way is to first fit in pieces of joist horizontally, either midway between the sills and plates (except at the window- and door-spaces), or running the entire length above and below the windows. Just where and how many of these pieces are to be put in depends upon the arrangement of the doors and windows, and pieces of vertical studding can be fitted in at each side of the door- and window-spaces and wherever advisable. Short braces, with their ends sawed at an angle of 450, can also be fitted at the corners, where the corner-posts meet the sills and plates, and be nailed in place to help stiffen the frame.
Continue to:
My Books

