Scows And Punts
Description
This section is from the book "Woodworking For Beginners: A Manual for Amateurs", by Charles G. Wheeler. Also available from Amazon: Woodworking For Beginners.
Scows And Punts
A flat-bottomed boat, if made with care, may be not merely good-looking, but light, strong, and useful, and sometimes superior for some purposes to a round-bottomed boat.
Boats of this class are easily and cheaply built and by no means to be despised. They are safe, capacious, and comfortable, and the flat bottom permits much freedom of movement by the occupants, making them good boats for fishing and general use on ponds and rivers, as well as for transporting loads.
Before beginning work read carefully Marking, Rule, Square, Saw, Plane, Nailing, Painting, in Part V., and look up any other references,
The process is to first get out the sides, then the ends, next to fasten the sides and ends together as in making a box, then to nail on the bottom, and finally to put in the seats and any other fittings. Almost any kind of soft wood can be used for a boat of this kind. Pine is excellent. Care should be taken to select clear, straight-grained stock, free from knots, checks, and other defects, and thoroughly dry.
For the sides, take two boards, for example, 14' long, 14" wide, and \" thick, planed on both sides. Both edges should be
"jointed " and the ends squared and sawed accurately. Mark, saw, and plane the slant at each end of these boards as shown in Fig. 408. The ends must next be got out. In this case they can be 4' long and 4 1/4" wide. Nail together the sides and ends just as in making a flat box. Use three nails (3" or 3 1/2" long) at each corner. It is safest to bore holes for the nails (see Boring). Copper nails are best for boats, but galvanized iron answers very well for common boats of this kind. Next place this frame, bottom up, on horses or boxes or a flat floor and plane down the projecting edges of the end pieces to agree with the slant of the sides.
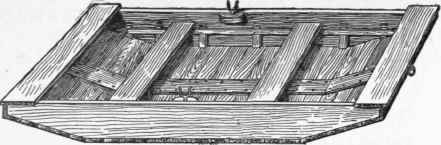
Fig. 408.
Pieces for the bottom are now to be sawed from boards about 6" to 8" wide. Mark and saw one piece and use it for a pattern by which to mark the lengths of the remaining pieces. You can take the length directly from either end, allowing a trifle (say 1/8") to spare, for planing the ends after they are nailed. Having sawed the required number of pieces, which will depend on the width of the boards, nail them on carefully. Before nailing, thoroughly paint the bottom edge to which they are to be nailed with thick white-lead paint. See that the edges of each board are straight, paint the edges as you lay them, and nail thoroughly with 2^" nails. Do not put the nails so close to the edge as to cause splitting. The edges of the pieces which come together at the angles of the bottom must be fitted carefully with the plane (see Bevelling), to make as tight joints as possible. The boards should be pressed closely together as they are nailed. They will assist in keeping the sides and ends of the boat at right angles, but it would be well to test the angles with the large square, or by measuring the diagonals, when you nail on the first two boards.
A quicker way is to nail on all the boards (not sawing them accurately to a length) and then to saw the ends all off by a line.
A good way is to use, for the bottom, plain sheathing or matched boards, if obtainable without the bead or moulding commonly worked on the surface, which would be apt to cause leakage. The sheathing can be planed down on both sides to a thickness of 5/8", which will remove the moulding, but this is rather thin for the bottom of a boat as large as this, though an excellent way for a narrower boat.
When the bottom is all nailed on, turn the boat on each side and plane off any irregularity in the ends of the bottom boards, so that they will be flush with the sides.
A cleat from 4" to 6" wide should be laid along the middle of the bottom to stiffen it, as shown. The nails should be driven through the boards and clinched. Wrought nails, or some kind that will bend over and not break, must of course be used for this. This cleat is often nailed on the outside instead of the inside.
Nail a seat at each end directly on top of the sides and ends as shown. From 12" to 18" in width will do. The seat for rowing (about 8" or 9" wide) can rest on cleats, as shown.
Next screw a cleat, about 2" deep, 7/8" thick, and 10" long, to the insides of the gunwales at the places for the rowlocks (see Screws). Common iron rowlocks can be bought almost anywhere, and the way to put them on is obvious (see Boring). A substitute for them can be arranged easily by simply boring two holes, 3 1/2" apart, for the insertion of round thole pins of hard wood. Another simple way (Fig. 409) is to make two mortises or slots, 3 1/2" apart and 1 1/2" long x 5/8" wide, to hold thole pins (Fig. 410). The cutting can be done wholly in the cleats by sawing and paring.
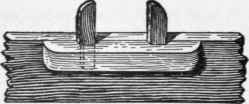
Fig. 409.
Fig. 410.
Insert a ring-bolt at the end by which to fasten the boat, or a staple can be driven in, or a hole bored at the end of the seat.
If care has been taken to make close joints, the wood will swell on being put in the water and in a short time the boat should be tight. Unless made for some temporary purpose, however, a boat that is worth making at all is worth painting. It should be painted carefully with lead paint, both inside and out, two or three coats, being careful to work the paint well into the wood and the cracks (see Painting).
Continue to:
My Books

