Toboggan
Description
This section is from the book "Woodworking For Beginners: A Manual for Amateurs", by Charles G. Wheeler. Also available from Amazon: Woodworking For Beginners.
Toboggan
This is now commonly made of narrow strips, in principle much like several skis placed side by side - an easier form to make than the older pattern, formed of one or two wide pieces, as originally made by the Indians.
1 Mrs. Alec Tweedie says of the way skis are worn in Norway: " The toes are fastened by a leather strap. Another strap goes round the heel in a sort of loop fashion, securing the foot, but at the same time giving the heel full play. A special ski boot is worn over enormously thick horsehair stockings. This boot has no hard sole at all, and, instead of being sewn at the sides, the large piece of thick leather which goes under the foot is brought well over the top and secured to what might ordinarily be called a leather tongue. At the back of the boot is a small strap, which is used to fasten the ski securely to the boot. Once fixed on the ski, the boot is so secure no fall can loosen it, and the only way to extricate the foot is to undo the three straps."
White oak and hickory are probably the best woods. Ash, maple, birch, basswood, or any hard wood which can be bent and has elasticity can be used. As in the case of the ski, to make the best possible the pieces should be rift, or split out, rather than sawed, to ensure straight grain; but, as this may be out of the question for you, be sure to select the straightest-grained clear stock you can find, for, besides the bending of the ends, there is great strain put upon it in coasting. For the same reason use air-dried stock and avoid kiln-dried if possible.
Probably the best and most scientific way to fasten the parts of a toboggan together is the old way adopted by the Indians of binding or lashing with thongs. This gives great elasticity and allows the toboggan to adjust itself to the inequalities of the surface to a greater degree than is possible with the tightly fastened joints now in use. You can try this way instead of that given below, if you prefer, but be sure to cut little grooves in the bottom for the thongs or cords to fit in, or they will be quickly worn through.
Before beginning work read carefully Marking, Rule, Square, Saw, Plane, in Part V., and look up any other references.
The size can vary from 3' long by 1' wide to 10' or 12' long by 20" to 22" wide; 4' long by 15" or 16" wide is good for a single toboggan; 8' long by 18" is a good size for three or more persons. You will probably find the stock most readily in the form of 12' boards. One-half inch in the rough will be thick enough, though you may have to take inch (rough) or f" (planed) boards. Let us make an 8' toboggan (Fig.
223). Have the stock planed and sawed in strips about 10' long, 2 1/2" wide, and not less than 1/4" nor more than 3/8" in thickness. If they are tapered a little in thickness for 12" or 15" at the forward end they can be bent more easily, but do not shave them down too much (see Plane and Draw-shave). Smooth the bottom surfaces of the strips with plane and scraper (see Scraper) It is hardly necessary to plane the upper surfaces by hand, as the planer will leave them fairly smooth, though they will look a little nicer smoothed by hand. Plane the edges. Next get out eight cross-bars or cleats 18" long x 3/8" thick and from 1 1/2" to 3" wide. If wide they can be tapered at the edges, and if narrow, the edges should be rounded (Fig. 224). Get out also two or three cleats 18" long, 1/4" thick, and 1 1/4" wide, and one piece 18" long and about 3/4" x7/8" (half of a hardwood broomstick will do).
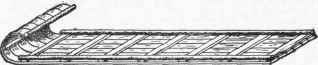
Fig. 223.
The long strips must now be bent at the forward end (see Bending Wood). After they are bent take the eight cleats and, laying one across the strips as it is to go, mark points for three holes at each strip (Fig. 224). Bore 3/16 or 1/4" holes in the cross strips and countersink them very carefully (see Boring and Countersink), so that the heads of the screws will be very slightly lower than the surface - sunk barely enough to prevent any corners or edges from sticking above the surface. Take great care not to countersink too deeply, for the long strips are so thin that the screws may come through on the under side. Mark and bore the other seven cleats by this first one.
Now take one cleat, to be put on at the rear end 8' from the beginning of the curve. Screw one end of this cleat in place (see Screws), test with the square, and screw the other end. Then put in the intermediate screws, driving them all firmly home, and saw off the ends of the long strips just beyond this cleat. Square lines across every foot to the curve at the front, and screw on the other cleats. The length of the screws (which can be quite stout) should be such that they will almost, but not quite, go through to the under side of the toboggan. Be careful about this or the points will have to be filed off. Then screw the smaller cleats on the inside of the curve. Screw the remaining (stouter) cleat on the outside of the curve at the place where the curve is to end, and then saw off the projecting ends of the strips by this cleat. By thongs, belt-lacing, or strong cord at the ends of the cleat last put on fasten the curve (which will naturally tend to straighten somewhat) in the required position to the cleat beneath (Fig. 225).
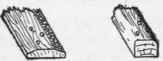
Fig. 224.
Side hand-rails can be fastened at each side on top of the cross-cleats (Fig. 223). A common way is to make every other cross-cleat thicker (say 7/8") and fasten the side bars to these with large and stout screw-eyes, or notches can be cut on the under side of these thicker cleats before they are screwed on, and by passing thongs or cord through these notches the side-bars can be lashed in place. The side bars you can plane round or eight-sided (see Rounding Sticks) out of strips of any strong wood.
Sandpaper the bottom and finish with plenty of raw linseed oil, or with oil, shellac, and varnish, in successive coats (see Finishing). If open-grained wood is used it can be filled to good advantage with a coat of good wood-filler well rubbed in (see Finishing), and the bottom can be waxed or rubbed with tallow, if you wish.
If you are willing to put in the labour you can bevel or slope off one side of each of the long strips (except the two outer ones) so as to leave the strip thickest in the middle (Fig. 226). Unless you are willing to take pains enough to do it nicely (which will take some time), it will be best not to attempt it at all, or to have it done at a mill. If you have a good hill you can go well enough with the flat slrips and it is not important to round them unless you are scoring fractions of a second against time. Another way is to curve the cross-cleats slightly (Fig. 226), leaving the long strips flat.
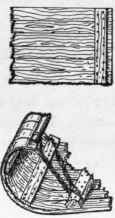
Fig. 225.

Fig. 226.
Some toboggans are made with low runners about an inch high. You Can, as you may know, patch up a sort of toboggan of barrel-staves, with which, though not a very workmanlike arrangement, you can have a lot of fun at no expense. You can get a high speed with this simple contrivance (Fig. 227) on a steep hill. It is not good, however, unless the pitch is steep. You can even get a good deal of sport from this apparatus in the summer on a very steep grassy knoll.

Fig. 227.
Continue to:
My Books

