Wooden Guns And Pistols
Description
This section is from the book "Woodworking For Beginners: A Manual for Amateurs", by Charles G. Wheeler. Also available from Amazon: Woodworking For Beginners.
Wooden Guns And Pistols
A gun on the principle of that shown in Fig. 228, the projectile power being furnished by elastic (rubber) cord, is easily made.
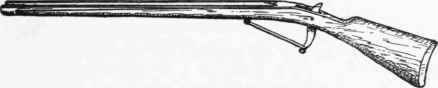
Fig. 228.
Before beginning work read carefully Marking, Rule, Square, Saw, Spokeshave, Knife, in Part V., and look up any other references.
First saw the outline of the gun from a straight-grained pine or whitewood board. This can be quickly and cheaply done at any wood-working mill. The gun can then be finally shaped with the spokeshave and knife. The rasp and file can be used (see Rasp and File). Much of the shaping can be done with the drawknife (see Drawknife), and, in fact, the whole can be whittled out with a knife if other tools are wanting.
The most difficult parts of the work are the groove for the arrow and the arrangement of the trigger. Much care is needed to cut an accurate groove with a gouge (see Gouge), and, unless you are skilled, you can get a truer result by having this done by a carpenter or at a mill. A mortise (see Mortising) must be cut for the trigger long enough to allow it sufficient play (Fig. 229). The arrangement of the trigger is shown in Fig. 229. The elastic underneath the barrel (at the lower end of the trigger) must be sufficiently powerful (combined with its additional leverage) to balance the elastic which propels the arrow, so that the trigger will remain in position and hold the upper elastic drawn, until the pressure of the finger on the trigger releases it.
The barrel of the gun is sometimes built of three pieces (Fig. 230, showing section) of thinner stock, which obviates the grooving but makes more work otherwise. The groove can be left open on top (Fig. 230) or covered with a thin strip (Figs. 231 and 232). In the latter case a depression must be made in the barrel, so that when the strip is put on there will be a long slot in which the string can play back and forth (Fig. 232). With this arrangement you can make a notch (Fig. 233) to hold the cord when drawn. The trigger can be of wood or wire, pivoted on a screw or nail, so that when pulled the string will be pushed up and released (Fig. 233).
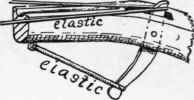
Fig. 229.

Fig. 230.

Fig. 231.
Fig. 232.

Fig. 233.
A tube is sometimes fastened to the barrel, as in a real gun, and a plunger is sometimes fitted to the tube to start the arrows, or bullets in case they are used (Fig. 234).
The ends of the elastic cord can be fastened to screw-eyes at the muzzle. A piece of leather thong or cord inserted at the middle of the upper elastic cord will wear better than the rubber at that point.
Fig. 234.
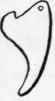
Fig. 235.
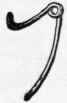
Fig. 236.
Another form of trigger is shown in Fig. 235, which can also be made of stiff wire (Fig. 236).
To finish the gun nicely, it should be scraped (see Scraper) and sandpapered with fine sandpaper (see Sandpaper). It can then be finished with oil and shellac or varnish (see Shellac, Varnish, Finishing).
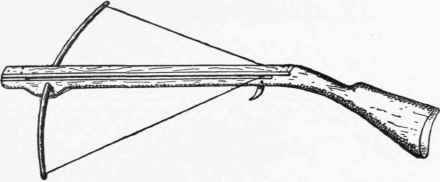
Fig. 237.
These same methods of construction can, of course, be applied to a pistol.
A bow-gun or crossbow (Fig. 237) can be made on the same principle, using a bow instead of the elastic, and inserting it in a hole made through an enlargement of the under side of the barrel (Fig. 238).
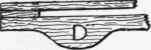
Fig. 238.Sleds. - Common sleds can be bought so cheaply that it is hardly worth while, as a rule, to make them. Many are so poorly made, however, and will stand so little rough usage, that a few suggestions may be of value if you should wish to make a really serviceable one yourself.
Take the dimensions from any sled which suits you. Avoid making your sled too high, however, as one ten or twelve inches high will coast no better than a low sled, and requires much more bracing to be strong.
Before beginning work read carefully Marking, Rule, Square, Saw, in Part V., and look up any other references.
The runners and cross-pieces should be of straight-grained oak, maple, ash, or other strong wood; 7/8" stock will do. Mark the runners carefully on the wood, according to your working-drawing (Fig. 239), and before sawing them out bore the holes for the rope (see Boring). Saw out the runners, or have them sawed by machine, and see that the curves are the same on each.
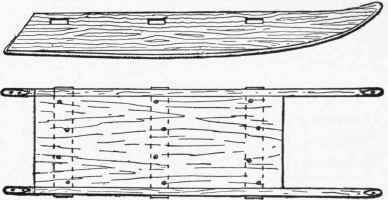
Fig. 239.
Get out three cross-pieces (Fig. 240) about 2" wide, and from -7/8" to 1 1/4" thick, with a shoulder at each end as shown. Mark and cut the mortises (see Mortising) in the runners (Fig. 239).
Put these parts together, forming the frame of the sled (Fig. 241), driving a pin through each mortise and tenon and adding the L irons shown in Figs. 241 and 242.
Fig. 240.
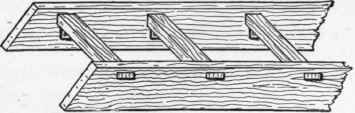
Fig. 241.
Fig. 242.
Continue to:
My Books

