How To Grind And Sharpen Tools. Part 2
Description
This section is from the book "Carpentry for Boys", by J. S. Zerbe. Also available from Amazon: Carpentry for Boys.
How To Grind And Sharpen Tools. Part 2
Simple Saw Setter
Take a block of wood, a 4 by 4 inch studding, four inches long. Get a piece of metal one-half inch thick and two inches square. Have a blacksmith or machinist bore a quarter-inch hole through it in the center and countersink the upper side so it may be securely fastened in a mortise in the block, with its upper side flush with the upper surface of the block. Now, with a file, finish off one edge, going back for a quarter of an inch, the angle at A to be about 12 degrees.
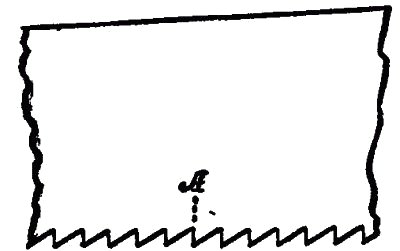 Fig. 13. Rip-Saw
Filing Angles
In its proper place will be shown how you may easily calculate and measure degrees in work of this kind. Fig. 12 shows an approximation to the right angle. B, B (Fig. 11) should be a pair of wooden pegs, driven into the wooden block on each side of the metal piece. The teeth of the saw rest against the pegs so that they serve as a guide or a gage, and the teeth of the saw, therefore, project over the inclined part (B) of the metal block. Now, with an ordinary punch and a hammer, each alternate tooth may be driven down until it rests flat on the inclined face (A), so that it is impossible to set the teeth wrongly. When you glance down the end of a properly set saw, you will see a V-shaped channel, and if you will place a needle in the groove and hold the saw at an angle, the needle will travel down without falling out.
 Fig. 14. cross-cut
Filing
The next step is the filing. Two things must be observed: the pitch and the angle. By pitch is meant the inclination of the teeth. Note the illustration (Fig. 13), which shows the teeth of a rip saw. You will see at A that the pitch of the tooth is at right angles to the edge of the saw. In Fig. 14, which shows the teeth of a cross-cut saw, the pitch (B) is about 10 degrees off. The teeth of the rip saw are also larger than those of the cross-cut.
The Angle Of Filing
By angle is meant the cutting position of the file. In Fig. 12, the lines B represent the file disposed at an angle of 12 degrees, not more, for a rip saw. For a cross-cut the angle of the file may be less.
Saw Clamps
You may easily make a pair of saw clamps as follows:
Take two pieces of hard wood, each three inches wide, seven-eighths of an inch thick, and equal in length to the longest saw. Bevel one edge of each as shown in A (Fig. 15), so as to leave an edge (B) about one-eighth of an inch thick. At one end cut away the corner on the side opposite the bevel, as shown at C, so the clamps will fit on the saw around the saw handle.
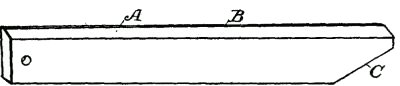 Fig. 15.
When the saw is placed between these clamps and held together by the jaws of the vise, you are ready for the filing operation. Observe the following filing suggestions: Always hold the file horizontal or level. In filing, use the whole length of the file. Do the work by a slow, firm sweep.
Do not file all of the teeth along the saw at one operation, but only the alternate teeth, so as to keep the file at the same angle, and thus insure accuracy; then turn the saw and keep the file constantly at one angle for the alternate set of teeth.
Give the same number of strokes, and exert the same pressure on the file for each tooth, to insure uniformity. Learn also to make a free, easy and straight movement back and forth with the file.
Continue to:
My Books

