Crosslap Joint
Description
This section is from the book "Shop Projects Based On Community Problems", by Myron G. Burton. Also available from Amazon: Shop Projects Based on Community Problems.
Crosslap Joint
Paragraph 62. The crosslap joint is sometimes called a half lap, because in making this joint the material is lapped by cutting out half the thickness from one piece, and the other half from the other. This joint is employed in various kinds of construction work where pieces of material running in different directions must cross.
To Lay Out The Crosslap Joint
In preparing a crosslap joint the first step is to make both pieces of material perfectly square. Then square a line across the working face of one of the pieces of material A at the position where the crosslap is to come. Lay the other piece of material B across the first piece with its working edge exactly even with the first line squared across, and with a sharp-pointed knife measure the width of the gain which is to be cut in A. At this point, with the try-square, square a second line across A. If this has been properly done the two lines will be just far enough apart to receive the width of the piece B. Square these lines down on each edge of A. With the marking gauge set to the depth which the gain is to be cut, carefully gauge the depth of the gain on each edge of the material. Exercise great care not to gauge beyond the pencil lines which are squared on the edges. With a back saw, saw on the two lines down to the gauge line. It is well to saw on the inside of the mark in order that the gain may not be too large. With a sharp chisel cut out the material between the two sawed lines, chiseling part way from one edge, and the remainder from the other edge to avoid splintering out. When the gain is cut in A, place B in the gain, and with the sharp point of a knife lay out the width of the gain to be cut in B. With the try-square carefully square these two lines across and also on both edges. With the marking gauge set exactly as it was when you made A, gauge the depth which the gain is to be cut in B. In making the piece B your gauging should be done not from the side on which your gain is to be cut, but from the opposite side in order to leave sufficient material to fill the gain which is cut in A. Cut this gain in the same manner in which you cut the gain in A. After the joint is assembled it may be well to plane both surfaces very carefully with a sharp plane set to take a very thin shaving.
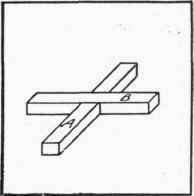
Figure 47.
Continue to:
My Books

